“You want breakfast ready by 7:30, and it’s already 7:15?” That’s how my mornings often start—chaotic, rushed, and with a lingering guilt about what the kids end up grabbing on the way out. One frazzling Saturday, I decided to try something a bit different: a batch of crispy sheet pan French toast sticks that I could prep ahead and reheat quickly. Honestly, I wasn’t sure if the kids would go for it; after all, French toast is usually a lovingly made, single-serving dish, not something mass-produced on a pan. But that morning, after pulling those golden sticks from the oven, the house filled with this warm cinnamon-sweet smell that almost made me forget the ticking clock.
What surprised me most was how the texture held up—crisp on the outside, soft inside, and perfectly dunkable in syrup or even a quick smear of peanut butter. And because they were made all on one sheet pan, clean-up was a breeze (which, if you’re a busy parent like me, is half the battle). I ended up making them three times that week, sneaking bits for myself when no one was watching. This recipe stuck not just because it’s convenient but because it feels like a little celebration in the middle of a hectic morning.
Some mornings, it’s these small wins—like a batch of crispy sheet pan French toast sticks—that keep me going. They offer comfort and simplicity, all while fitting neatly into the chaos of real life. It’s not fancy, just honest, tasty food that works on your schedule, not the other way around.
Why You’ll Love This Recipe
This recipe has quickly become one of my go-tos, and here’s why it might become yours too:
- Quick & Easy: The entire batch comes together in about 30 minutes, perfect for busy weeknights or rushed mornings.
- Simple Ingredients: No need for specialty items—just staples you probably already have, like eggs, bread, and cinnamon.
- Perfect for Meal Prep: Make a big batch, store in the fridge or freezer, and reheat anytime for a fuss-free breakfast or snack.
- Crowd-Pleaser: Kids, adults, picky eaters—you name it. Everyone loves the crispy yet tender bite of these sticks.
- Unbelievably Delicious: The cinnamon and vanilla blend in the batter gives just the right amount of sweetness without being overwhelming.
This isn’t just another French toast recipe. The secret is the sheet pan method paired with cutting the bread into sticks before baking—no soggy mess here. The edges get perfectly crisp, and the inside stays soft, making it ideal for dipping or drizzling. Plus, rather than standing over a skillet flipping each piece, you can multitask or even relax a bit while they bake.
It’s a recipe that fits seamlessly into busy lives, whether you’re juggling work-from-home mornings or weekend brunch plans. I even find myself making it alongside other easy treats like the puff pastry baked brie with cranberry chutney when hosting friends—because simplicity and taste don’t have to be separate.
What Ingredients You Will Need
This recipe uses simple, wholesome ingredients to deliver bold flavor and satisfying texture without fuss. Most are pantry staples, and substitutions are straightforward if needed.
- Bread: 8 thick slices of sturdy bread like Texas toast or brioche (day-old bread works best, helps absorb batter without falling apart)
- Eggs: 4 large eggs (room temperature is best for even mixing)
- Milk: 1 cup (240 ml) whole milk or any milk alternative (almond, oat, etc.)
- Vanilla Extract: 1 teaspoon (use pure vanilla for best flavor)
- Cinnamon: 1 teaspoon ground cinnamon (adds warm spice)
- Sugar: 2 tablespoons granulated sugar (for subtle sweetness; swap for coconut sugar if desired)
- Salt: A pinch to balance flavors
- Butter: 2 tablespoons unsalted butter, melted (for brushing before baking)
- Optional Toppings: powdered sugar, maple syrup, fresh berries, or nut butter for serving
Ingredient tips: Look for firm, thick slices of bread to avoid sogginess. I like to use Texas toast because it holds up beautifully and crisps nicely. If you want a gluten-free version, a dense gluten-free bread can work but watch the soaking time closely to avoid falling apart.
Equipment Needed
- Sheet Pan: A rimmed baking sheet (at least 9×13 inches) works perfectly. Nonstick or lined with parchment paper makes cleanup easier.
- Mixing Bowl: For whisking together the egg mixture.
- Whisk or Fork: To beat eggs and combine ingredients smoothly.
- Pastry Brush: To lightly brush melted butter on the bread sticks before baking (optional but recommended).
- Cooling Rack: Useful for letting the French toast sticks rest briefly to maintain crispness.
If you don’t have a pastry brush, simply drizzle the melted butter and spread it gently with the back of a spoon. I learned the hard way that using a rimmed sheet pan prevents the batter from spilling over the edges—trust me, less mess makes mornings better.
Preparation Method
- Preheat your oven to 425°F (220°C). Line your sheet pan with parchment paper or lightly grease it.
- Cut the bread slices into sticks about 1 to 1.5 inches wide. Day-old bread is ideal because it soaks up the batter without falling apart.
- Whisk together the eggs, milk, vanilla, cinnamon, sugar, and a pinch of salt in a large bowl until fully combined and smooth. This is your custard base.
- Dip each bread stick into the egg mixture, making sure to coat all sides. Don’t soak them for too long or they’ll become soggy—just a quick dip will do.
- Arrange the coated sticks in a single layer on the prepared sheet pan, leaving a small gap between each for even baking.
- Brush the sticks lightly with melted butter—this helps achieve that coveted crispy edge and golden color.
- Bake for 15-18 minutes, flipping halfway through. When done, they should be golden brown and crisp on the outside.
- Remove from oven and let cool on a wire rack for 5 minutes before serving. This step keeps them from steaming on the pan and losing crispness.
Pro tip: If you want to save time, you can prep and dip the sticks the night before, then bake fresh in the morning. Also, flipping the sticks is key to avoid one-sided browning. I usually set a timer, because mornings can be hectic!
Cooking Tips & Techniques
Getting that perfect crisp without drying out the inside takes a little balance—here are some tips I’ve picked up after a few trial runs:
- Use thick bread: Thin slices just won’t hold up. Brioche or Texas toast with a bit of density soak up the batter without disintegrating.
- Don’t over-soak the bread: A quick dip is enough. Too long and you’ll get a soggy, mushy texture instead of crisp sticks.
- Flip halfway through baking: This ensures even browning on all sides and crispy edges all around.
- Brush with butter before baking: This little step makes a huge difference in texture and flavor.
- Use parchment paper: It prevents sticking and makes cleanup a snap.
- Timing: Keep an eye on them after 15 minutes—ovens vary, and you want that golden crust without drying out the inside.
One thing I learned the hard way is that skipping the cooling step leads to steam buildup and soggy sticks. Patience there pays off. Also, if you want to batch prep for the week, freezing after baking and reheating in the oven keeps that crisp better than microwaving.
Variations & Adaptations
This recipe is super flexible, so you can easily switch it up depending on your taste or dietary needs:
- Flavor Boost: Add a pinch of nutmeg or ground cardamom for a warm, aromatic twist.
- Savory Version: Skip the sugar and cinnamon, add a bit of grated Parmesan and herbs, then serve with a side of marinara or pesto.
- Gluten-Free Option: Use a sturdy gluten-free bread and watch soaking time closely to avoid falling apart.
- Dairy-Free Adaptation: Swap whole milk and butter for coconut milk and dairy-free margarine or oil.
- Sweet Toppings: Drizzle with chocolate sauce or sprinkle toasted coconut flakes for a special treat.
Personally, I tried a batch with a dash of pumpkin pie spice during fall, which paired incredibly well with a maple drizzle for a cozy seasonal breakfast. It’s fun to mix and match flavors to keep it interesting!
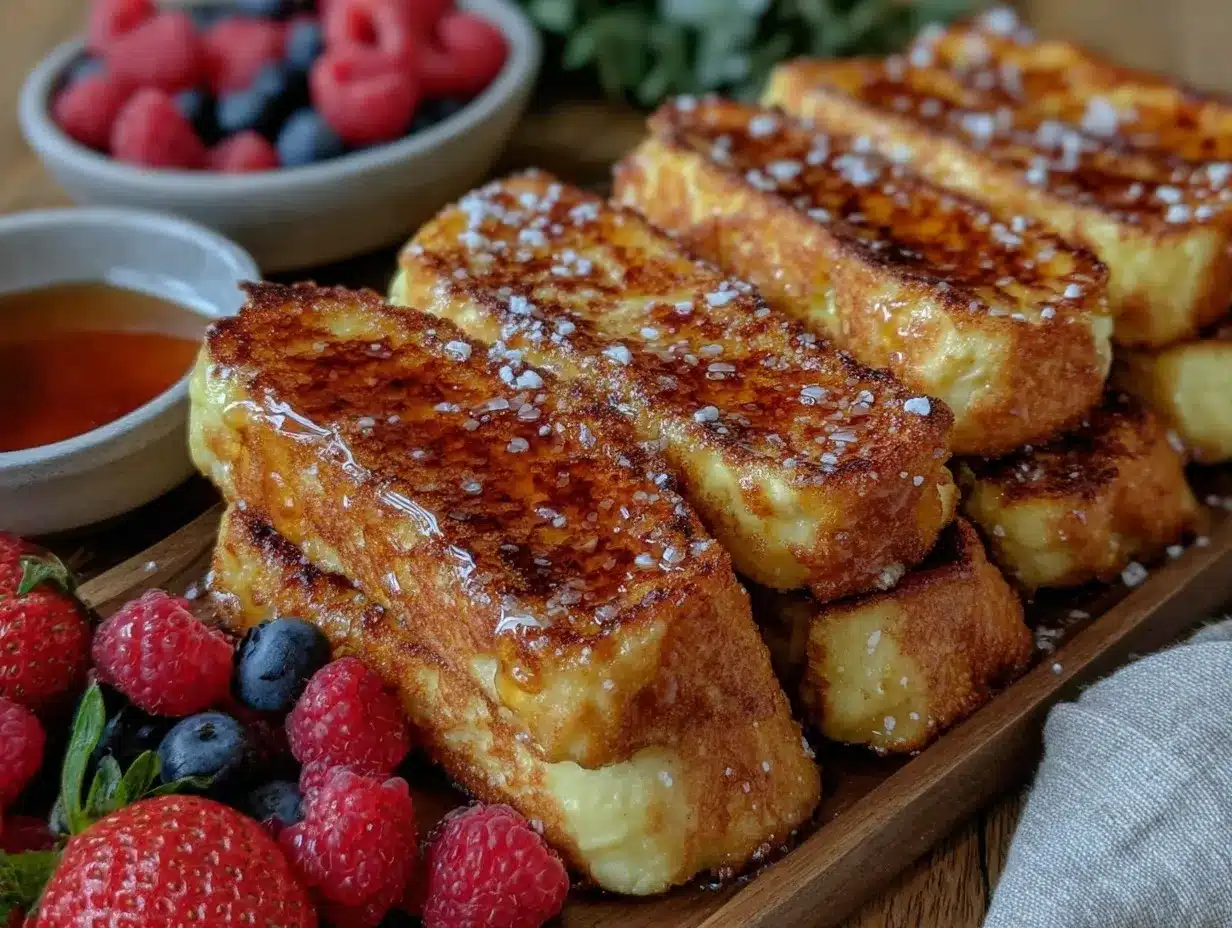
Serving & Storage Suggestions
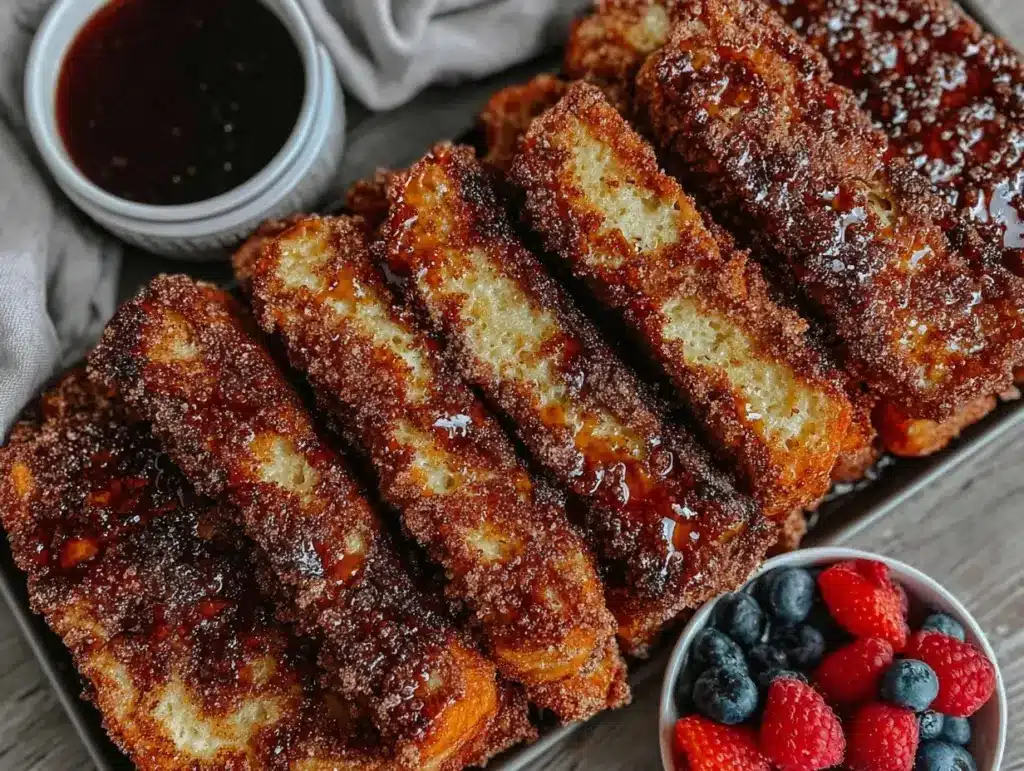
Serve these crispy sheet pan French toast sticks warm or at room temperature with your favorite dipping sauces—maple syrup is classic, but peanut butter, fruit preserves, or a quick yogurt dip work beautifully too.
They’re great as a grab-and-go breakfast, but also shine as a fun snack or even a casual brunch item paired with fresh fruit or a simple green salad. If you want a full brunch spread, pairing them with something savory like the creamy herb and garlic cheese ball bites can add a nice contrast.
Storage: Keep leftovers in an airtight container in the refrigerator for up to 4 days. For longer storage, freeze in a single layer on a baking sheet, then transfer to a freezer-safe bag for up to 2 months.
Reheating: The best way to reheat is in the oven or toaster oven at 350°F (175°C) for 8-10 minutes to restore crispness. Microwaving is quicker but may soften the crust.
Over time, the cinnamon and vanilla flavors mellow and deepen, so sometimes the next-day sticks taste even better!
Nutritional Information & Benefits
Here’s a rough estimate per serving (makes about 4 servings):
| Calories | 280 |
|---|---|
| Protein | 9g |
| Carbohydrates | 35g |
| Fat | 10g |
| Fiber | 2g |
This recipe offers a good balance of protein and carbs to keep you going through busy mornings. Using whole milk adds richness and calcium, while the eggs provide essential vitamins and help keep you full. You can swap in almond or oat milk for a dairy-free or lower-calorie option.
Remember, bread choice affects nutritional content. Whole grain or sprouted breads boost fiber and micronutrients, while white bread yields a lighter texture but fewer nutrients. For those watching sugar, you can reduce the added sugar or omit it entirely.
Conclusion
These crispy sheet pan French toast sticks prove that breakfast can be both simple and satisfying without taking over your morning. They fit right into hectic schedules, taste like a treat, and can be easily customized to suit your family’s tastes.
I love how this recipe transformed my breakfast routine from chaotic to calm, and I hope it brings the same little moments of joy to your kitchen. Feel free to experiment with flavors or pair it with dishes like the red wine braised short ribs with creamy polenta for a heartier brunch surprise.
Give it a try, tweak it to your liking, and don’t forget to share how it worked for you—I’m always eager to hear your stories and ideas!
FAQs About Crispy Sheet Pan French Toast Sticks
Can I use any bread for this recipe?
Thick, sturdy bread like Texas toast, brioche, or challah works best. Day-old bread is ideal to absorb the batter without falling apart. Thin or very soft bread may get too soggy.
How do I keep the French toast sticks crispy after reheating?
Reheat in the oven or toaster oven at 350°F (175°C) for 8-10 minutes. Avoid microwaving if you want to keep the crispiness.
Can I prepare these ahead of time?
Yes! You can dip and arrange the sticks the night before and bake fresh in the morning, or bake fully and freeze for later reheating.
What’s a good dipping sauce besides maple syrup?
Try peanut butter, fruit preserves, Greek yogurt mixed with honey, or even a chocolate drizzle for variety.
Is this recipe suitable for gluten-free diets?
With a gluten-free bread substitute, this recipe can work well. Just be mindful of the soaking time to prevent the sticks from falling apart.
Pin This Recipe!
Crispy Sheet Pan French Toast Sticks Easy Meal Prep Recipe

A quick and easy sheet pan French toast sticks recipe that is crispy on the outside, soft inside, perfect for meal prep and busy mornings.
- Prep Time: 10 minutes
- Cook Time: 18 minutes
- Total Time: 28 minutes
- Yield: 4 servings 1x
- Category: Breakfast
- Cuisine: American
Ingredients
- 8 thick slices of sturdy bread like Texas toast or brioche (day-old bread works best)
- 4 large eggs (room temperature)
- 1 cup (240 ml) whole milk or any milk alternative (almond, oat, etc.)
- 1 teaspoon pure vanilla extract
- 1 teaspoon ground cinnamon
- 2 tablespoons granulated sugar (or coconut sugar)
- A pinch of salt
- 2 tablespoons unsalted butter, melted (for brushing before baking)
- Optional toppings: powdered sugar, maple syrup, fresh berries, or nut butter
Instructions
- Preheat your oven to 425°F (220°C). Line your sheet pan with parchment paper or lightly grease it.
- Cut the bread slices into sticks about 1 to 1.5 inches wide. Day-old bread is ideal because it soaks up the batter without falling apart.
- Whisk together the eggs, milk, vanilla, cinnamon, sugar, and a pinch of salt in a large bowl until fully combined and smooth.
- Dip each bread stick into the egg mixture, making sure to coat all sides. Don’t soak them for too long or they’ll become soggy—just a quick dip will do.
- Arrange the coated sticks in a single layer on the prepared sheet pan, leaving a small gap between each for even baking.
- Brush the sticks lightly with melted butter to help achieve a crispy edge and golden color.
- Bake for 15-18 minutes, flipping halfway through. When done, they should be golden brown and crisp on the outside.
- Remove from oven and let cool on a wire rack for 5 minutes before serving to maintain crispness.
Notes
Use thick, sturdy bread like Texas toast or brioche for best results. Avoid over-soaking bread to prevent sogginess. Flipping halfway through baking ensures even crispness. Let sticks cool on a wire rack to maintain crispness. For meal prep, dip sticks the night before or freeze after baking. Reheat in oven or toaster oven at 350°F for 8-10 minutes to restore crispness. Microwaving may soften the crust.
Nutrition
- Serving Size: About 1/4 of the bat
- Calories: 280
- Fat: 10
- Carbohydrates: 35
- Fiber: 2
- Protein: 9
Keywords: French toast sticks, sheet pan French toast, easy breakfast, meal prep, crispy French toast, kid-friendly breakfast


