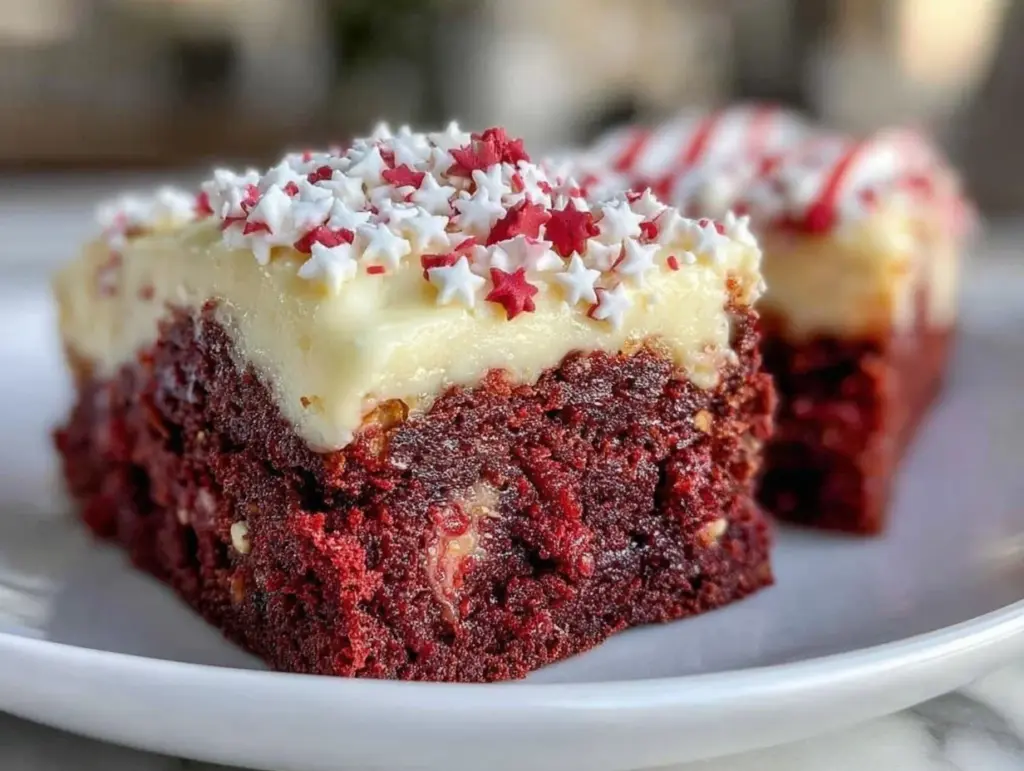
“You’ve got to see this,” my friend texted me just hours before the Fourth of July barbecue. I was skeptical—red velvet, brownies, and a flag all mashed into one dessert? Honestly, I thought it was a bit much. But curiosity got the best of me. When I arrived, there it was: a stunning Perfect Red Velvet Brownie Flag Cake with Cream Cheese Frosting, boldly waving its sweet colors. The smell alone was enough to make me pause and savor the moment—rich cocoa, tangy cream cheese, and just that hint of vanilla in the air.
What really caught me off guard was how approachable this dessert felt. It looked fancy, sure, but every bite was like a warm hug after a long day. I remember sneaking a slice while the party buzzed around me, thinking, “Why haven’t I made this before?”
Since then, this recipe has become my go-to when I want something that’s both impressive and satisfying. It’s perfect for when you want an easy crowd-pleaser that doesn’t require hours in the kitchen. Plus, there’s something quietly special about layering brownie and cake textures, topped with that creamy swirl of frosting. It’s the kind of treat that makes you feel good about indulging, you know?
This Perfect Red Velvet Brownie Flag Cake with Cream Cheese Frosting isn’t just a dessert; it’s a conversation starter, a centerpiece, and honestly, a little bit of magic on a plate. I’m sharing this recipe because it stuck with me—not just for the taste but for the way it brought people together around the table.
Why You’ll Love This Recipe
After testing this cake multiple times (seriously, I made it four times in one week), I can say with confidence this is the real deal. It’s a recipe that blends the richness of brownies with the moistness of red velvet cake, all crowned with the tangy-smooth cream cheese frosting that ties it all together.
- Quick & Easy: Ready in under 90 minutes including baking and assembly, it’s perfect for last-minute celebrations or casual get-togethers.
- Simple Ingredients: You don’t need anything exotic—just basics like cocoa powder, cream cheese, and a few pantry staples.
- Perfect for Patriotic Holidays: Ideal for Fourth of July, Memorial Day, or any occasion where a festive dessert shines.
- Crowd-Pleaser: Kids and adults alike ask for seconds, thanks to the balanced sweetness and creamy frosting.
- Unbelievably Delicious: The chewy brownie bottom layer contrasts beautifully with the airy red velvet cake above, making it a texture adventure.
What really sets this recipe apart is the layering technique—no soggy cake here. The brownie base is dense but not heavy, and the red velvet is tender with just enough cocoa to complement the frosting without overpowering it. Plus, I skip the usual food coloring overload by using natural beet powder sometimes, which keeps the red velvet color vibrant but less artificial. If you want a creative twist, try swapping the classic all-butter cream cheese frosting for a whipped version to lighten things up.
This cake isn’t just dessert; it’s a little showstopper that brings smiles. It’s the kind of recipe where you close your eyes after the first bite and think, “Yeah, this is worth the effort.”
What Ingredients You Will Need
This recipe uses simple, wholesome ingredients to deliver bold flavor and satisfying texture without the fuss. Most are pantry staples, so you likely already have what’s needed for this Perfect Red Velvet Brownie Flag Cake with Cream Cheese Frosting.
- For the Brownie Base:
- Unsweetened cocoa powder (½ cup / 50g) – I recommend Ghirardelli for the best flavor
- All-purpose flour (¾ cup / 95g)
- Granulated sugar (1 cup / 200g)
- Unsalted butter (½ cup / 115g), melted and slightly cooled
- Large eggs (2), room temperature
- Vanilla extract (1 tsp)
- Salt (¼ tsp)
- For the Red Velvet Cake Layer:
- All-purpose flour (1 cup / 125g)
- Granulated sugar (¾ cup / 150g)
- Unsweetened cocoa powder (2 tbsp / 12g)
- Buttermilk (½ cup / 120ml), room temperature (or use milk + 1 tbsp vinegar as a substitute)
- Vegetable oil (¼ cup / 60ml)
- Large egg (1), room temperature
- Red food coloring (2 tbsp) – natural beet powder works too!
- White vinegar (1 tsp)
- Baking soda (½ tsp)
- Salt (⅛ tsp)
- For the Cream Cheese Frosting:
- Cream cheese (8 oz / 225g), softened (I like Philadelphia brand)
- Unsalted butter (4 tbsp / 55g), softened
- Powdered sugar (2 cups / 240g), sifted
- Vanilla extract (1 tsp)
- Pinch of salt
If you’re looking for a dairy-free version, swap cream cheese and butter for vegan alternatives. Almond flour can be used for a gluten-free brownie base, but expect a slightly different texture. For a festive twist, sprinkle edible stars or use fresh blueberries and strawberries on top to complement the flag theme.
Equipment Needed
- 8×8 inch (20×20 cm) square baking pan – glass or metal works; I prefer metal for even heat distribution
- Mixing bowls – one large and one medium
- Electric mixer or handheld mixer – for smooth frosting
- Whisk and spatula – a flexible spatula is key for folding batter gently
- Measuring cups and spoons – precise measurements help nail the texture
- Cooling rack – to cool the brownies and cake layers evenly
- Offset spatula or butter knife – for spreading frosting neatly
If you don’t have an electric mixer, a sturdy whisk and some elbow grease can get the frosting whipped up, but it’ll take a bit longer. For budget-friendly pans, non-stick aluminum pans are affordable and reliable. Keeping your cream cheese and butter at room temperature is crucial for frosting that’s both fluffy and smooth—too cold and it’ll clump, too warm and it’ll be runny.
Preparation Method
- Prepare the Brownie Base (15 minutes prep + 25 minutes baking):
- Preheat your oven to 350°F (175°C). Grease the 8×8 inch pan and line with parchment paper for easy removal.
- In a large bowl, whisk together ½ cup cocoa powder, ¾ cup flour, 1 cup granulated sugar, and ¼ tsp salt.
- Stir in melted butter, then mix in eggs one at a time, followed by vanilla extract.
- Pour batter into the prepared pan and spread evenly.
- Bake for 25 minutes or until a toothpick inserted near the center comes out with moist crumbs (not wet batter).
- Let the brownie cool completely on a cooling rack before adding the red velvet layer.
- Make the Red Velvet Cake Layer (10 minutes prep + 20 minutes baking):
- In a medium bowl, sift together flour, cocoa powder, baking soda, and salt.
- In another bowl, whisk sugar, vegetable oil, egg, red food coloring, vinegar, and buttermilk until smooth.
- Gradually add dry ingredients to wet, folding gently until just combined (don’t overmix!).
- Carefully spread the red velvet batter over the cooled brownie layer. It should be somewhat thick but spreadable.
- Bake for 20 minutes or until the top springs back lightly to the touch.
- Cool completely before frosting.
- Prepare Cream Cheese Frosting (10 minutes):
- Beat softened cream cheese and butter until smooth and creamy using an electric mixer.
- Add vanilla extract and salt.
- Gradually mix in powdered sugar until fluffy and spreadable.
- Assemble the Flag Cake (15 minutes):
- Spread a thick layer of cream cheese frosting evenly over the cooled red velvet layer.
- Use a spatula to create gentle waves or smooth it out.
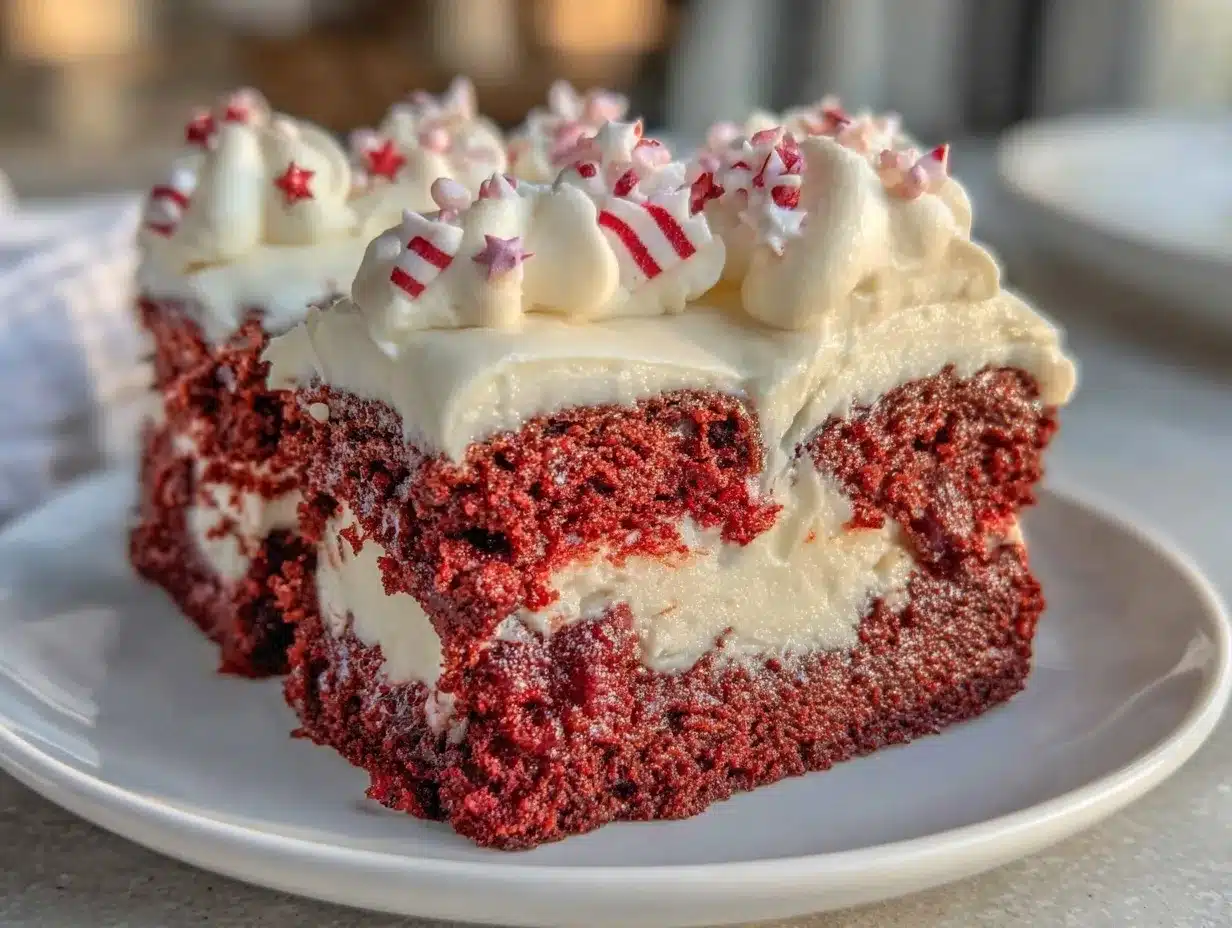
- For a festive flag look, add blueberries on the top-left corner (for stars) and alternate rows of sliced strawberries and white frosting stripes.
Note: Make sure each layer is completely cool before adding the next to avoid melting or sliding. If frosting feels too soft, chill it briefly before spreading. You’ll know it’s perfect when the frosting holds its shape but is still soft enough to spread smoothly.
Cooking Tips & Techniques
One trick I learned the hard way is to never rush cooling between layers. I once tried to add the red velvet batter on warm brownies, and it turned into a bit of a mess—layers blurred, and the texture got weird. Cooling is your friend here.
When mixing the red velvet batter, fold in the flour gently. Overmixing can lead to a tough cake, and you want that velvet-soft crumb. Also, for the cream cheese frosting, beat the cream cheese and butter until totally smooth before adding sugar. That little step makes it silky rather than grainy.
Timing-wise, multitask by preparing the frosting while the red velvet layer bakes. This way, everything’s ready to assemble once the cake cools. Using an offset spatula helps spread frosting evenly, especially over the textured brownie and cake layers.
Finally, if you want those perfect, clean flag stripes, use a piping bag with a round tip for precision. Otherwise, a steady hand and patience work just fine. I sometimes sprinkle a little coarse sugar on top for a festive sparkle.
Variations & Adaptations
- Gluten-Free Version: Substitute all-purpose flour with a 1:1 gluten-free baking blend. Almond flour also works for the brownie but adds a nuttier flavor.
- Vegan Adaptation: Use flax eggs (1 tbsp ground flaxseed + 3 tbsp water per egg), vegan butter, and dairy-free cream cheese for frosting.
- Flavor Twists: Add a teaspoon of espresso powder to the brownie batter to deepen the chocolate flavor. Or swap the classic cream cheese frosting for a whipped mascarpone topping for a lighter finish.
- Seasonal Decorations: Instead of the traditional flag toppings, try edible flowers or fresh fruit in summer, or cinnamon-dusted pecans for fall.
- Personal Favorite: I like to layer in a thin spread of raspberry jam between the brownie and cake for a surprise tartness that cuts through the sweetness.
Serving & Storage Suggestions
This cake is best served chilled or at room temperature. The cream cheese frosting firms up beautifully in the fridge, making it easier to cut neat slices. I usually slice it into squares and serve it alongside a cup of coffee or a cold glass of milk.
The patriotic flag design makes it a showstopper at summer parties, but it’s just as cozy for winter celebrations. Pair it with a tangy dip like the roasted red pepper hummus or some rich appetizers like spicy pimento cheese stuffed jalapeños to balance the sweetness.
Store leftovers tightly wrapped in the refrigerator for up to 4 days. For longer storage, freeze individual slices in airtight containers for up to 3 months; thaw overnight in the fridge before serving. The flavors actually mellow and blend nicely after a day, making it even tastier.
Nutritional Information & Benefits
Per serving (based on 12 slices): Approximately 320 calories, 18g fat, 38g carbohydrates, 3g protein.
The cocoa powder in both the brownie and red velvet layers offers antioxidants, while the cream cheese provides a good dose of calcium and vitamin A. Using natural beet powder for coloring can add trace nutrients and reduce artificial additives.
This dessert fits well into an occasional treat approach and can be tailored for gluten-free or vegan diets with simple swaps. Just a reminder: the richness of the frosting means moderation is key, but a small slice can be a delightful finish to any meal.
Conclusion
This Perfect Red Velvet Brownie Flag Cake with Cream Cheese Frosting stands out not only for its striking looks but because it’s truly satisfying from the first bite to the last crumb. I love how it brings together two classic favorites—brownies and red velvet cake—in a way that’s surprisingly easy to make and perfect for sharing.
Feel free to customize it with your favorite toppings or tweak the frosting consistency to your liking. Whether you’re celebrating a holiday or just want to treat yourself, this cake delivers on flavor and fun.
I’m always excited to hear how fellow bakers make it their own, so don’t hesitate to leave a comment or share your tweaks. Baking is better when shared, after all. Here’s to sweet moments and memorable desserts!
Frequently Asked Questions
Can I make this cake ahead of time?
Yes! You can bake both layers a day in advance and keep them wrapped tightly in the fridge. Assemble and frost the cake on the day you plan to serve for the freshest look and taste.
What if I don’t have buttermilk?
No problem. Use regular milk with 1 tablespoon of white vinegar or lemon juice added to it. Let it sit for 5 minutes before using to mimic buttermilk’s acidity.
Can I make this cake in a round pan instead of square?
Absolutely. Just adjust the baking time slightly and keep an eye on the layers. A 9-inch round pan works well; the layering and frosting steps remain the same.
How do I prevent the cream cheese frosting from being too runny?
Make sure your cream cheese and butter are softened but not warm. Beat them thoroughly before adding powdered sugar, and if needed, chill the frosting for 10-15 minutes before spreading.
Is it okay to use homemade cocoa powder substitutes?
Homemade cocoa powder isn’t recommended for this recipe due to flavor consistency. Using high-quality store-bought cocoa powder ensures the rich chocolate taste that balances the red velvet layers.
Pin This Recipe!
Perfect Red Velvet Brownie Flag Cake with Cream Cheese Frosting
A stunning layered dessert combining a chewy brownie base with moist red velvet cake, topped with tangy cream cheese frosting, perfect for patriotic celebrations and crowd-pleasing occasions.
- Prep Time: 35 minutes
- Cook Time: 45 minutes
- Total Time: 1 hour 20 minutes
- Yield: 12 servings 1x
- Category: Dessert
- Cuisine: American
Ingredients
- ½ cup unsweetened cocoa powder (50g)
- ¾ cup all-purpose flour (95g)
- 1 cup granulated sugar (200g)
- ½ cup unsalted butter (115g), melted and slightly cooled
- 2 large eggs, room temperature
- 1 tsp vanilla extract
- ¼ tsp salt
- 1 cup all-purpose flour (125g)
- ¾ cup granulated sugar (150g)
- 2 tbsp unsweetened cocoa powder (12g)
- ½ cup buttermilk (120ml), room temperature (or milk + 1 tbsp vinegar)
- ¼ cup vegetable oil (60ml)
- 1 large egg, room temperature
- 2 tbsp red food coloring (natural beet powder optional)
- 1 tsp white vinegar
- ½ tsp baking soda
- ⅛ tsp salt
- 8 oz cream cheese (225g), softened
- 4 tbsp unsalted butter (55g), softened
- 2 cups powdered sugar (240g), sifted
- 1 tsp vanilla extract
- Pinch of salt
Instructions
- Preheat oven to 350°F (175°C). Grease an 8×8 inch pan and line with parchment paper.
- In a large bowl, whisk together ½ cup cocoa powder, ¾ cup flour, 1 cup sugar, and ¼ tsp salt.
- Stir in melted butter, then mix in eggs one at a time, followed by vanilla extract.
- Pour brownie batter into prepared pan and spread evenly.
- Bake for 25 minutes or until a toothpick inserted near the center comes out with moist crumbs.
- Cool brownie completely on a cooling rack.
- In a medium bowl, sift together 1 cup flour, 2 tbsp cocoa powder, baking soda, and ⅛ tsp salt.
- In another bowl, whisk sugar, vegetable oil, egg, red food coloring, vinegar, and buttermilk until smooth.
- Gradually fold dry ingredients into wet ingredients until just combined.
- Spread red velvet batter evenly over cooled brownie layer.
- Bake for 20 minutes or until top springs back lightly to the touch.
- Cool completely before frosting.
- Beat softened cream cheese and butter until smooth and creamy using an electric mixer.
- Add vanilla extract and pinch of salt.
- Gradually mix in powdered sugar until fluffy and spreadable.
- Spread a thick layer of cream cheese frosting evenly over the cooled red velvet layer.
- Use a spatula to create gentle waves or smooth it out.
- Decorate with blueberries on the top-left corner and alternate rows of sliced strawberries and white frosting stripes to create a flag design.
Notes
Ensure each layer is completely cool before adding the next to prevent melting or sliding. If frosting is too soft, chill briefly before spreading. Use a piping bag for precise flag stripes or a steady hand. For dairy-free or gluten-free versions, substitute ingredients accordingly. Natural beet powder can be used for red coloring to reduce artificial additives.
Nutrition
- Serving Size: 1 slice (1/12th of c
- Calories: 320
- Fat: 18
- Carbohydrates: 38
- Protein: 3
Keywords: red velvet, brownie, flag cake, cream cheese frosting, patriotic dessert, Fourth of July, easy dessert, layered cake


