“You really think red, white, and blue can taste amazing all together?” my skeptical cousin asked as I pulled this poke cake out of the fridge. Honestly, I wasn’t sure at first either. I’d been fiddling with Jello poke cakes for a while, trying to find the perfect balance between bright colors and a moist, flavorful bite. This particular version with distinct red, white, and blue Jello layers was born out of a last-minute request for a patriotic dessert at a summer BBQ. I’d grabbed a boxed white cake mix on a whim, intending to just jazz it up a bit, but the idea of layering Jello into the pokes felt a bit daring.
As I poked the cake and poured over the first layer of red Jello, I wasn’t convinced it would set into anything more than a soggy mess. But then came the white creamy middle and the blue finish — and suddenly, the whole thing was a festive, eye-catching miracle. The cool, wiggly Jello combined with the soft cake was a texture surprise that kept me sneaking bites in between cooking and chatting with friends. That unexpected blend of flavors and textures turned a simple cake mix into a dessert that got everyone asking for the recipe.
Over the next few weeks, I made it multiple times (yes, multiple times in one week—no shame) for casual get-togethers and even a last-minute Fourth of July party. Each time, I tweaked the Jello flavors or the creaminess of the middle layer, until I landed on this version that feels just right — festive without fuss, and fun without being overly sweet. If you’re hunting for a red white and blue dessert that’s playful, easy, and pretty much guaranteed to please a crowd, this poke cake might just become your new go-to. It’s a little nostalgic, a little surprising, and honestly, a bit of a showstopper in the best way.
Why You’ll Love This Recipe
After testing this Perfect Red White and Blue Poke Cake with Jello Layers a handful of times, I can confidently say it’s one of those recipes that hits all the right notes. Whether you’re new to poke cakes or a seasoned pro, this one brings a fresh twist that’s both visually striking and delicious.
- Quick & Easy: This recipe comes together in under an hour, with most of the time spent chilling — ideal for busy summer afternoons or last-minute holiday gatherings.
- Simple Ingredients: No need for complicated shopping trips; most ingredients are pantry staples or easy to find at any grocery store.
- Perfect for Patriotic Occasions: Whether it’s Independence Day, Memorial Day, or just a summer picnic, the red, white, and blue theme makes it festive and fun.
- Crowd-Pleaser: Kids and adults alike love the cool Jello layers combined with moist cake — it’s consistently the dessert that disappears first.
- Unbelievably Delicious: The juicy Jello seeps into the cake’s crumb, keeping each bite tender, while the creamy middle layer adds a smooth contrast that’s just dreamy.
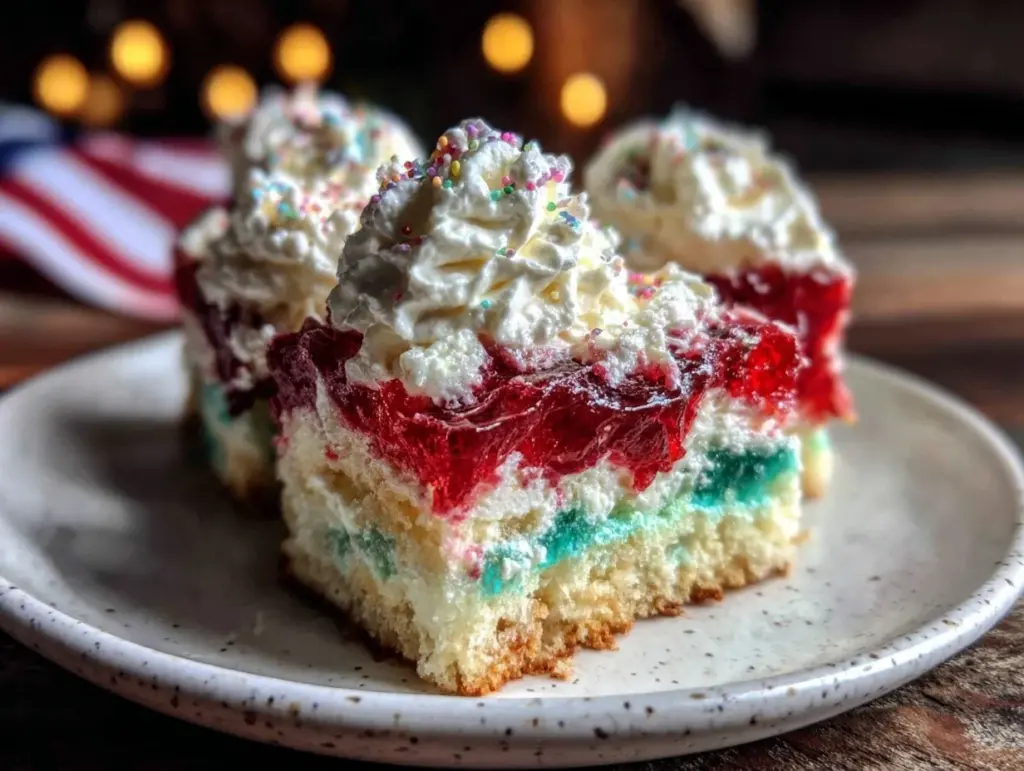
This isn’t your average poke cake. Instead of just one Jello flavor poured over the top, this recipe layers red, white, and blue Jello in carefully poked holes, creating a vibrant mosaic inside the cake. The cream layer in the middle adds a bit of tang and richness, making each forkful feel balanced and indulgent without being heavy. Honestly, it’s the kind of dessert that makes you pause for a moment and savor, especially on a warm day when you want something cool and refreshing but still indulgent.
And while you’re at it, this poke cake pairs beautifully with lighter appetizers like a zesty roasted red pepper hummus or a festive bite like these spicy pimento cheese stuffed jalapeños. Perfect for a full spread that keeps guests coming back for more.
What Ingredients You Will Need
This Perfect Red White and Blue Poke Cake recipe keeps things straightforward with ingredients that deliver bold color and flavor without a lot of fuss. Most are pantry-friendly and easy to swap if you’re in a pinch.
- For the Cake:
- White cake mix (about 15.25 oz box) – I prefer Duncan Hines Classic White for its moist crumb and mild flavor
- Eggs (3 large, room temperature)
- Water (1 cup / 240 ml)
- Vegetable oil (1/3 cup / 80 ml)
- For the Jello Layers:
- Red Jello (1 small package, 3 oz / 85 g) – cherry or strawberry flavor works best
- Blue Jello (1 small package, 3 oz / 85 g) – berry blue or blue raspberry
- For the White (Creamy) Layer:
- Sweetened condensed milk (1/2 cup / 120 ml) – adds richness and sweetness
- Whipped topping (1 cup / 240 ml), thawed – I like store-bought for ease, but homemade whipped cream also works
- Vanilla extract (1 tsp) – brings subtle warmth
Ingredient Tips: Use cold water for preparing the Jello to help it set firmly in the cake holes. For a lighter option, swap whipped topping for Greek yogurt mixed with a little honey, but the texture won’t be as silky. If you want a gluten-free version, choose a gluten-free white cake mix (they’re surprisingly good these days).
Equipment Needed
- 9×13-inch baking pan – standard size; glass or metal both work fine
- Mixing bowls – one for the cake batter, one for each Jello mixture, and one for the creamy layer
- Electric mixer or whisk – to mix the cake batter and whip the creamy layer
- Wooden spoon or skewer – to poke holes in the cake after baking
- Measuring cups and spoons – precise measurements help with Jello consistency
- Spatula – for spreading layers evenly
For budget-friendly setups, a hand whisk and a sturdy spoon for poking work just as well as electric tools. I’ve used both glass and metal pans; glass helps monitor the Jello setting through the sides, but metal bakes the cake slightly faster. Just keep an eye on baking time if switching.
Preparation Method

- Preheat and Prepare: Preheat your oven to 350°F (175°C). Grease your 9×13-inch pan lightly with butter or non-stick spray to ensure the cake releases easily.
- Make the Cake Batter: In a medium bowl, combine the white cake mix, 3 large eggs, 1 cup (240 ml) water, and 1/3 cup (80 ml) vegetable oil. Use an electric mixer or whisk to blend until smooth, about 2-3 minutes. The batter should be pourable but not runny.
- Bake the Cake: Pour the batter evenly into the prepared pan. Bake for 30-35 minutes or until a toothpick inserted in the center comes out clean. Oven times vary, so start checking at 28 minutes.
- Cool and Poke: Allow the cake to cool completely (about 1 hour). Once cool, use a wooden spoon handle or skewer to poke holes all over the cake about 1 inch apart, going about halfway through the cake.
- Prepare the Jello Layers: Dissolve each Jello package separately in 1 cup (240 ml) boiling water. Stir until fully dissolved. Then add 1 cup (240 ml) cold water to each bowl, stirring gently. Let them cool in the fridge for about 15-20 minutes until just warm but not set.
- Pour the Red Jello: Slowly pour the red Jello over one-third of the poked holes. Use a spoon to gently guide the Jello into the holes if needed. Refrigerate for 20 minutes to set.
- Create the White Creamy Layer: In a bowl, mix 1/2 cup (120 ml) sweetened condensed milk, 1 cup (240 ml) whipped topping, and 1 tsp vanilla extract until smooth and creamy. Spread this mixture evenly over the cake surface, filling the next third of the holes. Chill for another 20 minutes.
- Pour the Blue Jello: Finally, pour the blue Jello over the remaining holes. Refrigerate the entire cake for at least 2 hours or until fully set.
- Serve: Before serving, you can add fresh berries on top or a dusting of powdered sugar for extra flair. Cut into squares and enjoy the colorful surprise inside!
Pro tip: If your Jello seems too runny, pop it back in the fridge a few minutes longer before pouring. Also, make sure the cake is completely cool before poking, or else you risk crumbling.
Cooking Tips & Techniques
Getting the Perfect Red White and Blue Poke Cake right took a couple tries, so here are some tips I’ve picked up along the way:
- Don’t skip cooling the cake fully: Warm cake will make the Jello layers run and mix into the crumb, losing that neat layered effect.
- Use the right poking tool: A wooden spoon handle is perfect — thick enough to create deep holes but not too big to tear the cake apart.
- Cool Jello before pouring: Pouring hot Jello will melt the creamy layer or the cake crumb. Aim for warm but not hot — around body temperature is best.
- Layer chilling matters: Giving each layer time to set before the next pour prevents colors from bleeding together and keeps the cake looking vibrant.
- Multitask to save time: While the cake bakes, prep your Jello mixtures and creamy layer. Efficiency makes the process feel less tedious.
One time, I poured the blue Jello too soon after the cream layer, and it mixed into it, creating a purple mess rather than a crisp blue layer. Lesson learned the hard way! Also, avoid using gelatin-free Jello — it won’t set properly in the cake holes.
Variations & Adaptations
This recipe welcomes creativity! Here are some fun ways to tweak your Perfect Red White and Blue Poke Cake:
- Dietary Adaptation: Use a gluten-free white cake mix and a sugar-free Jello brand for a gluten-free, lower-sugar version.
- Seasonal Twist: Swap red Jello for raspberry or strawberry gelatin in summer, and use blueberry Jello for the blue layer. In winter, try cranberry and white chocolate pudding layers.
- Flavor Boost: Add a splash of lemon juice or a teaspoon of almond extract into the creamy layer for a subtle zing.
- Alternative Creamy Layers: Replace the sweetened condensed milk and whipped topping with mascarpone cheese mixed with a bit of honey for a tangier, richer bite.
- Personal Favorite: I once added fresh blueberries and sliced strawberries between the layers for extra texture and natural sweetness — it was a hit!
Serving & Storage Suggestions
This poke cake is best served chilled, straight from the refrigerator. The Jello layers are refreshing, especially on warm days, and the creamy middle adds a cool softness that feels like a special treat.
For presentation, try garnishing with fresh berries or a light dusting of powdered sugar to bring out the red, white, and blue theme even more. It pairs wonderfully with a crisp lemonade or iced tea for a patriotic picnic or backyard party.
Store leftovers tightly covered in the fridge for up to 3 days. The flavors meld beautifully overnight, making it even better the next day. If you want to freeze it, wrap tightly and freeze for up to a month, then thaw overnight in the fridge. Reheat is not recommended as the Jello layers won’t hold up.
Nutritional Information & Benefits
This Perfect Red White and Blue Poke Cake is an indulgent dessert but made with simple, familiar ingredients. A typical slice (about 1/12th of the cake) contains roughly 280-320 calories, with sugars mainly from the cake and Jello. The whipped topping adds some fat but also a creamy texture that keeps it from feeling dry.
Key ingredients like gelatin have some protein and may help with digestion. Using a white cake mix offers a neutral base, but you can swap to whole grain or gluten-free options if you prefer. Be mindful of allergens such as dairy and gelatin if serving to guests with sensitivities.
From a wellness perspective, this poke cake is a reminder that desserts can be fun and colorful without being overly complicated. It’s the kind of treat you enjoy mindfully — a little slice of celebration that complements a balanced life.
Conclusion
If you’re searching for a dessert that’s as fun to make as it is to eat, this Perfect Red White and Blue Poke Cake with Jello Layers fits the bill. It brings together bright colors, playful textures, and a sweet creaminess that feels just right. You can easily customize it to fit your taste or occasion, making it a versatile recipe worth keeping in your back pocket.
Personally, it’s a go-to whenever I want to impress without stress, especially when friends drop by unexpectedly or when the weather calls for something cool and festive. It’s a little bit nostalgic, a little bit surprising, and honestly, a whole lot of fun on the plate.
Give it a try, tweak it your way, and I’d love to hear how your version turns out — comments and stories always make my day. Here’s to colorful, joyful baking moments ahead!
FAQs
Can I use homemade cake instead of box mix for this poke cake?
Absolutely! Just make sure your homemade white cake has a sturdy but moist crumb to hold the Jello layers well. Slightly denser cakes work best for this technique.
How long should I chill the poke cake before serving?
At least 2 hours in the fridge is ideal to allow the Jello layers to set firmly. Overnight chilling improves flavor melding and texture.
Can I make this cake ahead of time?
Yes! It actually tastes better the next day after chilling overnight. Just keep it tightly covered in the fridge.
What if I want to make this poke cake dairy-free?
Swap the whipped topping for coconut whipped cream and use a dairy-free sweetened condensed milk alternative. The texture will be slightly different but still delicious.
Can I use gelatin-free Jello for this recipe?
Gelatin-free Jello won’t set properly in the cake holes, so it’s best to stick with traditional gelatin Jello for that perfect poke cake texture.
Pin This Recipe!

Perfect Red White and Blue Poke Cake Recipe Easy Jello Layer Dessert
A festive and easy poke cake featuring distinct red, white, and blue Jello layers combined with a moist white cake and a creamy middle layer, perfect for patriotic occasions.
- Prep Time: 15 minutes
- Cook Time: 35 minutes
- Total Time: 3 hours 50 minutes
- Yield: 12 servings 1x
- Category: Dessert
- Cuisine: American
Ingredients
- White cake mix (about 15.25 oz box)
- 3 large eggs, room temperature
- 1 cup (240 ml) water
- 1/3 cup (80 ml) vegetable oil
- 1 small package (3 oz / 85 g) red Jello (cherry or strawberry flavor)
- 1 small package (3 oz / 85 g) blue Jello (berry blue or blue raspberry)
- 1/2 cup (120 ml) sweetened condensed milk
- 1 cup (240 ml) whipped topping, thawed
- 1 tsp vanilla extract
Instructions
- Preheat oven to 350°F (175°C). Lightly grease a 9×13-inch baking pan.
- In a medium bowl, combine white cake mix, eggs, water, and vegetable oil. Mix until smooth, about 2-3 minutes.
- Pour batter evenly into the prepared pan and bake for 30-35 minutes or until a toothpick inserted in the center comes out clean.
- Allow cake to cool completely, about 1 hour.
- Use a wooden spoon handle or skewer to poke holes about 1 inch apart all over the cake, going halfway through.
- Dissolve each Jello package separately in 1 cup boiling water. Stir until dissolved, then add 1 cup cold water to each. Chill in fridge for 15-20 minutes until warm but not set.
- Slowly pour red Jello over one-third of the poked holes. Refrigerate for 20 minutes to set.
- Mix sweetened condensed milk, whipped topping, and vanilla extract until smooth. Spread evenly over the cake, filling the next third of the holes. Chill for 20 minutes.
- Pour blue Jello over the remaining holes. Refrigerate for at least 2 hours or until fully set.
- Optionally garnish with fresh berries or powdered sugar before serving. Cut into squares and enjoy.
Notes
Use cold water for preparing Jello to help it set firmly. Cool cake completely before poking to avoid crumbling. Chill each layer before adding the next to prevent colors from bleeding. For gluten-free, use gluten-free cake mix and sugar-free Jello. For dairy-free, substitute whipped topping with coconut whipped cream and use dairy-free condensed milk alternative.
Nutrition
- Serving Size: 1 slice (1/12th of c
- Calories: 300
- Sugar: 35
- Sodium: 250
- Fat: 10
- Saturated Fat: 4
- Carbohydrates: 48
- Protein: 3
Keywords: poke cake, red white and blue dessert, Jello poke cake, patriotic dessert, easy summer dessert, layered poke cake


