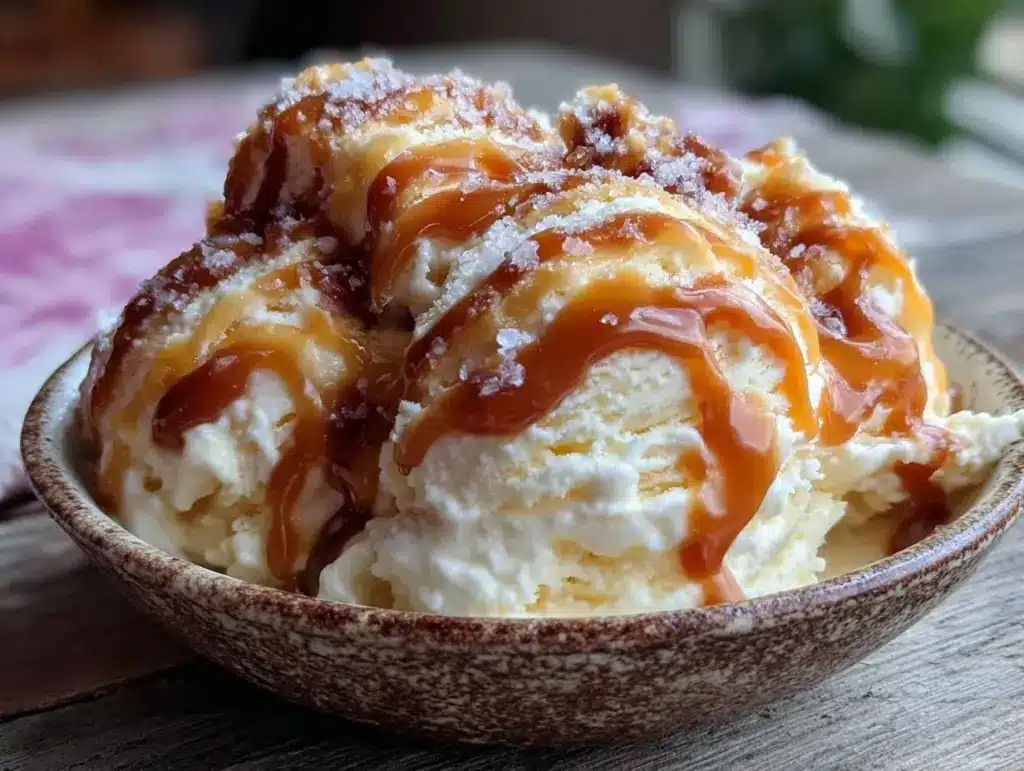
“Hey, have you tried that salted caramel swirl ice cream recipe yet?” my coworker asked one afternoon while scrolling through her phone. I shrugged, skeptical—homemade ice cream always seemed like a big production to me. But when she mentioned it was no churn and super creamy, I figured, why not? Honestly, I didn’t expect much, but let me tell you, this creamy no churn salted caramel swirl ice cream quickly became a late-night obsession. I found myself sneaking into the kitchen more than once just to grab a spoonful straight from the tub.
The first time I made it, I was actually out of vanilla ice cream, and I just wanted something sweet and comforting after a long day of juggling work and family chaos. I whipped up this no churn version with pantry staples, drizzled that luscious salted caramel right through it, and froze it overnight. The texture? Ridiculously smooth. The flavor? Sweet, salty, and just the right amount of indulgent. It was like a little quiet victory in my busy week.
What’s cool is that this recipe doesn’t demand fancy equipment or ingredients—you don’t even need an ice cream maker. You know that feeling when a simple recipe surprises you and becomes a staple? That’s exactly what happened here. The salted caramel swirl feels fancy but is actually super approachable. It’s now my go-to dessert whenever I want something homemade, effortless, and utterly satisfying. If you’ve been hesitant about making ice cream from scratch, this recipe might just change your mind, too.
There’s something comforting about the way that caramel threads through the creamy base, a little sweet swirl of happiness that never gets old. It’s become a quiet tradition in my kitchen—perfect for a solo treat or sharing with friends after dinner, maybe alongside a warm slice of Meyer lemon olive oil pound cake. Honestly, once you try this creamy no churn salted caramel swirl ice cream, you might find yourself coming back to it again and again, just like I do.
Why You’ll Love This Recipe
Having made this creamy no churn salted caramel swirl ice cream more times than I can count, I’m confident it’s one of the easiest homemade desserts that tastes like a dream. Here’s why it stands out:
- Quick & Easy: No ice cream maker needed, and you can whip it up in under 15 minutes. Perfect for those random sweet cravings or last-minute dessert needs.
- Simple Ingredients: Uses everyday pantry staples like sweetened condensed milk, heavy cream, and caramel sauce. No tricky shopping trips required.
- Perfect for Any Occasion: Whether it’s a casual weeknight treat or a celebratory dessert, this ice cream fits right in. It’s also a hit at gatherings—people always ask for seconds.
- Crowd-Pleaser: The salted caramel swirl gives it a flavor punch that both kids and adults adore. It’s the kind of recipe that disappears fast at parties.
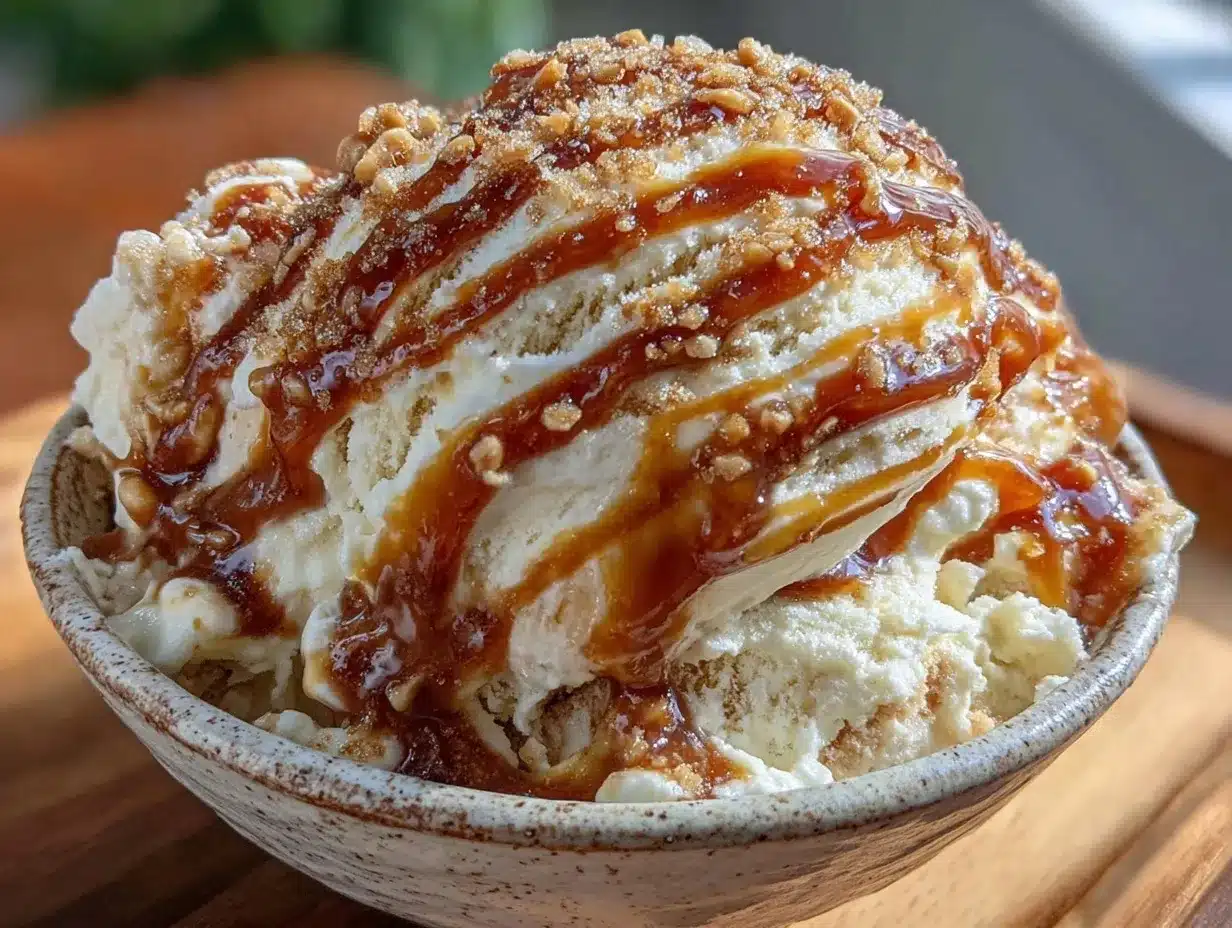
- Unbelievably Delicious: The texture is ultra creamy and velvety, thanks to the whipped cream base. The salted caramel adds a sophisticated sweet-salty balance.
What makes this recipe different? I’ve tested versions with caramel mixed in and layered, and swirling it in last-minute creates those gorgeous ribbons of flavor that surprise your taste buds. Plus, using sweetened condensed milk in the base keeps it smooth without ice crystals. This isn’t just another frozen treat — it’s creamy, luscious, and comforting, but without the fuss of traditional ice cream making.
Whether you’re serving it after a cozy dinner or packing it for a picnic, it’s a dessert that feels special without stress. And if you’re a fan of classic comfort foods with a twist, you might also enjoy pairing it with something savory like the crispy buffalo cauliflower bites for a fun flavor contrast.
What Ingredients You Will Need
This creamy no churn salted caramel swirl ice cream uses simple, wholesome ingredients to deliver bold flavor and a satisfyingly smooth texture without any fancy equipment. Most of these are pantry staples, and substitutions are easy if needed.
- Sweetened Condensed Milk – 1 (14 oz / 396 g) can, the magic ingredient that keeps the ice cream creamy and sweet without churning.
- Heavy Whipping Cream – 2 cups (480 ml), chilled, for fluffy, airy texture when whipped.
- Vanilla Extract – 1 ½ teaspoons, for classic warm flavor.
- Salted Caramel Sauce – About ¾ cup (200 ml), homemade or store-bought. I recommend using Trader Joe’s or Ghirardelli brands for the best richness.
- Sea Salt – A pinch, to sprinkle on top or mix into the caramel for that perfect salty kick (optional but recommended!).
Optional additions to customize:
- Chopped nuts like pecans or walnuts for texture.
- Chocolate chips or chunks for an extra indulgent twist.
- Use coconut cream instead of heavy cream for a dairy-free version (results vary slightly in texture).
If you want to switch things up seasonally, try swirling in some homemade pumpkin spice caramel in the fall or a berry coulis for a fruity touch. The key is to keep your caramel thick enough to create those beautiful ribbons throughout the creamy base.
Equipment Needed
- Mixing Bowls: A large bowl for whipping cream and another for folding ingredients. Glass or stainless steel works best to hold cold temperatures.
- Electric Mixer or Stand Mixer: Essential for whipping the heavy cream to soft peaks. You can do it by hand, but be prepared for a bit of an arm workout!
- Spatula: For gently folding the whipped cream into the condensed milk mixture without deflating it.
- Freezer-Safe Container: A loaf pan or plastic container with a lid works great for freezing the ice cream evenly.
- Measuring Cups and Spoons: To keep your ingredient ratios spot on.
If you don’t have an electric mixer, a handheld whisk can work, but it’ll take longer to get the cream fluffy. For freezing, I prefer a metal loaf pan — it speeds freezing time and helps with scooping. Also, keeping your bowls chilled before whipping the cream really helps achieve the perfect texture faster.
Preparation Method
- Chill your mixing bowls and beaters in the freezer for about 10-15 minutes before starting. This helps the heavy cream whip up better and faster.
- Pour 2 cups (480 ml) of cold heavy whipping cream into the chilled bowl. Using an electric mixer, whip on medium-high speed until soft peaks form. This usually takes around 3-5 minutes. You’ll know it’s ready when the cream holds shape but still looks creamy and fluffy.
- In a separate large bowl, combine 1 can (14 oz / 396 g) of sweetened condensed milk with 1 ½ teaspoons of vanilla extract. Stir gently until fully blended. This mixture is your ice cream base.
- Carefully fold the whipped cream into the condensed milk mixture using a spatula. Use gentle, sweeping motions to keep the airiness intact. The mixture should look light and creamy.
- Transfer about two-thirds of the ice cream base into your freezer-safe container. Smooth it out with the spatula.
- Drizzle ½ cup (130 ml) of salted caramel sauce evenly over the base layer. Then spoon the remaining ice cream mixture on top, spreading gently.
- Use a butter knife or skewer to swirl the caramel through the ice cream gently. Don’t overmix—those pretty caramel ribbons are what make this recipe special.
- Optionally, sprinkle a pinch of sea salt on top for that extra burst of flavor.
- Cover the container with a lid or plastic wrap and freeze for at least 6 hours or overnight until firm.
- Before serving, let the ice cream sit at room temperature for about 5 minutes to soften slightly for easier scooping.
Quick tip: If your caramel is too runny, simmer it gently on the stove for a few minutes to thicken before swirling. Thick caramel holds its shape better when freezing.
Cooking Tips & Techniques
Whipping the cream properly is key here. I learned the hard way that if the cream is over-whipped, it turns grainy and hard, which ruins the smooth texture. Stop whipping as soon as soft peaks form—meaning when you lift the whisk, the cream holds shape but the tip curls over.
Folding the whipped cream into the condensed milk gently keeps the mixture airy. I usually fold in thirds, turning the bowl slowly, so I don’t lose all the volume. It definitely takes more patience than just stirring, but the payoff is worth it.
When swirling the caramel, resist the urge to mix it fully in. Those little streaks give the ice cream its beautiful marbled look and bursts of concentrated flavor. If you swirl too vigorously, it just blends and looks dull.
Also, freezing time matters. I’ve found that less than 6 hours and you’ll get a soft-serve texture, which is great if you’re in a hurry. For firmer scoops, overnight freeze is best. Letting it soften a bit before scooping makes a big difference in mouthfeel.
Multitasking tip: While the ice cream freezes, you can prep a quick savory snack like the roasted red pepper hummus to snack on while waiting. A little salty and creamy combo to balance the sweet.
Variations & Adaptations
This creamy no churn salted caramel swirl ice cream is super versatile, and I’ve tried a few fun twists over time:
- Nutty Caramel Crunch: Add chopped toasted pecans or almonds into the caramel swirl for extra texture and a nutty flavor boost.
- Dairy-Free Version: Swap heavy cream for full-fat coconut cream and use coconut condensed milk to keep it creamy but vegan-friendly. The flavor is slightly tropical but still delicious.
- Chocolate Salted Caramel: Mix in mini chocolate chips or swirl in some chocolate fudge sauce alongside the caramel for a decadent double swirl effect.
- Seasonal Spice: Stir a pinch of cinnamon or pumpkin pie spice into the base for fall vibes. It pairs well with the caramel’s warmth.
- Fruit Twist: Swirl in a raspberry or blackberry coulis instead of caramel for a bright, fruity variation that balances sweetness with tartness.
Personally, I once tried layering caramel and chocolate swirls, freezing in layers, and it made for a stunning dessert that disappeared at a family gathering. There’s plenty of room for making this recipe your own.
Serving & Storage Suggestions
This creamy no churn salted caramel swirl ice cream is best served slightly softened. Let it sit at room temperature for 5-7 minutes before scooping to get that perfect creamy texture without being too hard.
Serve it in simple bowls or waffle cones for a casual vibe. It pairs beautifully with warm desserts like a slice of Meyer lemon olive oil pound cake or even alongside rich chocolate brownies for a special treat.
Store leftovers in an airtight freezer-safe container to prevent ice crystals and freezer burn. This ice cream keeps well for up to 2 weeks, though I doubt it will last that long!
For reheating, just let it soften naturally; microwaving can cause melting and refreezing issues. Also, the flavors deepen slightly after a day in the freezer, so if you can wait, it tastes even better the next day.
Nutritional Information & Benefits
Each serving of this creamy no churn salted caramel swirl ice cream (about ½ cup or 125 ml) contains roughly 250-300 calories, with around 15-20 grams of fat, primarily from the heavy cream. It’s a rich treat, but made with no artificial additives or preservatives.
The sweetened condensed milk provides calcium and some protein, while the caramel adds sugar and a touch of sodium that balances the sweetness.
This dessert is naturally gluten-free, making it suitable for those avoiding gluten. Using coconut cream and non-dairy condensed milk adapts it for dairy-free diets as well.
From a wellness perspective, I appreciate that this recipe skips the stabilizers and emulsifiers found in many store-bought ice creams, so it feels more like a homemade treat you can enjoy mindfully.
Conclusion
This creamy no churn salted caramel swirl ice cream is one of those recipes that feels like a small win every time you make it. It’s simple, indulgent, and perfect for when you want something homemade but don’t want to fuss over complicated steps or equipment.
Feel free to tweak the caramel amount, add mix-ins, or try different swirls to suit your taste. It’s a flexible canvas for any ice cream lover’s cravings. I keep coming back to it because it’s reliably delicious and just plain fun to make.
Next time you want a cool, creamy dessert that looks impressive but is super easy, give this recipe a shot. And if you’re curious about other easy homemade treats, you might enjoy the decadent chocolate ganache brownies or the puff pastry baked brie with cranberry chutney for sweet and savory inspiration.
Enjoy the creamy, salted swirl of happiness—because sometimes the best desserts are the simplest ones made with a little bit of love.
Frequently Asked Questions
Can I make this ice cream without sweetened condensed milk?
Sweetened condensed milk is key to the creamy texture without churning. You could try replacing it with a homemade version or sweetened evaporated milk, but results may be less smooth.
How long does the ice cream need to freeze?
Freeze for at least 6 hours, but overnight is best for firm scoops. If you prefer soft-serve texture, 4-5 hours may be enough.
Can I store this ice cream in the freezer for a long time?
It’s best enjoyed within 2 weeks for optimal texture and flavor. Keep it in an airtight container to avoid freezer burn.
Is it possible to make this recipe vegan or dairy-free?
Yes! Use coconut cream instead of heavy cream and coconut condensed milk or a plant-based alternative. Texture might vary slightly but still very tasty.
How do I get those perfect caramel swirls?
Drizzle the caramel on top of the ice cream base and gently swirl with a knife or skewer just a few times. Avoid overmixing to keep the beautiful ribbons.
Pin This Recipe!
Creamy No Churn Salted Caramel Swirl Ice Cream
A super creamy, no churn homemade ice cream featuring luscious salted caramel swirls. Easy to make with pantry staples and no ice cream maker required.
- Prep Time: 15 minutes
- Cook Time: 0 minutes
- Total Time: 6 hours 15 minutes
- Yield: 8 servings 1x
- Category: Dessert
- Cuisine: American
Ingredients
- 1 (14 oz / 396 g) can sweetened condensed milk
- 2 cups (480 ml) heavy whipping cream, chilled
- 1 ½ teaspoons vanilla extract
- About ¾ cup (200 ml) salted caramel sauce, homemade or store-bought
- Pinch of sea salt (optional)
- Optional: chopped nuts like pecans or walnuts
- Optional: chocolate chips or chunks
- Optional dairy-free substitution: coconut cream instead of heavy cream
Instructions
- Chill your mixing bowls and beaters in the freezer for about 10-15 minutes before starting.
- Pour 2 cups (480 ml) of cold heavy whipping cream into the chilled bowl. Using an electric mixer, whip on medium-high speed until soft peaks form, about 3-5 minutes.
- In a separate large bowl, combine 1 can (14 oz / 396 g) of sweetened condensed milk with 1 ½ teaspoons of vanilla extract. Stir gently until fully blended.
- Carefully fold the whipped cream into the condensed milk mixture using a spatula, using gentle sweeping motions to keep the mixture airy and light.
- Transfer about two-thirds of the ice cream base into your freezer-safe container and smooth it out.
- Drizzle ½ cup (130 ml) of salted caramel sauce evenly over the base layer. Then spoon the remaining ice cream mixture on top, spreading gently.
- Use a butter knife or skewer to swirl the caramel through the ice cream gently, creating ribbons without overmixing.
- Optionally, sprinkle a pinch of sea salt on top.
- Cover the container with a lid or plastic wrap and freeze for at least 6 hours or overnight until firm.
- Before serving, let the ice cream sit at room temperature for about 5 minutes to soften slightly for easier scooping.
Notes
Chill bowls and beaters before whipping cream for best results. Do not overwhip cream to avoid grainy texture. Swirl caramel gently to keep ribbons. Freeze at least 6 hours for firm texture; overnight preferred. Let soften 5 minutes before serving. For thicker caramel, simmer gently before swirling. Dairy-free version possible using coconut cream and coconut condensed milk.
Nutrition
- Serving Size: ½ cup (125 ml)
- Calories: 275
- Sugar: 26
- Sodium: 90
- Fat: 18
- Saturated Fat: 11
- Carbohydrates: 28
- Protein: 3
Keywords: no churn ice cream, salted caramel ice cream, homemade ice cream, easy dessert, creamy ice cream, no ice cream maker, caramel swirl


