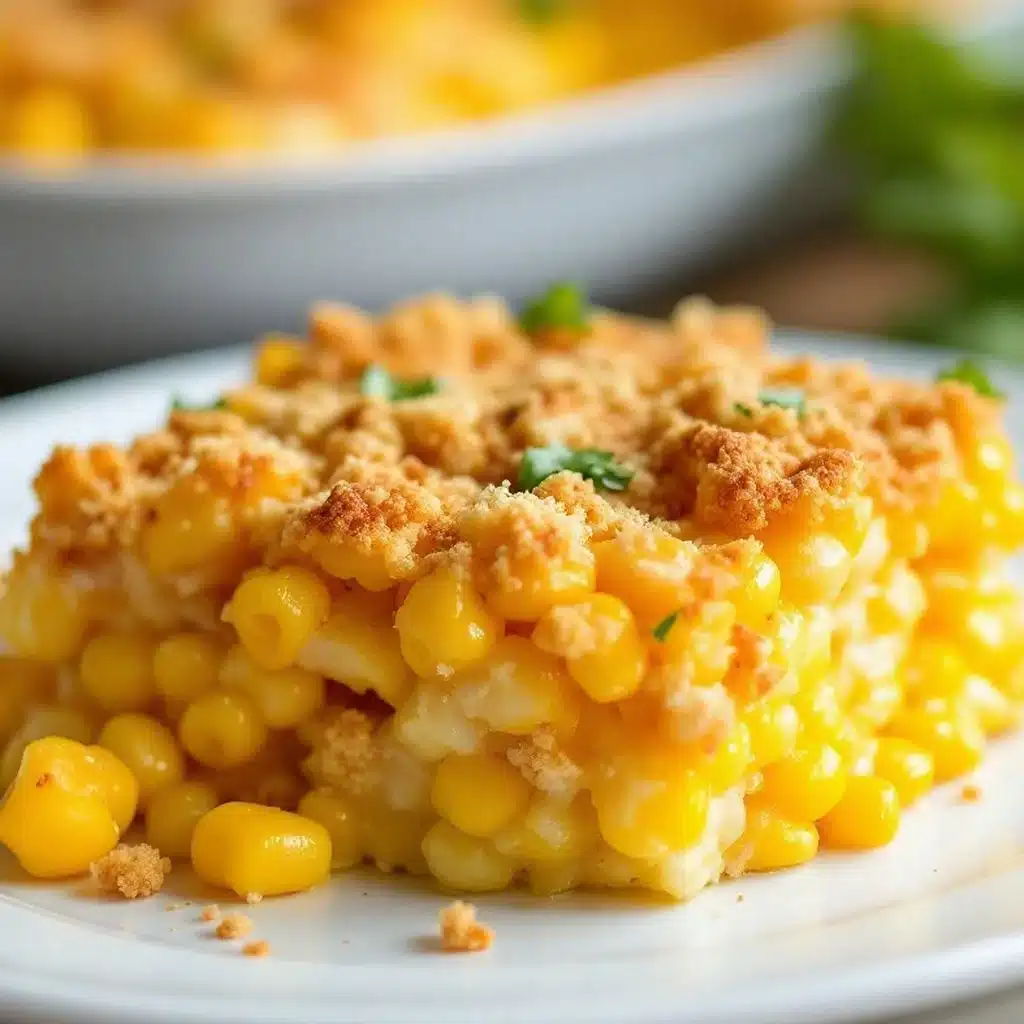
I burned the bottom of a 9×13 pan of corn casserole three times in a row before I finally understood what I was doing wrong. It wasn’t the oven temperature, and it wasn’t even the amount of butter. I was just impatient, pulling it out when it looked set on the edges but still jiggly in the middle, only to watch it turn into a scorched, bitter mess while I waited for the center to finish cooking. I honestly didn’t think I cared that much about cornbread casserole back then. It felt like just another box mix obligation for Thanksgiving, something to shovel onto a plate while avoiding eye contact with the person asking for seconds.
Let’s face it, we’ve all had those years where we relied on shortcuts because we were too tired to cook properly. I used to think that mixing a box of Jiffy with some sour cream and eggs was the peak of culinary achievement for a side dish. It was easy, sure. But it lacked soul. It tasted like cardboard and regret if you didn’t get the ratio exactly right. The first time I got this creamy jiffy corn casserole right, I didn’t post it on social media or write a blog post about it. I just sat at the kitchen table with a spoon and stared at the bowl, wondering how something so simple could taste like a hug from my grandmother.
There was no grand revelation or magical ingredient swap. I just stopped rushing. I let the butter melt properly into the dry mix. I let the sour cream temper the sweetness of the corn and the batter. When I finally pulled that golden, bubbling dish out of the oven, the smell filled the entire house. It smelled like comfort, like safety, like Sunday dinners that actually mattered. That’s when I knew I had to write this down. Not because it’s fancy, but because it’s the kind of recipe that anchors a meal. It’s the quiet realization that sometimes the best food is the one you stop trying to overcomplicate.
Why You’ll Love This Recipe
This isn’t just another cornbread mix disaster waiting to happen. This creamy jiffy corn casserole is the result of testing, tweaking, and eating way too many dry, crumbly failures until the texture hit that perfect sweet spot. It’s moist without being soupy, sweet without being cloying, and rich enough to make you question if you’re allowed to eat dessert for dinner. Here is why this specific version has earned a permanent spot in my rotation and why it should earn one in yours too.
- Quick & Easy: You can have this in the oven in under 15 minutes of prep time. It’s perfect for those weeknights when you’re exhausted or for holiday prep when you’re juggling five other dishes.
- Simple Ingredients: You likely have everything you need in your pantry right now. Corn muffin mix, butter, sour cream, eggs, and canned corn. No fancy grocery trips or obscure spices.
- Perfect for Holidays: This is the ultimate potluck star. It travels well, holds its temperature in a slow cooker, and disappears faster than you can say “pass the gravy.”
- Crowd-Pleaser: Kids love the sweetness, and adults appreciate the savory depth from the sour cream and butter. It bridges the gap between a side dish and a snack.
- Unbelievably Delicious: The texture is creamy and custard-like, with bits of corn providing little pops of flavor. It’s next-level comfort food that feels homemade despite the shortcut.
What makes this recipe different from the rest is the balance. Most recipes use equal parts dry mix and wet ingredients, which often leads to a dense, bread-like result. By adjusting the ratios and ensuring the butter is fully incorporated, we create a batter that bakes into a tender, almost pudding-like consistency. It’s not just good—it’s the kind of side that makes you close your eyes after the first bite. It’s comfort food reimagined for the modern busy cook, with the same soul-soothing satisfaction as a recipe from a 1970s community cookbook, but with fewer steps. It’s perfect for impressing guests without stress, or turning a simple roast chicken dinner into something memorable.
What Ingredients You Will Need
This recipe uses simple, wholesome ingredients to deliver bold flavor and satisfying texture without the fuss. The beauty of this dish lies in its accessibility. You don’t need to hunt down specialty items or worry about sourcing organic heirloom corn from a farmer’s market. The magic happens in how these basic pantry staples interact during the baking process. I always recommend using full-fat dairy here because the fat carries the flavor and creates that luxurious mouthfeel. Skim milk or fat-free sour cream will leave you with a dry, crumbly result that no amount of butter can fix.
- Jiffy Corn Muffin Mix: The base of the recipe. I prefer the standard yellow mix for its consistent texture and reliable leavening. It’s the brand I grew up with, and it just works.
- Unsalted Butter: You need melted butter. I use a full half-cup because fat equals flavor. Salted butter works too, but you’ll need to reduce any added salt (though this recipe doesn’t call for extra salt anyway).
- Sour Cream: Full-fat, plain sour cream is non-negotiable. It adds tanginess that cuts through the sweetness of the corn and the muffin mix. It also provides the moisture that keeps the casserole from drying out.
- Large Eggs: These act as the binder. They hold the moisture in and help the casserole set into that beautiful custard-like structure. Room temperature eggs mix in more easily.
- Canned Whole Kernel Corn: I use the kind with the liquid (juice) included. That starchy liquid is crucial for binding the batter and adding corn flavor. Drain it if you prefer a less wet batter, but keep the juice for a creamier result.
- Whole Kernel Corn with Celery (Optional): Some people prefer the “Cream Style” corn + “Whole Kernel” corn combo. I actually prefer just the whole kernel with the juice because it gives better texture contrast.
If you need to substitute, you can use a different brand of corn muffin mix, but the baking time might vary slightly since leavening agents differ. For a dairy-free version, you can swap the butter for coconut oil and the sour cream for a high-fat coconut yogurt, though the tang will be different. In summer, you can swap the canned corn for fresh corn cut from the cob, but you’ll need to cook it slightly first to soften the kernels.
Equipment Needed
You don’t need a fancy kitchen to make this, but having the right tools makes the process smoother. The most important piece of equipment is a 9×13-inch baking dish. Glass is best because it conducts heat evenly and allows you to see the browning on the edges. If you only have ceramic, that works too, but it might take a minute longer to brown. Avoid dark metal pans if you can, as they can cause the edges to burn before the center is set.
You’ll need a medium mixing bowl. A large bowl is fine, but you want something where you can whisk the eggs and sour cream together easily before adding the dry ingredients. A whisk is better than a spoon here because it incorporates the air and ensures there are no lumps of dry mix remaining. A silicone spatula is helpful for scraping the sides of the bowl and folding in the corn gently so you don’t crush the kernels.
If you’re using a microwave to melt the butter, a microwave-safe measuring cup with a spout makes pouring easier. If you’re melting it on the stove, a small saucepan works. I also recommend using a measuring spoon set for accuracy. While this recipe is forgiving, baking is chemistry, and getting the ratio of wet to dry right matters. If you’re using a slow cooker for serving, a 6-quart insert is ideal. No specialized equipment is needed, just basic, reliable tools that you probably already own.
Preparation Method

Preheat your oven to 350°F (175°C). Grease your 9×13-inch baking dish with a little butter or non-stick spray. This step is crucial because the sugar in the corn mix and the butter in the batter can caramelize and stick if the pan isn’t properly prepared.
In a medium mixing bowl, whisk together the two large eggs until they are lightly beaten. Add the half cup of melted butter to the eggs. Whisk them together vigorously. This might seem like a small step, but emulsifying the butter and eggs before adding the dry ingredients ensures a smooth, consistent batter. You don’t want streaks of solid butter in the final mix.
Next, pour in the entire box of Jiffy corn muffin mix. If you are using the corn with the liquid, pour the entire can (including the juice) into the bowl. If you are using separate cans of whole kernel and cream style, combine those now. Add the one cup of sour cream.
Using your whisk or a sturdy spoon, mix everything together. Don’t overmix, but make sure there are no dry pockets of corn meal left at the bottom of the bowl. The batter will be thick and chunky. This is normal. If it seems too dry, add a splash of milk, but usually, the corn juice and sour cream provide enough moisture.
Pour the batter into your prepared 9×13-inch baking dish. Spread it out evenly with your spatula. Place the dish in the preheated oven. Bake for 45 to 50 minutes. You’ll know it’s done when the top is golden brown and puffed up, and the center is set but still has a slight jiggle. Insert a knife into the center; it should come out clean or with just a few moist crumbs.
Remove from the oven and let it cool for at least 10 minutes before serving. This resting time allows the casserole to set further, making it easier to cut into squares. If you cut into it immediately, it might be too soft and fall apart. The residual heat will continue to cook the center slightly, so don’t worry if it looks a little soft when you pull it out.
Cooking Tips & Techniques
The biggest mistake people make with this recipe is underbaking it. Because it’s a moist casserole, it takes longer to set than a standard cornbread. If you pull it out too early, you’ll get a gummy, raw center. Trust the time, and use the knife test. If the knife comes out wet with batter, give it another 5-10 minutes.
Another tip is to ensure your butter is melted but not hot. If the butter is boiling hot when you mix it with the eggs, it can start to scramble them slightly. Let it cool for a minute after melting. Also, room temperature sour cream mixes more evenly into the batter. If your sour cream is straight from the fridge, let it sit on the counter for 15 minutes before starting.
If you’re making this for a crowd and need to hold it, you can keep it warm in a slow cooker on the “warm” setting for up to two hours. Just transfer the baked casserole to the slow cooker insert. This is great for potlucks where you’re worried about the dish cooling down.
For a crispier top, you can broil the casserole for the last 2-3 minutes of baking. Watch it closely, as sugar burns quickly. This adds a nice textural contrast to the creamy interior. If you prefer a softer top, skip the broil.
Don’t skip the resting time. I know it’s tempting to dig in, but the structure of the casserole needs a few minutes to firm up. This makes serving much cleaner and less messy.
Variations & Adaptations
While the classic version is perfect, there are plenty of ways to customize this dish to fit your taste or dietary needs. One of my favorite variations is adding a layer of shredded cheddar cheese on top before baking. The cheese melts into the batter, creating a savory, cheesy crust that pairs beautifully with the sweet corn.
For a spicy kick, mix in a diced jalapeño or a tablespoon of chopped green chilies. This cuts through the sweetness and adds a nice heat. You can also stir in a quarter cup of cooked, crumbled bacon for a smoky, salty contrast. This turns the side dish into something more substantial.
If you want to make it vegetarian but still hearty, add a cup of sautéed mushrooms or diced bell peppers. These vegetables add moisture and flavor without changing the overall texture too much. For a gluten-free option, use a gluten-free cornbread mix. Make sure to check the label, as some mixes contain wheat flour.
For a lower-carb version, you can substitute half of the corn muffin mix with almond flour or a low-carb baking mix. This changes the texture slightly, making it denser, but it still tastes great. Just be aware that baking times might vary slightly.
If you’re making this for a holiday, adding a tablespoon of honey or brown sugar can enhance the sweetness. This is especially good if you’re serving it with savory mains like roasted turkey or ham.
Serving & Storage Suggestions
This casserole is best served warm, right out of the oven. It pairs wonderfully with roasted meats, grilled chicken, or even a simple salad. For a complete meal, serve it with my creamy sausage and lemon pasta for a cozy night in. The brightness of the pasta dish complements the rich, sweet corn perfectly.
Leftovers can be stored in an airtight container in the refrigerator for up to 4 days. The flavors actually deepen after a day or two, making it even better as leftovers. To reheat, place individual portions in the microwave for 30-60 seconds, or warm the whole dish in a 350°F oven for 15-20 minutes.
You can also freeze this casserole. Bake it as directed, let it cool completely, then wrap it tightly in plastic wrap and aluminum foil. It will keep in the freezer for up to 3 months. Thaw in the refrigerator overnight and reheat in the oven.
If you’re serving it at a party, consider transferring it to a slow cooker after baking. This keeps it warm and prevents it from drying out. It’s also great for potlucks because it travels well in the baking dish if you have a large enough car.
Nutritional Information & Benefits
This creamy jiffy corn casserole is a indulgent side dish, but it does provide some nutritional value. Corn is a good source of fiber, which aids in digestion, and provides vitamins like B1 and B6. The eggs add protein, which helps keep you full. However, because of the butter and sour cream, this dish is high in fat and calories.
It is not suitable for those with corn allergies or gluten sensitivities (unless using a GF mix). The dairy content makes it unsuitable for vegans or those with lactose intolerance. Moderation is key here. Enjoy it as a special treat or a holiday staple, rather than a daily side.
From a wellness perspective, I find that this recipe satisfies a sweet craving without the need for dessert. It’s comforting and grounding, which can be helpful during stressful times or busy holidays. It’s not a “health food,” but it’s a made-from-scratch comfort food that brings joy to the table.
Conclusion
This creamy jiffy corn casserole is worth trying because it delivers on simplicity, flavor, and comfort in equal measure. It’s a recipe that respects your time while still delivering a homemade taste that store-bought options can’t match. I love this recipe because it reminds me that cooking doesn’t have to be complicated to be meaningful. It’s about showing up, doing the work, and sharing something warm with the people you care about.
I encourage you to try this recipe and make it your own. Add cheese, add bacon, add spices. Make it fit your family’s tastes. That’s the beauty of cooking—it’s yours to shape.
If you make this, I’d love to hear how it turned out. Leave a comment below and let me know your favorite variation. Share your photos on social media and tag me so I can see your creations. Cooking is better when we do it together.
FAQs
Can I use fresh corn instead of canned corn?
Yes, you can use fresh corn. Cut the kernels off about 3-4 ears of corn. You may want to cook the kernels in a pan for a few minutes to soften them slightly before adding them to the batter, as fresh corn is harder than canned.
Why is my corn casserole too dry?
This usually happens if you use too much dry mix or not enough wet ingredients. Make sure you are using the full can of corn with the juice, and do not drain it. Also, ensure your sour cream is full-fat and not skim.
Can I make this in a slow cooker?
Yes, bake the casserole in the oven as directed, then transfer it to a slow cooker set to “warm” to keep it hot for serving. You can also mix the batter and pour it directly into a greased slow cooker insert, but baking times may vary, so check for doneness earlier.
Is this recipe gluten-free?
The standard Jiffy mix contains wheat flour, so it is not gluten-free. However, you can substitute it with a gluten-free cornbread mix. Check the label to ensure it’s a direct 1:1 substitute for the best results.
How long does this casserole last in the fridge?
It will last for up to 4 days in an airtight container in the refrigerator. Reheat in the microwave or oven before serving.
Pin This Recipe!

Creamy Jiffy Corn Casserole: Best Easy Side Dish

A rich, custard-like corn casserole made with Jiffy mix, sour cream, and butter. This easy side dish is moist, comforting, and perfect for holidays or weeknight dinners.
- Prep Time: 15 minutes
- Cook Time: 45 minutes
- Total Time: 60 minutes
- Yield: 8 servings 1x
- Category: Side Dish
- Cuisine: American
Ingredients
- 1 box (8.5 oz) Jiffy Corn Muffin Mix
- 1/2 cup unsalted butter, melted
- 1 cup full-fat plain sour cream
- 2 large eggs, room temperature
- 1 can (15.25 oz) whole kernel corn with liquid (do not drain)
Instructions
- Preheat oven to 350°F (175°C). Grease a 9×13-inch baking dish with butter or non-stick spray.
- In a medium mixing bowl, whisk the eggs until lightly beaten.
- Add the melted butter to the eggs and whisk vigorously to emulsify.
- Pour in the entire box of Jiffy corn muffin mix and the can of corn with its liquid.
- Add the sour cream to the bowl.
- Mix everything together with a whisk or sturdy spoon until combined. Do not overmix; ensure no dry pockets remain.
- Pour the batter into the prepared baking dish and spread evenly.
- Bake for 45 to 50 minutes, or until the top is golden brown and puffed, and a knife inserted in the center comes out clean or with moist crumbs.
- Remove from oven and let cool for at least 10 minutes before serving to allow the casserole to set.
Notes
Ensure butter is melted but not hot to avoid scrambling eggs. Use full-fat sour cream for best texture. If using a slow cooker for serving, transfer baked casserole to the insert and keep on ‘warm’ setting. For a crispier top, broil for 2-3 minutes at the end of baking. Do not skip the resting time to ensure clean slicing.
Nutrition
- Serving Size: 1 square slice
- Calories: 320
- Sugar: 8
- Sodium: 450
- Fat: 18
- Saturated Fat: 10
- Carbohydrates: 35
- Fiber: 2
- Protein: 6
Keywords: Jiffy corn casserole, cornbread casserole, holiday side dish, easy corn recipe, creamy corn casserole, Thanksgiving side dish


