Introduction
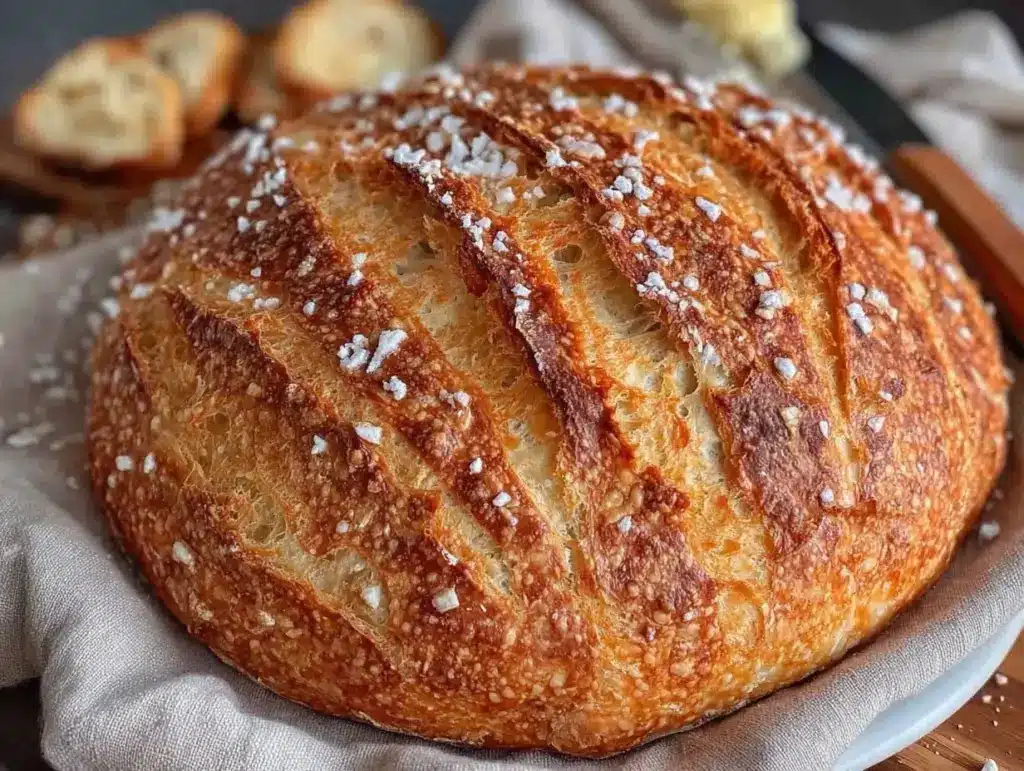
Picture this: the scent of freshly baked bread drifting through your kitchen, filling every corner with a warm, toasty aroma that’s nearly impossible to resist. The crackle of a golden crust echoing as you slice into it, revealing a pillowy, chewy crumb that somehow manages to be both rustic and elegant. That’s the magic of this Crispy No-Knead Artisan Dutch Oven Bread recipe—honestly, it’s the kind of loaf that makes you pause, close your eyes, and just breathe it all in. The first time I pulled this bread from my Dutch oven, I stood over the counter in awe, grinning like a kid at a county fair. My kitchen smelled like a Parisian bakery, and I couldn’t help but sneak a piece (okay, maybe two) before anyone else got home.
I stumbled on this no-knead bread years ago, back when I was knee-high to a grasshopper and watched my grandma work her flour-dusted magic. She believed in simple, honest ingredients and recipes you could pass down for generations. This loaf quickly became our go-to for Sunday dinners, lazy rainy weekends, and even those last-minute get-togethers when you want something special without fussing around for hours. If I’d found this recipe earlier, I would’ve saved myself a lot of kneading and sore arms! My family can’t keep their hands off it—trust me, there’s always someone hovering near the cooling rack, waiting for that first slice. Whether it’s for potlucks, holiday brunches, or just to brighten up your Pinterest board, this bread brings pure, nostalgic comfort every single time.
Over the years, I’ve tested this Crispy No-Knead Artisan Dutch Oven Bread recipe more times than I can count (in the name of research, of course). It’s earned its place as a staple for family gatherings, gifting, and those moments when you want a little extra warmth in your life. It feels like a hug in loaf form, and you’re going to want to bookmark this one—trust me.
Why You’ll Love This Crispy No-Knead Artisan Dutch Oven Bread Recipe
If you ask me, this recipe checks all the boxes for bread lovers—whether you’re a seasoned home baker or just dipping your toes into the world of yeast. I’ve baked dozens of loaves, tweaked hydration levels, played with proofing times, and even tested it at altitude. Here’s what makes this bread truly stand out:
- Quick & Easy: Comes together with just a few minutes of hands-on time, then the dough does its magic overnight. Perfect for busy weeknights or those “I need bread tomorrow” moments.
- Simple Ingredients: You probably already have everything in your pantry—flour, yeast, salt, and water. No fancy trips to the store required!
- Bakery-Style Results: The Dutch oven creates a perfect steamy environment for a shatteringly crisp crust and tender, chewy interior—just like your favorite bakery loaf.
- Crowd-Pleaser: Kids love it for sandwiches, adults rave about it with soups and salads, and honestly, it never lasts long in my house.
- Versatile Occasion Bread: Perfect for holiday brunches, cozy dinners, potlucks, or as a showstopper on your cheese board.
What sets this recipe apart from the rest? For starters, there’s no kneading required—just a simple stir and patience while the dough rises. The high hydration gives you that signature open crumb, while a hot Dutch oven guarantees that irresistible golden shell. I’ve fine-tuned the salt and yeast levels for balanced flavor, so you get all the satisfaction without any bitterness or bland spots.
This isn’t just another bread recipe—it’s the kind that makes you close your eyes after that first bite and maybe sigh a little. It’s comfort food with a homemade twist, but faster and easier than traditional artisan loaves. I love how it lets me impress guests without breaking a sweat, and turns an ordinary meal into something memorable. So, if you’re looking for a bakery-style loaf that’s as easy as it is delicious, you’re in the right place.
What Ingredients You Will Need
This Crispy No-Knead Artisan Dutch Oven Bread recipe is built on simple, wholesome ingredients that deliver big flavor and the perfect crust every time. You probably have most of these on hand—and if not, substitutions are easy enough.
- For the Dough:
- All-Purpose Flour (3 cups / 360g) – Standard unbleached flour works great; I use King Arthur for best consistency.
- Warm Water (1 1/2 cups / 360ml, about 100°F/38°C) – Not hot! Just warm to the touch; this helps activate the yeast.
- Active Dry Yeast (1/2 tsp / 2g) – You can use instant yeast if that’s what you have; same quantity.
- Salt (1 1/2 tsp / 9g) – Fine sea salt gives the best flavor without overwhelming the dough.
- For Dusting & Baking:
- Cornmeal or Extra Flour (for dusting) – Keeps the dough from sticking and adds a rustic touch.
- Olive Oil or Nonstick Spray (optional, for the bowl) – Makes for easier dough removal.
- Optional Add-Ins:
- Seeds (poppy, sesame, flax) – For crunch and flavor on the crust.
- Chopped Fresh Herbs (rosemary, thyme, basil) – Fold into the dough for a fragrant twist.
- Minced Garlic or Shallot – Adds a savory kick.
- Whole Wheat Flour (swap up to 1 cup / 120g for a heartier loaf)
Ingredient tips: For the best texture, measure your flour by weight if possible. If you’re out of all-purpose, bread flour works well too—just expect a slightly chewier crumb. In summer, I sometimes swap in fresh chopped herbs for a garden-fresh vibe. If you need gluten-free bread, try a 1:1 baking blend (Bob’s Red Mill is my go-to). For a richer flavor, use filtered water and a pinch of sugar (about 1/2 tsp) with the yeast, especially in cooler weather.
Don’t worry if you’re missing a specialty flour or fancy salt—the basics will still give you a loaf good enough for gifting or sharing.
Equipment Needed

The beauty of this recipe is that you don’t need a bunch of gadgets—just a few kitchen staples make all the difference. Here’s the gear I use (and some tips if you’re working with what you have):
- Dutch Oven (4-6 quart) – Essential for that crisp crust; I use a classic Lodge cast iron, but any heavy, oven-safe pot with a lid works. Enamel-coated is fine too.
- Large Mixing Bowl – Wide enough for the dough to rise and expand. If you don’t have one, a deep soup pot does the trick.
- Wooden Spoon or Dough Scraper – For stirring and shaping. If you don’t have a scraper, a spatula works.
- Parchment Paper – Makes dough transfer easy and prevents sticking. If not available, oil the pot generously.
- Kitchen Towel or Plastic Wrap – For covering the bowl during rise.
- Measuring Cups & Spoons – Accuracy matters, especially for flour and water.
If you’re on a budget, thrift stores are a goldmine for Dutch ovens and mixing bowls. Just check for chips or cracks. Clean your Dutch oven with warm water and a gentle brush—no soap if you have classic cast iron. For parchment paper, I buy in bulk for savings (and less sticking headaches). Honestly, you don’t need fancy tools—just a sturdy pot and some kitchen basics.
Preparation Method
Step 1: Mix the Dough
- In a large mixing bowl, combine 3 cups (360g) all-purpose flour, 1/2 tsp (2g) active dry yeast, and 1 1/2 tsp (9g) salt.
- Pour in 1 1/2 cups (360ml) warm water (about 100°F/38°C). Stir until a shaggy, sticky dough forms. No need for perfection—just get everything incorporated. If the dough feels extra dry, add a tablespoon more water at a time.
- If using add-ins (herbs, garlic, seeds), fold them in now.
Step 2: First Rise (12-18 hours)
- Cover the bowl tightly with plastic wrap or a clean kitchen towel. Leave at room temperature (around 68°F/20°C) for 12-18 hours. The dough should double in size and be covered in bubbles when ready.
- (Troubleshooting: If it’s cold in your kitchen, let the dough rise in a turned-off oven with the light on.)
Step 3: Shape the Dough & Second Rise
- Lightly flour your countertop. Turn out the dough and gently shape it into a round ball. Don’t knead—just tuck the edges under and rotate until smooth.
- Place dough on a piece of parchment paper and cover loosely with a towel. Let rise for 1-2 hours, until slightly puffed.
Step 4: Preheat Dutch Oven
- About 30 minutes before baking, place your Dutch oven (with lid) into the oven and preheat to 450°F (230°C). This ensures a sizzling hot pot for maximum crustiness.
Step 5: Bake the Bread
- Carefully remove the hot Dutch oven and take off the lid. Lift the dough (with parchment) and set it inside. Slash the top with a sharp knife for that classic artisan look (optional).
- Cover and bake for 30 minutes. Then remove the lid and bake another 10-15 minutes, until deep golden and crackling.
Step 6: Cool & Slice
- Carefully lift bread from the pot and let cool on a rack for at least 1 hour (this is the hardest part, but it keeps the crumb from getting gummy).
- Slice, marvel at the crispy crust, and enjoy!
Notes: If your crust seems pale, bake uncovered a few extra minutes. For a softer crust, wrap bread in a towel as it cools. Dough too sticky? Dust your hands with flour or use a wet spatula.
Efficiency tip: Mix the dough before bed, let it rise overnight, and bake fresh in the morning. The Dutch oven does the hard work for you!
Cooking Tips & Techniques
After many test loaves and a few minor bread disasters, I’ve learned some tricks for consistently great results with this Crispy No-Knead Artisan Dutch Oven Bread recipe. Here are my best tips:
- Hydration Is Key: The dough should be sticky and loose—don’t panic if it looks wetter than traditional bread dough! That’s what gives you those airy holes and chewy texture.
- Proofing Time: Don’t rush the first rise. A longer, slower fermentation means better flavor. If you’re short on time, use a warmer spot to speed things up, but try for at least 12 hours.
- Preheat Thoroughly: Get your Dutch oven blazing hot before adding the dough. This shock of heat gives the loaf its signature oven spring and crust.
- Avoid Over-Flouring: Too much flour when shaping can make the bread dense. Use just enough to keep it from sticking, and work quickly.
- Slash for Style: A sharp knife (or lame) lets steam escape and gives that gorgeous artisan look. If you forget, no worries—the bread still tastes amazing!
- Let It Cool: I know, waiting is tough. But slicing hot bread can lead to a gummy center. Patience pays off here.
- Personal Failures: I once under-proofed my dough and ended up with a flat loaf (still tasty but a little sad-looking). If your bread doesn’t rise much, check your yeast freshness and proofing environment.
Multitasking tip: Mix up your dough while prepping dinner or before bed, then let it do its thing overnight. The next day, it’s ready to bake—no extra work!
Consistency: Stick to weight measurements if you can. Flour volume can vary, but grams never lie. If you want reliable results, a kitchen scale is worth its weight in gold.
Every loaf gets a little easier—once you see those cracks in the crust, you’ll feel like a bread wizard!
Variations & Adaptations
This Crispy No-Knead Artisan Dutch Oven Bread recipe is endlessly customizable. Here are some of my favorite twists:
- Gluten-Free Version: Substitute a 1:1 gluten-free flour blend (Bob’s Red Mill or King Arthur) for all-purpose flour. The texture changes a bit but still delivers great flavor.
- Seeded Loaf: Sprinkle sesame, flax, or poppy seeds on top before baking for extra crunch and aroma. You can also fold them into the dough.
- Herb & Garlic Bread: Mix in 1-2 tablespoons chopped fresh rosemary or thyme and 1 clove minced garlic. Adds savory depth and a beautiful aroma.
- Whole Wheat Swap: Replace up to 1 cup (120g) of all-purpose flour with whole wheat flour for a heartier, nutty flavor.
- Dairy-Free: This recipe is naturally dairy-free, but you can brush the crust with olive oil or vegan butter after baking for extra shine.
- Cooking Method: If you don’t have a Dutch oven, bake in a covered oven-safe pot, or just on a baking sheet (crust won’t be quite as crackly, but still tasty).
Allergen tips: For nut allergies, avoid adding nut-based flours or toppings. For lower sodium, decrease the salt by half—just know the flavor changes slightly.
Personal favorite: I love tossing in roasted garlic and a handful of chopped sun-dried tomatoes for a Mediterranean twist. It’s perfect with olive oil and a glass of wine!
Feel free to play around—this loaf is forgiving, and every variation brings something new to the table.
Serving & Storage Suggestions
To get the most out of your Crispy No-Knead Artisan Dutch Oven Bread, here’s how I serve and store it:
- Serving Temperature: Best enjoyed slightly warm, when the crust is still crisp and the crumb is tender. If you’ve let it cool completely, a quick warm-up in the oven (350°F/175°C for 5 minutes) revives that bakery-fresh feel.
- Presentation: Slice thick for rustic toast, or thin for sandwiches. I love serving it on a wooden board with a pat of butter, jam, or a drizzle of olive oil.
- Pairings: Perfect with hearty soups, stews, salads, or as a base for avocado toast. For fancy brunches, pair with smoked salmon or creamy cheese.
- Storage: Keep at room temperature in a bread bag or wrapped in a clean kitchen towel for up to 2 days. For longer storage, slice and freeze in a zip-top bag—thaws quickly in the toaster.
- Reheating: For best results, reheat slices in the oven or toaster rather than the microwave. This keeps the crust crisp.
- Flavor Development: The flavors deepen after a day, so leftovers taste even better with soup or as croutons.
Leftover tip: Cube stale bread and toast for homemade croutons or blitz for breadcrumbs. Nothing goes to waste!
Nutritional Information & Benefits
Every slice of this Crispy No-Knead Artisan Dutch Oven Bread is packed with simple, honest nutrition. Here’s a quick breakdown (per slice, based on 12 slices):
- Calories: ~120
- Carbohydrates: ~24g
- Protein: ~4g
- Fat: ~0.5g
- Sodium: ~230mg
Health highlights: Made with whole ingredients, this bread is naturally low in fat and cholesterol. If you add seeds or whole wheat flour, you get a boost of fiber and minerals. No preservatives or additives—just flour, water, yeast, and salt.
Dietary notes: This loaf is vegan and dairy-free as written. For gluten-free diets, use a certified GF flour blend. Potential allergens include wheat and gluten; always check your flour source if you have sensitivities.
Personally, I love how this bread fits into a balanced lifestyle—great for sandwiches, toast, or just with a bowl of homemade soup.
Conclusion
If you’re looking for a bread recipe that’s as cozy as it is impressive, this Crispy No-Knead Artisan Dutch Oven Bread is absolutely worth trying. It’s easy enough for beginners, yet delivers those bakery-style results that’ll have everyone asking for seconds (and maybe even the recipe!). You can tweak it to suit your tastes—add herbs, swap flours, toss in seeds—and make each loaf uniquely yours.
I love this recipe because it’s simple, delicious, and always brings people together—whether it’s for a family meal or just a quiet breakfast at home. Give it a try, and don’t be shy about sharing your own twists in the comments or on social media. Let me know how it turned out, or what creative adaptations you came up with!
Here’s to warm kitchens, crispy crusts, and the kind of bread that feels like home. Happy baking!
FAQs
Can I make this bread without a Dutch oven?
Yes! You can use any heavy oven-safe pot with a lid. If you don’t have one, try baking on a sheet pan—just note the crust won’t be quite as crispy.
How do I know when the dough has risen enough?
The dough should double in size and look bubbly on top. If it’s cold in your kitchen, it may take longer—just let it go until it’s visibly puffed.
Can I refrigerate the dough to bake later?
Absolutely. After the first rise, cover and refrigerate for up to 24 hours. Let it come to room temperature before shaping and baking.
Why is my bread dense or flat?
This usually means the dough didn’t rise long enough or your yeast wasn’t fresh. Check your proofing time and yeast next batch.
What’s the best way to reheat leftover bread?
For crispy crust, pop slices in the oven at 350°F (175°C) for a few minutes or use a toaster. Avoid microwaving—it softens the crust.
Pin This Recipe!

Crispy No-Knead Artisan Dutch Oven Bread: Easy Homemade Bakery-Style Loaf
This easy no-knead artisan bread delivers a shatteringly crisp crust and a chewy, airy crumb, all baked in a Dutch oven for bakery-style results at home. With simple ingredients and minimal hands-on time, it’s perfect for beginners and seasoned bakers alike.
- Prep Time: 15 minutes
- Cook Time: 40-45 minutes
- Total Time: 13-19 hours
- Yield: 1 loaf (about 12 slices) 1x
- Category: Bread
- Cuisine: American, European
Ingredients
- 3 cups (360g) all-purpose flour
- 1 1/2 cups (360ml) warm water (about 100°F/38°C)
- 1/2 tsp (2g) active dry yeast (or instant yeast)
- 1 1/2 tsp (9g) fine sea salt
- Cornmeal or extra flour, for dusting
- Olive oil or nonstick spray (optional, for bowl)
- Optional add-ins: poppy, sesame, or flax seeds; chopped fresh herbs (rosemary, thyme, basil); minced garlic or shallot; up to 1 cup whole wheat flour (swap for all-purpose)
Instructions
- In a large mixing bowl, combine flour, yeast, and salt.
- Pour in warm water and stir until a shaggy, sticky dough forms. Add optional add-ins if desired.
- Cover the bowl tightly with plastic wrap or a clean kitchen towel. Let rise at room temperature for 12-18 hours, until doubled and bubbly.
- Lightly flour your countertop. Turn out the dough and gently shape into a round ball, tucking edges under.
- Place dough on parchment paper and cover loosely with a towel. Let rise for 1-2 hours, until slightly puffed.
- About 30 minutes before baking, place Dutch oven (with lid) into oven and preheat to 450°F (230°C).
- Carefully remove hot Dutch oven and take off lid. Lift dough (with parchment) and set inside. Slash top with a sharp knife if desired.
- Cover and bake for 30 minutes. Remove lid and bake another 10-15 minutes, until deep golden and crackling.
- Lift bread from pot and cool on a rack for at least 1 hour.
- Slice and enjoy!
Notes
For best results, measure flour by weight. If dough is too sticky, dust hands with flour or use a wet spatula. For a softer crust, wrap bread in a towel as it cools. Mix dough before bed for fresh morning baking. Variations include gluten-free flour, seeds, herbs, or whole wheat swap. Let bread cool fully before slicing to avoid a gummy crumb.
Nutrition
- Serving Size: 1 slice (1/12 of loa
- Calories: 120
- Sodium: 230
- Fat: 0.5
- Carbohydrates: 24
- Fiber: 1
- Protein: 4
Keywords: no-knead bread, artisan bread, Dutch oven bread, homemade bread, easy bread recipe, bakery-style loaf, vegan bread, dairy-free bread, rustic bread


