Introduction
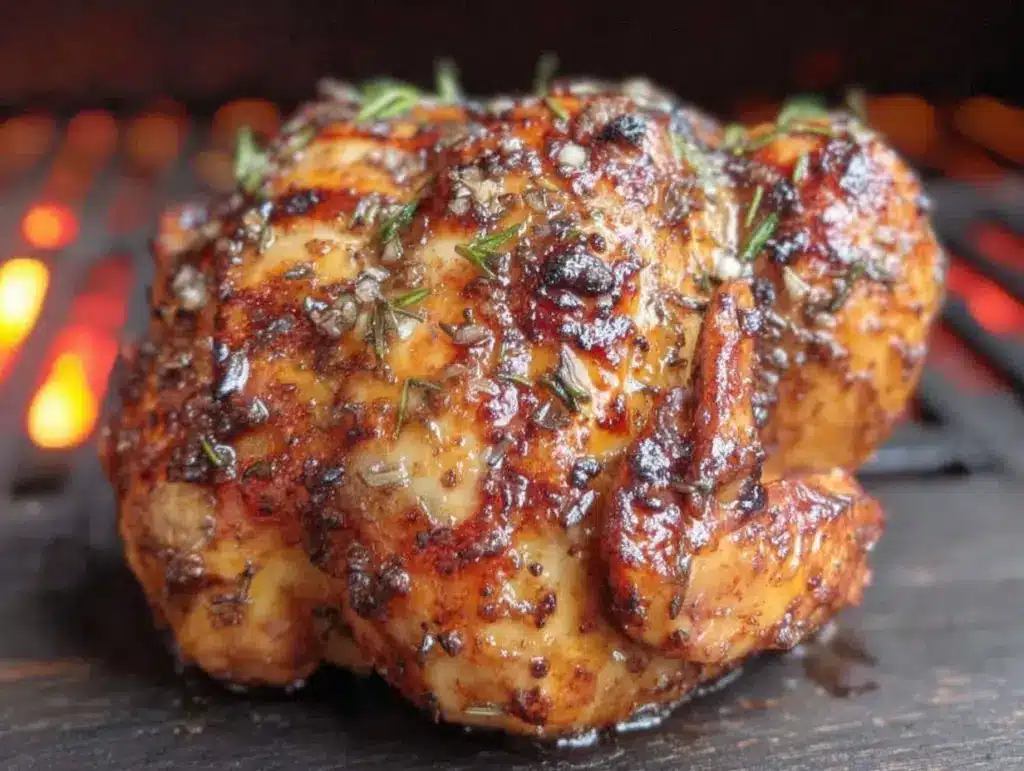
Let me just say, the first whiff of smoky, herby chicken sizzling away on my backyard grill—balanced on a half-empty beer can, no less—is one of those moments that sticks with you. The skin turns golden and audibly crisp, juices drip and sizzle, filling the air with the kind of savory aroma that draws neighbors to the fence. You know, it’s the scent that makes everyone pause mid-conversation and say, “What is that?!”
I remember the first time I tried crispy beer can chicken on the grill. My uncle showed me his “secret” technique during a summer picnic, and I was instantly hooked. I stood there, knee-high to a grasshopper, watching the chicken wobble on its can—looking a bit ridiculous, but smelling like heaven. The first bite? I swear, it was the kind of moment where you pause, take a deep breath, and just smile because you know you’ve stumbled onto something truly special.
This recipe is pure, nostalgic comfort, but with a little backyard showmanship thrown in. Honestly, I wish I’d discovered it years ago when I struggled to keep roasted chicken juicy instead of desert-dry. My family couldn’t stop sneaking bites off the cutting board (can’t really blame them), and now it’s a staple for our summer gatherings, rainy weekend cookouts, and even holiday dinners when we want something fun and unfussy.
Crispy beer can chicken is dangerously easy, but feels gourmet—perfect for potlucks, a sweet treat for your kids after soccer practice, or if you just want to brighten up your Pinterest dinner board. I’ve tested and tweaked this recipe more times than I can count (in the name of research, of course), and every time, it feels like a warm hug and a celebration in one. If you’re searching for the juiciest grilled dinner, you’re going to want to bookmark this one.
Why You’ll Love This Recipe
Honestly, crispy beer can chicken is one of those recipes that delivers every time—no matter your grilling skill level. Here’s why this has become my go-to for juicy, flavorful chicken:
- Quick & Easy: Comes together in about 10 minutes of prep and just over an hour on the grill—no complicated techniques and barely any hands-on time.
- Simple Ingredients: You probably have everything you need in your kitchen already—no fancy grocery runs required.
- Perfect for Backyard Gatherings: It’s a showstopper for summer cookouts, family dinners, and any occasion where you want people to “ooh” and “ahh.”
- Crowd-Pleaser: Kids love the crispy skin, adults rave about the juicy meat, and honestly, it’s hard not to sneak seconds (or thirds).
- Unbelievably Delicious: The combo of the beer’s steam, simple spices, and slow grilling gives you next-level flavor and texture. The skin is shatteringly crisp, while the inside stays so tender you barely need a knife.
What really sets this crispy beer can chicken apart? For one, the can of beer isn’t just a gimmick. It steams the chicken from the inside, keeping it ultra-moist while the grill crisps up the skin to perfection. I blend my own spice rub, balancing garlic, paprika, and just a hint of brown sugar—so it’s savory with a touch of sweetness. And let’s face it, nothing says “grill master” like pulling a perfectly cooked chicken off the grill with a cold beer in hand.
This isn’t just another grilled chicken recipe—it’s the one that makes you close your eyes after the first bite, savoring every juicy, crispy mouthful. Whether you’re impressing guests without breaking a sweat, or just craving comfort food that feels a little special, crispy beer can chicken is your ticket to dinner bliss.
What Ingredients You Will Need
This crispy beer can chicken recipe uses simple, wholesome ingredients that work together to give you bold flavor and that addictive, juicy texture. Most are pantry staples, and a few can be swapped without fuss.
- Whole Chicken (about 4-5 lbs / 1.8-2.3 kg): Go for fresh, not frozen if you can—makes for the juiciest meat.
- Beer (1 can, 12 oz / 355 ml): Any lager or pale ale works; I love using a local craft beer for added flavor. Non-alcoholic beer is fine too.
- Olive Oil (2 tbsp / 30 ml): Helps crisp the skin and lets the rub stick. Avocado oil also works if you prefer.
- Brown Sugar (1 tbsp / 13 g): Adds a hint of sweetness and gives the skin a caramelized finish.
- Paprika (2 tsp / 4 g): For color and subtle smoky flavor. Smoked paprika gives it a deeper kick.
- Garlic Powder (1 ½ tsp / 4 g): Adds savory depth.
- Onion Powder (1 tsp / 2 g): Boosts the umami.
- Dried Thyme (1 tsp / 1 g): Earthy, herby flavor.
- Salt (2 tsp / 10 g): Kosher salt is best for even seasoning. Adjust to taste.
- Black Pepper (1 tsp / 2 g): Freshly cracked has the best punch.
- Optional: Cayenne Pepper (½ tsp / 1 g): For a little heat (skip if you’re serving kids).
- Lemon (1, sliced): For stuffing inside the cavity (adds brightness).
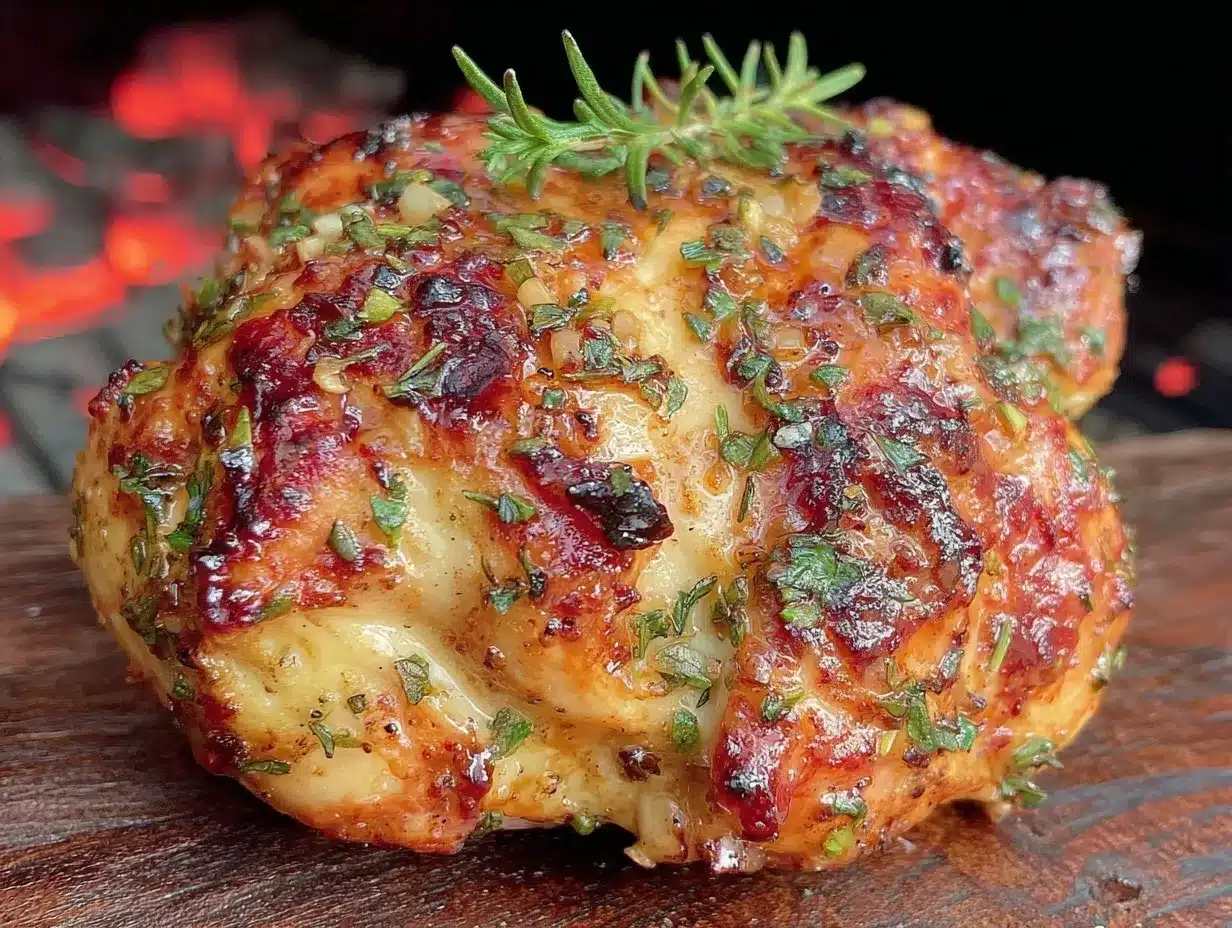
- Fresh Herbs (like rosemary, sage, or parsley): Optional, but I love tucking a few sprigs inside or under the skin for extra aroma.
Ingredient tips: I recommend using organic chicken from a trusted brand for best texture and flavor. If you’re gluten-free, swap the beer for gluten-free lager (works just as well). Don’t have brown sugar? Use coconut sugar for a slightly different twist.
In summer, I sometimes toss a few fresh herbs from the garden under the skin—think rosemary or sage. If you want to go low-carb, skip the sugar entirely and amp up the spices instead. The beauty of this recipe is how flexible it is, so feel free to tweak it to your taste or pantry.
Equipment Needed
You don’t need a fancy kitchen arsenal to make crispy beer can chicken—just a few essentials and a couple of handy alternatives if you don’t have specialty tools.
- Grill (Gas or Charcoal): Both work perfectly. I get great results on my old Weber kettle grill.
- Meat Thermometer: Crucial for checking doneness. I use a digital instant-read for quick, accurate readings.
- Beer Can Chicken Stand (Optional): Makes balancing the chicken easier, but you can steady it with the can alone.
- Heavy-Duty Tongs: For moving the chicken safely.
- Aluminum Foil: To catch drippings and keep your grill clean.
- Small Bowl and Spoon: For mixing the spice rub.
- Basting Brush: If you want to brush on extra oil or butter mid-grill.
If you don’t have a dedicated chicken stand, no worries—the beer can does the job just fine. I’ve used a crumpled ring of foil to steady things in a pinch. For thermometers, budget-friendly models from the local supermarket work, but if you grill often, it’s worth investing in something sturdy. Clean your grill grates before you start—trust me, burned bits from last week’s burgers aren’t a flavor booster!
Preparation Method
Here’s how to make crispy beer can chicken on the grill step-by-step. I’ll walk you through every detail (with a few personal tips to help you avoid the rookie mistakes I’ve made over the years).
- Prep the Chicken (10 min): Remove giblets from the chicken cavity and pat the skin dry with paper towels. Dry skin = crispier results.
- Mix the Spice Rub (5 min): Combine brown sugar, paprika, garlic powder, onion powder, thyme, salt, black pepper, and optional cayenne in a bowl. Stir until evenly blended.
- Oil and Season (5 min): Rub olive oil all over the chicken, including under the skin if you can (I use my hands for this—messy, but worth it). Sprinkle and pat the spice rub generously over the chicken, making sure to cover every nook.
- Prepare the Beer Can (2 min): Open the beer and pour out (or drink) half. Use a can opener to make a few extra holes in the top for more steam. Drop a couple slices of lemon and fresh herbs into the can.
- Mount the Chicken (3 min): Carefully lower the chicken onto the beer can, so the can fits into the cavity and the chicken stands upright. Tuck the legs forward for stability. (If you’re using a stand, place the can in the holder first.)
- Set Up the Grill (10 min): Preheat your grill to medium-high (about 375°F / 190°C). Set up for indirect heat by turning off burners under the chicken (gas) or moving coals to the sides (charcoal). Place a drip pan or layer of foil under where the chicken will sit.
- Grill the Chicken (60-75 min): Place the chicken (upright) on the grill over the drip pan. Close the lid and grill for about 60-75 minutes, rotating halfway if needed for even browning. The skin should be deep golden and crisp; juices should run clear when you pierce the thigh.
- Check Doneness (1 min): Insert a meat thermometer into the thickest part of the thigh (not touching bone)—internal temp should be 165°F / 74°C.
- Rest the Chicken (10 min): Carefully remove the chicken (use tongs and oven mitts—it’ll be hot!). Let it stand upright for 10 minutes before carving. This keeps the juices inside.
- Carve and Serve: Slide the chicken off the can (use caution—the can is steamy!). Carve into legs, thighs, wings, and breast meat. Serve hot with your favorite sides.
Notes: If the chicken starts to brown too fast, tent with foil for the last 20 minutes. If you’re grilling in cooler weather, add 10-15 minutes to cook time. The beer can and cavity herbs give off an amazing aroma—don’t skip them!
Cooking Tips & Techniques
I’ve learned a ton from grilling crispy beer can chicken over the years—some wins, some “well, that was a disaster” moments. Here are my best tricks for getting it right, every time.
- Dry Your Chicken Thoroughly: This really isn’t optional! Moisture on the skin means soggy, not crispy. Pat it dry inside and out before oiling and seasoning.
- Indirect Heat Is Key: Place the chicken away from direct flames. If you put it right over a burner or coal, the skin can scorch before the inside is cooked.
- Use a Meat Thermometer: Trust me, guessing leads to dry chicken or, worse, undercooked meat. An instant-read thermometer is your best friend.
- Oil Under the Skin: If you’re feeling brave, gently separate the chicken skin from the breast and rub in a little olive oil and seasoning. The skin crisps even better.
- Don’t Rush Resting: Letting the chicken rest after grilling allows juices to redistribute—keeps every bite moist.
- Troubleshooting: If your chicken won’t stand up, use a ring of crumpled foil or a stand. If your grill lid is too low, tilt the chicken slightly or use a smaller bird.
- Personal Failures: Once, I tried to rush and skipped drying the skin—let’s just say, the family ate a lot of barbecue sauce that night. Patience and prep make all the difference.
- Consistency Tips: Always measure your spices and check your grill’s temp. Fluctuating heat can mean uneven cooking, so keep an eye on things (but don’t open the lid too often).
Multitasking is easy with this recipe—prep your side dishes while the chicken grills. And honestly, the leftovers are almost better the next day!
Variations & Adaptations
One of my favorite things about crispy beer can chicken? How easy it is to switch things up. Here are some tried-and-true variations:
- Low-Carb/Keto: Skip the brown sugar in the rub and add extra herbs and spices like smoked paprika and cumin.
- Gluten-Free: Use a gluten-free beer or substitute with apple cider for a different flavor twist.
- Spicy Tex-Mex: Add chili powder and cayenne to the rub, and stuff the cavity with lime slices and cilantro.
- Herb Lovers: Try fresh rosemary, sage, and parsley under the skin and in the beer can for a fragrant, earthy punch.
- Seasonal: In winter, swap beer for hard apple cider and toss a cinnamon stick into the can. In summer, mix lemon zest into the rub.
- Cooking Methods: No grill? You can bake beer can chicken in the oven at 375°F / 190°C for about 75-90 minutes. Use a roasting pan to catch drips.
- Personal Favorite: I love using a honey-mustard rub instead of brown sugar and paprika for a tangy-sweet crust. Just mix 1 tbsp honey and 1 tbsp mustard into your oil before rubbing.
Customizing is half the fun! If you’ve got picky eaters, go mild on the spices. Allergic to beer? Apple juice or stock works as a steamy substitute. The method is forgiving, so experiment and find your signature flavor.
Serving & Storage Suggestions
Beer can chicken is best served hot off the grill, with juices still glistening and the skin crackling. I like to present it whole at the table—makes for a dramatic reveal!
- Serving Temperature: Serve immediately after carving, while the skin is crisp and the meat is juicy.
- Presentation: Garnish with fresh herbs and lemon wedges. Sides like grilled corn, potato salad, or crusty bread are perfect matches.
- Beverage Pairings: Cold lager, iced tea, or a zesty lemonade go great with the smoky flavors.
- Storage: Refrigerate leftovers in an airtight container for up to 3 days.
- Freezing: Freeze cooked chicken (carved off the bone) for up to 2 months. Thaw overnight in the fridge.
- Reheating: Reheat gently in the oven at 325°F / 160°C, covered with foil to retain moisture, or zap in the microwave for a quick lunch.
- Flavor Notes: The spices mellow as the chicken sits—sometimes leftovers taste even better after the flavors settle in overnight.
If you have extra chicken, toss it into salads, wraps, or soup for easy meals. The crispy skin won’t stay as snappy after refrigeration, but the meat stays juicy.
Nutritional Information & Benefits
Here’s a quick look at what you’re getting with this recipe (based on a 4 lb / 1.8 kg chicken, per serving):
- Calories: About 350 per serving (skin-on)
- Protein: 40g
- Fat: 18g
- Carbohydrates: 5g (mostly from the rub)
- Sodium: Depends on salt used; about 500mg per serving
Chicken is rich in lean protein, which helps keep you full and supports muscle health. Olive oil adds healthy fats, and if you use fresh herbs, you get extra antioxidants. If you’re following a gluten-free or low-carb diet, simply swap the beer and sugar as noted above. Watch for allergens: chicken, beer (gluten), and some spice blends.
Personally, I love how this recipe fits into a balanced lifestyle—it’s hearty but not heavy, and you control what goes into the rub. Plus, nothing beats the satisfaction of a home-grilled, wholesome dinner with family.
Conclusion
Crispy beer can chicken on the grill is truly one of those recipes you’ll come back to again and again. It’s juicy, full of flavor, and has just enough wow-factor to make any dinner feel special. The method is easy, the ingredients are simple, and the results will have everyone asking for seconds.
Feel free to swap spices, try different beers, or even bake it in the oven if grilling isn’t your thing. I love this recipe because it always brings people together—whether we’re crowded around the grill outside or sharing leftovers the next day.
So what are you waiting for? Give this crispy beer can chicken recipe a try, share your tweaks in the comments, and let me know how it turns out! There’s something magical about making dinner that’s both fun and totally delicious. (And if your family sneaks bites before you’re ready to serve, well, you know you did it right.)
FAQs
Can I make beer can chicken without a grill?
Absolutely! You can roast the chicken in your oven at 375°F (190°C) for about 75-90 minutes. Place the chicken (on the beer can) in a roasting pan to catch drippings.
What type of beer works best for beer can chicken?
Any light lager or pale ale is great. You can use non-alcoholic beer if you prefer, or swap in apple cider for a different flavor.
How do I know when the chicken is done?
Check the internal temperature with a meat thermometer—it should be 165°F (74°C) in the thickest part of the thigh. Juices should run clear.
Can I prepare beer can chicken ahead of time?
You can season and mount the chicken on the beer can several hours before grilling. Keep it refrigerated until you’re ready to cook.
Is beer can chicken safe to eat?
Yes, as long as you use a standard beer can and cook your chicken to the correct temperature. Never use cans with plastic linings or coatings.
Pin This Recipe!
Crispy Beer Can Chicken

This crispy beer can chicken recipe delivers juicy, flavorful meat with shatteringly crisp skin, thanks to a simple spice rub and the steam from a can of beer. It’s a showstopper for backyard gatherings and easy enough for any home cook.
- Prep Time: 15 minutes
- Cook Time: 75 minutes
- Total Time: 90 minutes
- Yield: 6 servings 1x
- Category: Main Course
- Cuisine: American
Ingredients
- 1 whole chicken (about 4–5 lbs)
- 1 can beer (12 oz)
- 2 tbsp olive oil
- 1 tbsp brown sugar
- 2 tsp paprika (smoked or regular)
- 1 1/2 tsp garlic powder
- 1 tsp onion powder
- 1 tsp dried thyme
- 2 tsp kosher salt
- 1 tsp black pepper
- 1/2 tsp cayenne pepper (optional)
- 1 lemon, sliced
- Fresh herbs (rosemary, sage, or parsley; optional)
Instructions
- Remove giblets from the chicken cavity and pat the skin dry with paper towels.
- In a small bowl, combine brown sugar, paprika, garlic powder, onion powder, thyme, salt, black pepper, and optional cayenne. Mix well.
- Rub olive oil all over the chicken, including under the skin if possible. Sprinkle and pat the spice rub generously over the chicken.
- Open the beer and pour out (or drink) half. Use a can opener to make a few extra holes in the top. Drop a couple lemon slices and fresh herbs into the can.
- Carefully lower the chicken onto the beer can so the can fits into the cavity and the chicken stands upright. Tuck the legs forward for stability.
- Preheat grill to medium-high (about 375°F). Set up for indirect heat by turning off burners under the chicken (gas) or moving coals to the sides (charcoal). Place a drip pan or layer of foil under where the chicken will sit.
- Place the chicken (upright) on the grill over the drip pan. Close the lid and grill for 60-75 minutes, rotating halfway if needed for even browning.
- Check doneness by inserting a meat thermometer into the thickest part of the thigh (not touching bone)—internal temp should be 165°F.
- Carefully remove the chicken from the grill (use tongs and oven mitts). Let it stand upright for 10 minutes before carving.
- Slide the chicken off the can (use caution—the can is steamy!). Carve into legs, thighs, wings, and breast meat. Serve hot with your favorite sides.
Notes
Pat the chicken dry for crispier skin. Use indirect heat to avoid burning. Tent with foil if browning too fast. Add 10-15 minutes to cook time in cooler weather. Swap beer for gluten-free beer or apple cider if needed. For oven method, roast at 375°F for 75-90 minutes.
Nutrition
- Serving Size: About 6 oz cooked ch
- Calories: 350
- Sugar: 3
- Sodium: 500
- Fat: 18
- Saturated Fat: 5
- Carbohydrates: 5
- Protein: 40
Keywords: beer can chicken, grilled chicken, crispy chicken, summer grilling, backyard barbecue, easy chicken recipe, juicy chicken, family dinner


