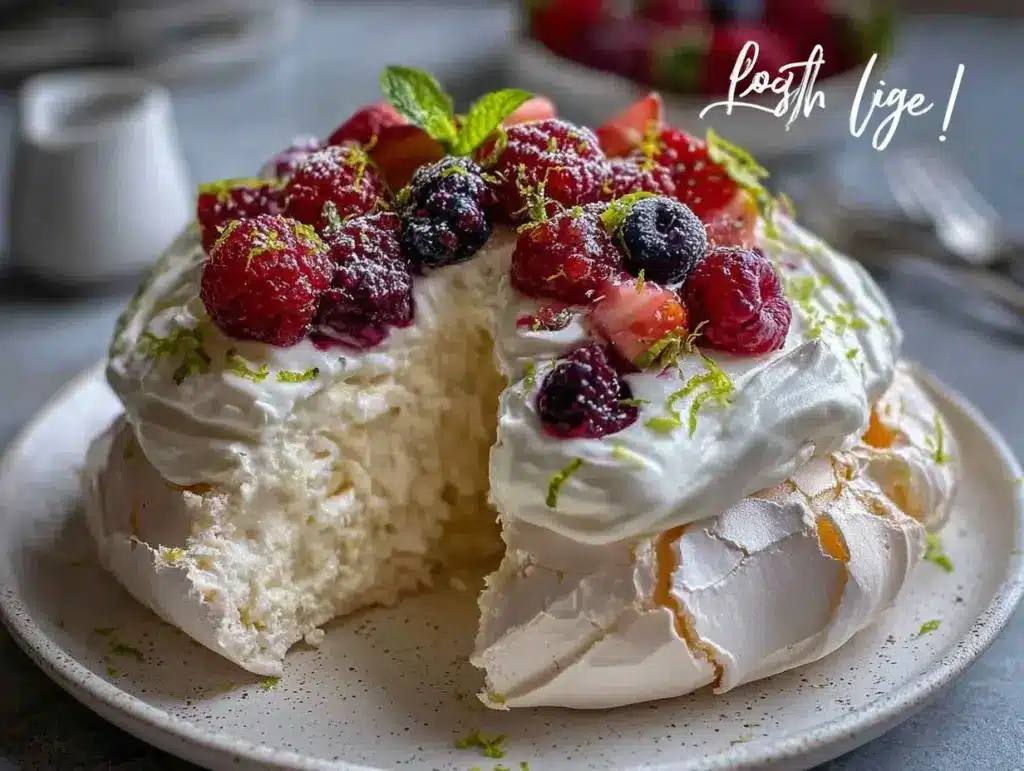
Picture this: The gentle crackle of a spoon breaking through a shatteringly crispy meringue shell, the aroma of vanilla swirling through the air, and a pillow of marshmallowy meringue waiting underneath, topped with the juiciest, most vibrant berries you can find. That’s the magic of a homemade crispy fresh berry pavlova. The first time I pulled this beauty from my oven, the whole kitchen smelled like sweet vanilla clouds and toasted sugar—a smell that instantly made me think of summer picnics and birthday parties from when I was knee-high to a grasshopper.
Honestly, pavlova felt like some kind of mysterious, fancy-pants dessert until I finally tried making one myself on a rainy Sunday, years ago, when I’d stumbled across a pile of ripe berries at the market. I was instantly hooked. The meringue was so light, like a cloud, and the crisp, delicate crust gave way to a chewy center. It was the kind of moment where you pause, take a deep breath, and just smile because you know you’re onto something truly special. My family couldn’t stop sneaking bites off the baking tray, and I caught my partner pretending to “tidy up” the broken edges (yeah, right).
This crispy fresh berry pavlova recipe became my go-to for every gathering—Mother’s Day brunches, impromptu cookouts, or those “just because” evenings when you need a little joy. It’s dangerously easy to whip up, surprisingly forgiving, and brings pure, nostalgic comfort. I wish I’d discovered this cloud-like meringue perfection years ago. It’s perfect for impressing guests, brightening up your Pinterest feed, or treating yourself to something that feels like a warm hug. I’ve tested this pavlova more times than I can count (in the name of research, of course). Now it’s a staple for family celebrations—and, honestly, you’re going to want to bookmark this one for every sweet occasion.
Why You’ll Love This Crispy Fresh Berry Pavlova Recipe
Let’s face it: There’s a certain thrill in serving a dessert that looks like it belongs in a pastry shop window, but takes hardly any fancy skills. After years of recipe tinkering, kitchen messes, and more than a few sunken meringues, I can confidently say this crispy fresh berry pavlova delivers every single time. Here’s why you’re about to fall in love with it too:
- Quick & Easy: Prepping only takes about 20 minutes (with the mixer doing most of the heavy lifting). It’s mostly hands-off, so you can catch up on your favorite show while it bakes.
- Simple Ingredients: You probably have everything you need in your pantry and fridge—no wild-goose-chase for specialty items here.
- Perfect for Celebrations: This pavlova is a showstopper at brunches, potlucks, baby showers, and cozy dinners. It’s the kind of dessert people remember.
- Crowd-Pleaser: Kids love the crunchy edges and marshmallowy center, adults rave about the fresh berries and lightness. No one ever complains about seconds.
- Unbelievably Delicious: The contrast of crispy meringue, creamy whipped topping, and juicy berries is just next-level comfort food. It’s sweet without being heavy, and every bite feels special.
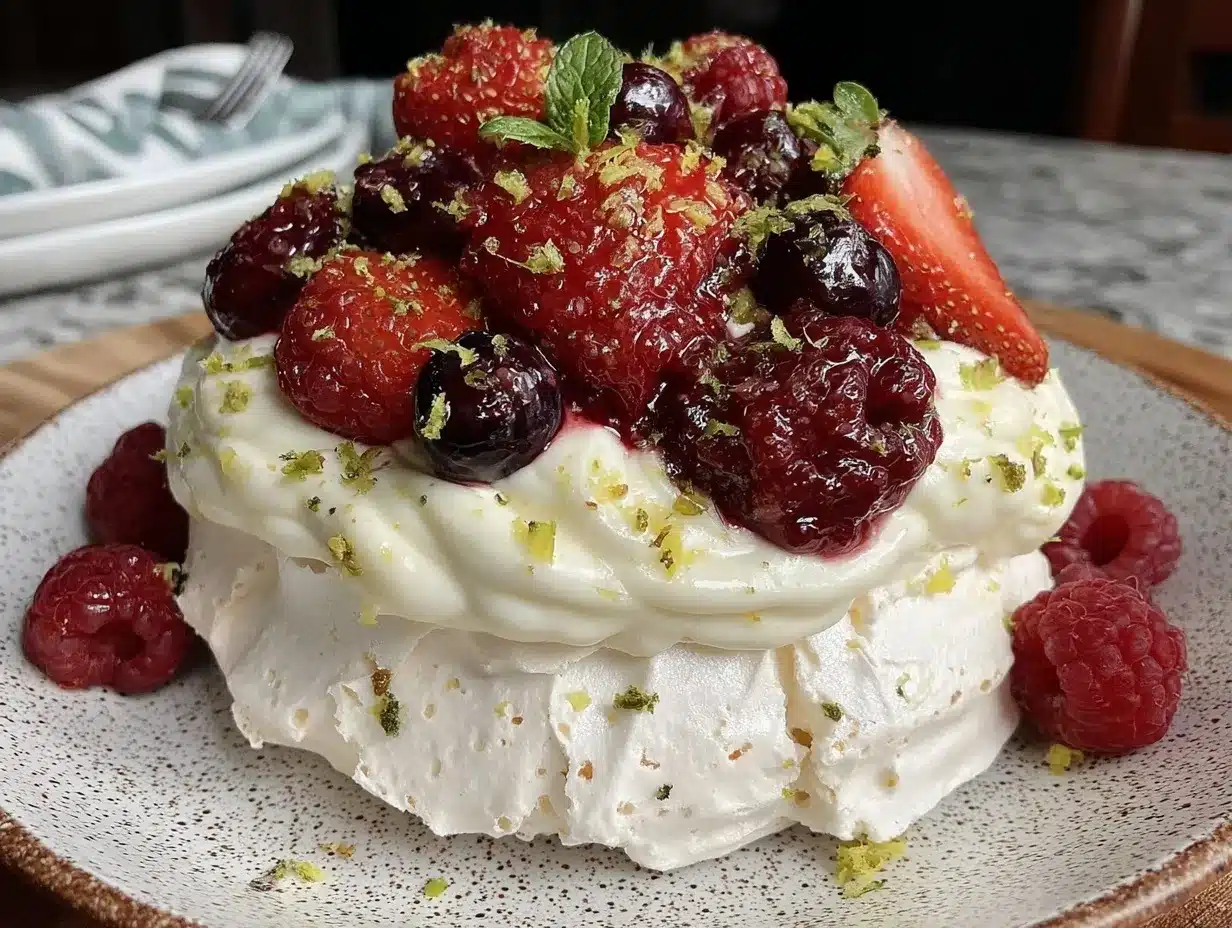
What sets my pavlova apart? I use a gentle, slow-bake method that guarantees a crackly shell and cloud-like center, plus a dash of vinegar and cornstarch to keep things stable (learned that the hard way after a few disasters). The topping is simple: just softly whipped cream and a tumble of fresh berries. No complicated sauces—just the pure, sunny flavor of fruit.
Honestly, this isn’t just another meringue dessert. It’s comfort food with a little sparkle—a stress-free way to impress, and a dish that makes you close your eyes after that first bite. Whether you want to wow your guests or make an ordinary day feel magical, this crispy fresh berry pavlova delivers every time. Once you try it, you’ll see why it’s earned a permanent spot in my recipe box (and my heart).
What Ingredients You Will Need
This crispy fresh berry pavlova recipe uses humble, everyday ingredients to create a truly unforgettable dessert. There’s nothing too fancy here—just a handful of pantry staples and fresh fruit that come together for a show-stopping treat. Here’s what you’ll need:
- For the Meringue Base:
- Large egg whites (4 eggs, about 120g) – Room temperature for best volume
- Granulated sugar (1 cup / 200g) – I like to use superfine/caster sugar if available for a smoother texture
- Cornstarch (2 tsp / 5g) – Helps stabilize the meringue and keeps the center marshmallowy
- White vinegar (1 tsp / 5ml) – Adds acidity for structure (you can use lemon juice in a pinch)
- Pure vanilla extract (1 tsp / 5ml) – For a gentle, warm aroma (I use Nielsen-Massey if I’m feeling fancy)
- Pinch of salt – Brings out all the flavors
- For the Topping:
- Heavy whipping cream (1 cup / 240ml) – Cold, for soft, billowy peaks
- Powdered sugar (1-2 Tbsp / 8-16g) – Sweetens the cream just the right amount
- Pure vanilla extract (½ tsp / 2.5ml) – Again, a little goes a long way
- Fresh berries (2 cups / about 300g) – A mix of strawberries, raspberries, blueberries, and blackberries is classic, but use whatever looks good!
- Optional: Fresh mint leaves – For a pretty finish (totally optional, but it makes for a stunning presentation)
Ingredient Tips:
- Egg Whites: Make sure absolutely no yolk sneaks in, or your meringue won’t whip up. Older eggs tend to whip up fluffier (who knew?).
- Sugar: Superfine sugar dissolves more easily, but regular works if that’s what you’ve got—just beat a bit longer.
- Berries: In summer, I swap in chopped peaches and nectarines or even pitted cherries. In winter, frozen berries (thawed & well-drained) work in a pinch, though they’ll be juicier.
- Whipped Cream: You can use coconut cream for a dairy-free version—chill a can overnight, scoop the solid cream, and whip with a splash of vanilla.
That’s it—no mystery ingredients, and nothing you can’t find at your regular grocery store. If you’re missing something, there’s usually a swap (I’ve made this with lemon juice instead of vinegar and it still turned out dreamy). The beauty of this pavlova is its flexibility and forgiving nature. You’re going to love it!
Equipment Needed
Making a crispy fresh berry pavlova doesn’t require a professional kitchen—just a few trusty basics and a couple of helpful tools. Here’s your checklist:
- Electric mixer – Stand mixer with whisk attachment or a handheld mixer. (I’ve made meringue by hand once—my arm still remembers. Trust me, use a mixer if you can!)
- Large mixing bowl – Glass or metal works best. Plastic can hold onto grease, which is a meringue’s worst enemy.
- Measuring cups & spoons – For precision. I use a kitchen scale for the egg whites and sugar when I want to be extra exact (makes a difference!)
- Rubber spatula – For folding in the cornstarch and scraping the bowl clean.
- Baking sheet – Lined with parchment paper (not wax paper—it will stick and make you sad).
- Offset spatula or large spoon – For shaping the pavlova mound. Even a butter knife works in a pinch.
- Cooling rack – Not strictly necessary, but it helps cool your pavlova evenly.
Budget-Friendly Tip: No stand mixer? A sturdy hand whisk and some elbow grease get the job done—just be ready for a workout. If you don’t have an offset spatula, a regular spoon is fine for making those signature swoops and swirls.
For best results, give your mixing bowl and whisk a quick wipe with vinegar and a paper towel before starting—any grease can sabotage your meringue. I learned this the hard way and now it’s a non-negotiable step (worth it for perfect, cloud-like meringue every time!).
How To Make Crispy Fresh Berry Pavlova – Step By Step
-
Preheat & Prep:
- Preheat your oven to 250°F (120°C).
- Line a large baking sheet with parchment paper. Draw a 7-8 inch (18-20cm) circle as a guide, then flip the paper over.
Tip: Oven temp matters! Too hot and your pavlova will brown and crack. Low and slow is the secret.
-
Whip the Egg Whites:
- In a clean, dry bowl, add 4 large egg whites (120g). Beat on medium speed until soft peaks form (about 2-3 minutes).
- Add a pinch of salt right at the start. It helps stabilize the foam.
Sensory cue: The whites will look frothy with gentle “waves” at this stage.
-
Add Sugar Gradually:
- With the mixer running, add 1 cup (200g) granulated sugar, 1 tablespoon at a time.
- Beat until glossy, stiff peaks form and the sugar is fully dissolved (about 6-8 minutes). Test by rubbing a small bit between your fingers—it should feel smooth, not gritty.
If your meringue feels grainy, keep beating a bit longer.
-
Add Vinegar, Cornstarch, and Vanilla:
- Add 2 tsp (5g) cornstarch, 1 tsp (5ml) white vinegar, and 1 tsp (5ml) vanilla extract.
- Mix on low just until combined. Don’t overmix here—gentle is key.
Troubleshooting: If the meringue deflates, it’s probably overmixed or the bowl wasn’t clean enough.
-
Shape the Meringue:
- Spoon the meringue onto your parchment circle. Use an offset spatula or spoon to create a nest shape, building up the sides with a slight dip in the center (for all those berries later).
- It doesn’t have to be perfect—rustic swirls look beautiful!
Personal tip: Make the sides a little higher than the middle to hold toppings.
-
Bake:
- Place the pan in the center of the oven. Bake for 90 minutes, then turn off the oven and prop the door open with a wooden spoon. Let the pavlova cool completely in the oven (about 1 hour).
Sensory cue: The outside should be pale, crisp, and dry. The inside stays marshmallowy.
-
Make the Whipped Cream:
- In a cold bowl, whip 1 cup (240ml) heavy cream with 1-2 Tbsp (8-16g) powdered sugar and ½ tsp (2.5ml) vanilla until soft peaks form.
Warning: Don’t overwhip or you’ll get butter. Stop at soft, billowy peaks.
-
Assemble:
- Just before serving, mound the whipped cream in the pavlova’s center. Top generously with 2 cups (about 300g) of fresh berries and a few mint leaves if you like.
Efficiency tip: Wait to assemble until right before serving, or the meringue can soften.
And there you have it—a showstopping, cloud-like dessert that’s easier than it looks! If your pavlova cracks, no worries. Just call it “rustic” and pile on the berries. I promise, no one will mind.
Cooking Tips & Techniques for the Best Pavlova
- Clean Equipment Is Key: Even a smidge of grease or egg yolk will prevent your whites from whipping properly. I always wipe my bowl and whisk with vinegar first—sounds fussy, but it’s worth it.
- Slow Sugar Addition: Pouring in the sugar gradually gives you that silky, glossy meringue. If you add it too quickly, the meringue can weep or collapse (been there, done that…total mess).
- Know Your Oven: Every oven has hot spots. If your pavlova is browning too quickly, lower the temperature a bit or tent it with foil.
- Let It Cool in the Oven: This prevents sudden temperature shocks that cause cracks. I once rushed a pavlova for a dinner party and it split right down the middle—now I always give it extra time to cool with the door propped open.
- Don’t Overbake: The outside should be dry and crisp, but not colored. If it’s sticky or gooey on the outside, leave it for another 10-15 minutes, but keep an eye on it.
- Timing Tricks: I sometimes bake the meringue base the night before, let it cool in the oven overnight, and assemble right before serving. Multitasking at its best!
- Humidity Is Not Your Friend: Pavlova hates moisture. On super humid days, I avoid making meringues or just keep expectations realistic (they’ll still taste amazing, even if they’re a little chewier).
- Personal Oops: I once tried to move the pavlova while it was still warm—crumble city. Always let it cool completely before transferring.
Stick with these tips, and you’ll have a crispy fresh berry pavlova that’s light, cloud-like, and utterly irresistible every time—promise!
Variations & Adaptations
One of my favorite things about this crispy fresh berry pavlova recipe is how flexible it is. You can switch up the flavors, adapt for dietary needs, or just use whatever fruit you have on hand. Here are some ideas to make it your own:
- Seasonal Fruit Swap: Not berry season? Try sliced peaches, pitted cherries, passion fruit pulp, or poached pears. In winter, roasted apples with a sprinkle of cinnamon are delicious.
- Dairy-Free/Vegan: Swap the whipped cream for coconut whipped cream (chill a can of full-fat coconut milk overnight, scoop out the solid part, and whip with a bit of sugar and vanilla). For egg-free meringue, use aquafaba (liquid from a can of chickpeas)—it whips up shockingly well, though the texture is a bit different.
- Chocolate Lovers: Fold in 2 Tbsp (12g) sifted cocoa powder to the meringue for a chocolate pavlova. Top with chocolate shavings and berries for a decadent twist.
- Nutty Crunch: Sprinkle toasted sliced almonds or crushed pistachios over the finished pavlova for added crunch and flavor.
- Mini Pavlovas: Make individual portions by forming 6-8 small nests instead of one big one. They bake a little faster (about 50-60 minutes) and are perfect for parties.
- Personal Favorite: I sometimes swirl raspberry puree into the meringue just before baking for a pretty marbled effect and extra berry punch.
Allergy note: If you need to avoid eggs, aquafaba is a surprisingly good substitute, though the result is a bit more delicate. For nut allergies, stick with the classic version and skip any garnishes.
Let your imagination run wild. Once you’ve got the basic crispy meringue down, the sky’s the limit!
Serving & Storage Suggestions
For the wow factor, serve your crispy fresh berry pavlova as soon as it’s assembled. Here’s how to make it shine:
- Serving Temperature: Room temperature is best, right after you’ve added the whipped cream and berries. The contrast of crisp meringue, cool cream, and juicy fruit is unbeatable.
- Presentation: Pile the berries high and sprinkle with fresh mint. For extra flair, dust with a little powdered sugar just before serving. A pretty cake stand makes it Pinterest-perfect.
- Pairing Ideas: Serve with a cup of strong coffee, a glass of Prosecco, or even a fruity iced tea. For brunch, it pairs beautifully with a savory quiche or a simple green salad.
- Storage: Once topped, pavlova is best enjoyed within 2 hours (the meringue will soften as it sits). If you have leftovers, cover lightly and refrigerate—just expect the shell to get a bit chewier.
- Make Ahead: You can bake the meringue base a day ahead. Store it (undecorated) in an airtight container at room temperature, away from humidity. Assemble with cream and berries right before serving for peak crispness.
- Reheating: Meringue can’t really be reheated, but if it’s lost its crunch, a quick 5-minute warm-up in a low oven (200°F / 90°C) can help revive the shell a bit—just keep an eye on it.
- Flavor Development: The flavors of the cream and fruit mingle with the pavlova as it sits, making for a soft, almost cake-like treat the next day (if you’re lucky enough to have leftovers!).
Honestly, it rarely lasts that long in my house. It’s just too good.
Nutritional Information & Benefits
This crispy fresh berry pavlova recipe is lighter than many desserts, thanks to its meringue base. Here’s a quick look at the nutritional side (per slice, based on 8 servings):
- Calories: About 180 kcal
- Fat: 6g (mainly from the cream)
- Carbohydrates: 30g
- Protein: 3g
- Sugar: 25g (mainly from the meringue and fruit)
Health Benefits: The berries pack a punch of vitamin C, antioxidants, and fiber. The meringue is naturally gluten-free, and you can easily make it dairy-free with coconut cream. There are no heavy butters or oils—just simple ingredients that let the fruit shine.
The main allergens here are eggs and dairy (from the cream), but both have easy swaps if needed. From a wellness perspective, I love this pavlova as a “treat yourself” dessert that feels light and fresh, not overly rich or heavy.
Conclusion
If you’re searching for a dessert that checks all the Pinterest-worthy boxes—gorgeous, simple, crowd-pleasing, and full of fresh flavor—this crispy fresh berry pavlova recipe is it. The combination of shatteringly crisp meringue, cloud-like chew, and juicy berries is pure happiness on a plate. I can’t count the number of times this recipe brought smiles and “wow, you made that?!” reactions at my table.
Don’t be afraid to make it your own—switch up the fruit, try coconut cream, or experiment with a little chocolate. That’s the beauty of pavlova: it’s forgiving, flexible, and always impressive. Personally, I love how every bite takes me back to family gatherings, laughter, and those simple joys that make cooking worth it. I hope it does the same for you.
If you try this recipe, let me know in the comments below! Share your favorite toppings, tips, or your own twists. And if you snap a pic for Pinterest or Instagram, don’t forget to tag me—I love seeing your creations. Here’s to crispy clouds and sweet, berry-filled moments. You’ve got this!
Frequently Asked Questions
Can I make the pavlova base ahead of time?
Absolutely! Bake the meringue base the day before, let it cool completely, and store in an airtight container at room temp. Add cream and berries just before serving for best texture.
Why did my pavlova crack?
Cracks happen if the oven is too hot or if it cools too quickly. Letting it cool in the oven with the door propped open helps. But honestly—even cracked pavlova tastes amazing!
Can I use frozen berries?
Yes, just thaw and drain them well before topping your pavlova. Frozen berries are juicier, so use a slotted spoon to avoid a soggy meringue.
Is this pavlova gluten-free?
Yes! The meringue base is naturally gluten-free. Just check your toppings and any added flavorings to be sure.
How do I know when my meringue is ready?
The meringue should be glossy, hold stiff peaks, and feel smooth when you rub a bit between your fingers. If it’s gritty, keep beating until the sugar dissolves completely.
Pin This Recipe!
Crispy Fresh Berry Pavlova
This cloud-like pavlova features a shatteringly crisp meringue shell with a marshmallowy center, topped with softly whipped cream and a vibrant mix of fresh berries. It’s an easy, showstopping dessert perfect for celebrations or a sweet treat any day.
- Prep Time: 20 minutes
- Cook Time: 1 hour 30 minutes
- Total Time: 2 hours 50 minutes
- Yield: 8 servings 1x
- Category: Dessert
- Cuisine: Australian
Ingredients
- 4 large egg whites (about 120g), room temperature
- 1 cup granulated sugar (200g, superfine/caster sugar preferred)
- 2 teaspoons cornstarch (5g)
- 1 teaspoon white vinegar (5ml, or lemon juice)
- 1 teaspoon pure vanilla extract (5ml)
- Pinch of salt
- 1 cup heavy whipping cream (240ml), cold
- 1–2 tablespoons powdered sugar (8-16g)
- 1/2 teaspoon pure vanilla extract (2.5ml)
- 2 cups fresh berries (about 300g, strawberries, raspberries, blueberries, blackberries, or mix)
- Optional: Fresh mint leaves for garnish
Instructions
- Preheat oven to 250°F (120°C). Line a large baking sheet with parchment paper and draw a 7-8 inch circle as a guide, then flip the paper over.
- In a clean, dry bowl, add egg whites and a pinch of salt. Beat on medium speed until soft peaks form (about 2-3 minutes).
- With mixer running, add granulated sugar 1 tablespoon at a time. Beat until glossy, stiff peaks form and sugar is dissolved (about 6-8 minutes).
- Add cornstarch, vinegar, and vanilla extract. Mix on low just until combined.
- Spoon meringue onto parchment circle. Shape into a nest with higher sides and a slight dip in the center.
- Bake for 90 minutes. Turn off oven, prop door open with a wooden spoon, and let pavlova cool completely in oven (about 1 hour).
- In a cold bowl, whip heavy cream with powdered sugar and vanilla until soft peaks form.
- Just before serving, mound whipped cream in pavlova’s center. Top with fresh berries and mint leaves if desired.
Notes
Ensure all equipment is grease-free for best meringue results. Add sugar gradually for a silky texture. Let pavlova cool in the oven to prevent cracks. Assemble just before serving for maximum crispness. For dairy-free, use coconut cream. Pavlova is best enjoyed within 2 hours of assembly.
Nutrition
- Serving Size: 1 slice (1/8 pavlova
- Calories: 180
- Sugar: 25
- Sodium: 60
- Fat: 6
- Saturated Fat: 4
- Carbohydrates: 30
- Fiber: 2
- Protein: 3
Keywords: pavlova, berry dessert, meringue, gluten-free, easy dessert, summer dessert, whipped cream, celebration, brunch, cloud-like, crispy meringue


