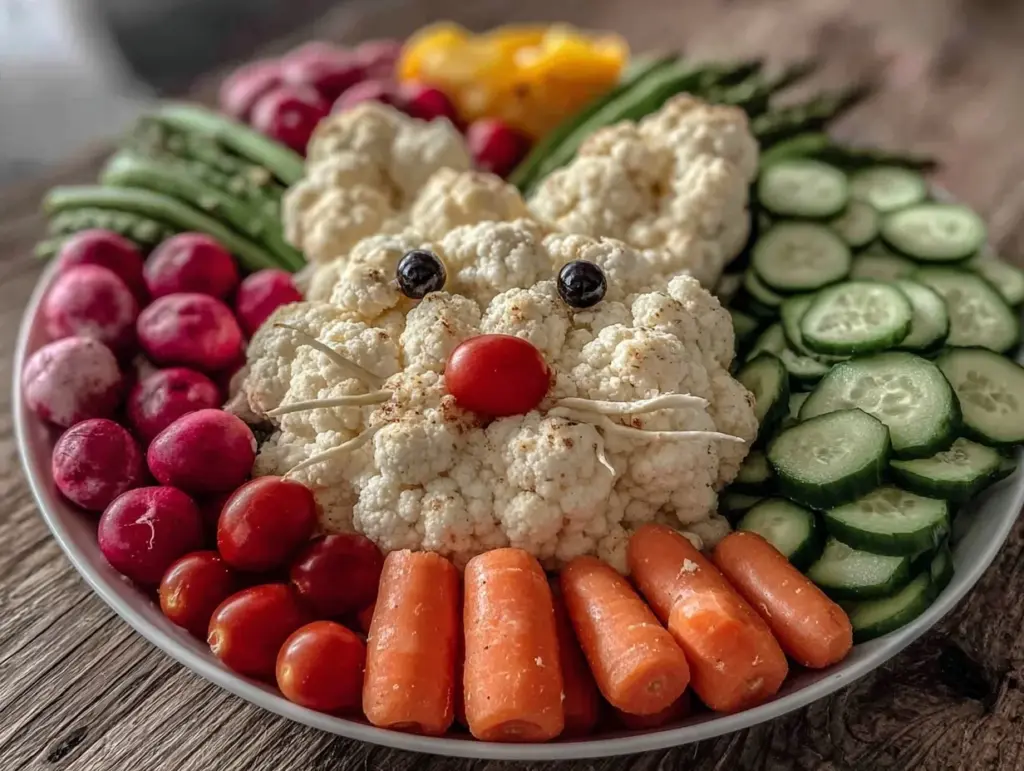
Let me tell you, the first time I assembled a Fresh Easter Bunny Veggie Tray, my kitchen was absolutely bursting with color (and let’s be real, with excitement). The crisp snap of fresh carrots, the earthy aroma of bell peppers, and the way the radishes shimmered under the light—honestly, it was a feast for the senses before anyone even took a bite. Picture this: you’re slicing vibrant veggies while the kids hover nearby, sneaking bites of sweet snap peas and giggling every time you remind them, “Hey, those are for the bunny’s ears!” The whole process feels like you’re creating edible art, and by the end, you’ve got a showstopper that’s almost too cute to eat (almost).
The first time I made this Easter Bunny Veggie Tray, it was a rainy Saturday before the holiday. I wanted something cheerful, healthy, and fun—something that would draw everyone to the table, even the picky eaters. You know that moment when you finally step back, admire your handiwork, and just grin because you know you’ve made something special? That’s exactly how I felt. It reminded me of spring family gatherings when I was knee-high to a grasshopper, and my grandma would always say, “If it’s not colorful, it’s not a party!” This tray is pure, nostalgic comfort wrapped up in a playful package.
My family couldn’t stop sneaking veggies off the tray as soon as it hit the table (and I can’t really blame them). Even my veggie-averse nephew was hooked after one look at the bunny face made from creamy ranch dip and fluffy cauliflower. Honestly, it’s dangerously easy to put together, and the reactions are priceless—lots of “awws,” laughter, and requests for seconds. Whether you want to brighten up your Easter brunch spread, surprise your kids with a sweet treat, or give your Pinterest board a pop of color, this Easter Bunny Veggie Tray is the way to go. I’ve tested and tweaked this recipe more times than I can count (in the name of research, of course), and it’s become a staple for family gatherings, gifting, and, well, whenever I want to add some spring cheer to the kitchen. It feels like a warm hug in veggie form—you’re going to want to bookmark this one!
Why You’ll Love This Easter Bunny Veggie Tray
If you’re anything like me, you love recipes that are both easy and impressive—especially for holidays. After years of hosting and plenty of Pinterest fails, I can say this Easter Bunny Veggie Tray is a true winner. Here’s why it stands out:
- Quick & Easy: Comes together in under 30 minutes—even faster if you enlist a few helpers. Perfect for busy holiday mornings or last-minute get-togethers.
- Simple Ingredients: No fancy grocery trips or hard-to-find items. Most of these veggies are classic, affordable, and you probably have a bunch already in your fridge.
- Perfect for Easter Brunch: It’s the ultimate centerpiece for Easter brunches, potlucks, and even kid-friendly parties. It brightens up the table and sets a festive mood.
- Crowd-Pleaser: Kiddos, grandparents, and everyone in between gravitate toward this adorable tray. I’ve had kids ask for “the bunny veggies” all year long!
- Unbelievably Delicious: Crisp, fresh flavors with creamy ranch dip—honestly, it’s hard to go wrong. The variety means there’s something for everyone, even the pickiest eaters.
What sets this Easter Bunny Veggie Tray apart? It’s not just about the cute face (though that’s a big plus). It’s the way you arrange the veggies for maximum color and crunch. I use a blend of sweet, tangy, and mild veggies for a balanced taste, and a classic ranch dip for the bunny’s face that’s always a hit. If you want to switch things up, you can blend cottage cheese into the dip for extra fluffiness or swap in Greek yogurt for a lighter touch. It’s my best version because it’s flexible, forgiving, and always gets a wow.
Beyond looks, it’s the kind of recipe that makes you close your eyes after the first crunchy bite—bright, fresh, and comforting in a way that only good food can be. Whether you’re impressing guests or just trying to get your kids to eat more vegetables, this tray turns a simple meal into a memory. Plus, you can prep nearly everything ahead, so there’s zero stress when the crowd arrives. That’s my kind of holiday win!
What Ingredients You Will Need
This Easter Bunny Veggie Tray uses simple, wholesome ingredients to deliver bold flavor and popping color without any fuss. Most veggies are pantry staples or easy to find, and you can swap things in or out based on what’s in season or on sale. Here’s what you’ll need:
- For the Bunny Face:
- Ranch dip or Greek yogurt ranch dip (about 1 cup / 240 g – for the bunny’s face and as a dipping sauce; I recommend Hidden Valley Ranch or homemade with Greek yogurt for extra creaminess)
- Cauliflower florets (1–2 cups / 100–200 g, for the bunny’s cheeks and fluff; pick firm, white florets for best look)
- Black olives (2–3 whole, for eyes and nose)
- Baby carrots (2–3 pieces, for bunny’s teeth)
- Radishes (thinly sliced, for the bunny’s pink cheeks and ears)
- Cherry tomatoes (a few, for rosy cheeks or decorative accents)
- For the Bunny Ears & Body:
- Baby carrots (1–2 cups / 120–240 g, for ears, border, and bunny paws)
- Sugar snap peas or green beans (1 cup / 100 g, for green accents around the bunny)
- Red bell pepper (1 large, sliced into strips, for ear lining and color)
- Yellow bell pepper (1 large, sliced, for pops of brightness)
- Cucumber (1–2, sliced into rounds, for bunny’s body and base)
- Broccoli florets (1 cup / 90 g, for extra green texture)
- Celery sticks (cut into short pieces, for bunny paws and tray filler)
- For Garnish & Color:
- Grape tomatoes (handful, for added color—kids love these as “bunny eggs”)
- Fresh parsley (a few sprigs, for leafy garnish)
- Optional: Sliced radishes or colored bell peppers (for extra color and crunch)
You can swap in seasonal veggies—think asparagus tips or rainbow carrots in spring. If you’re looking for a gluten-free or dairy-free option, use a dairy-free ranch dip or hummus for the bunny’s face. For picky eaters, use extra carrots and cherry tomatoes—these seem to go first, at least in my house. Don’t worry if you’re missing one or two veggies; just load up with what you’ve got and let the colors shine!
Equipment Needed
You really don’t need fancy tools for this Easter Bunny Veggie Tray—just a few basics and maybe some creative flair. Here’s what I use:
- Large serving platter or tray (A round or oval tray works best for bunny shapes; I’ve used everything from a basic cookie sheet to a pretty wooden board—whatever is big enough for your veggies.)
- Small bowls (For dips—ramekins or even teacups look cute!)
- Sharp knife (For slicing veggies; I love my Victorinox chef’s knife, but any sharp blade will do.)
- Cutting board (A sturdy one makes prepping safer and easier.)
- Vegetable peeler (Optional, for carrots or cucumbers if you want fancy shapes.)
- Paper towels or clean kitchen towels (To dry veggies so they don’t slip around on the tray.)
- Toothpicks (Optional, for securing ears or little veggie details—handy but not essential.)
If you don’t have a serving tray, a large dinner plate or even a baking sheet lined with parchment will work. I’ve tried plastic and wooden trays—both clean up easily, but the wooden ones look extra festive. Just wash and dry everything well before assembling. If you use a fancy platter, avoid sharp knives on it to keep it scratch-free. Budget options are totally fine, honestly—this recipe is all about the veggies!
Preparation Method
-
Prep the Veggies:
Wash all vegetables thoroughly under cool running water. Pat dry with paper towels. Slice cucumbers into thin rounds, bell peppers into strips, celery into sticks, and radishes into thin slices. Cut cauliflower and broccoli into bite-sized florets. If you like, peel carrots for smoothness. (Takes about 10 minutes.)
Tip: Drying veggies helps them stick to the tray better and keeps the bunny face from getting soggy.
-
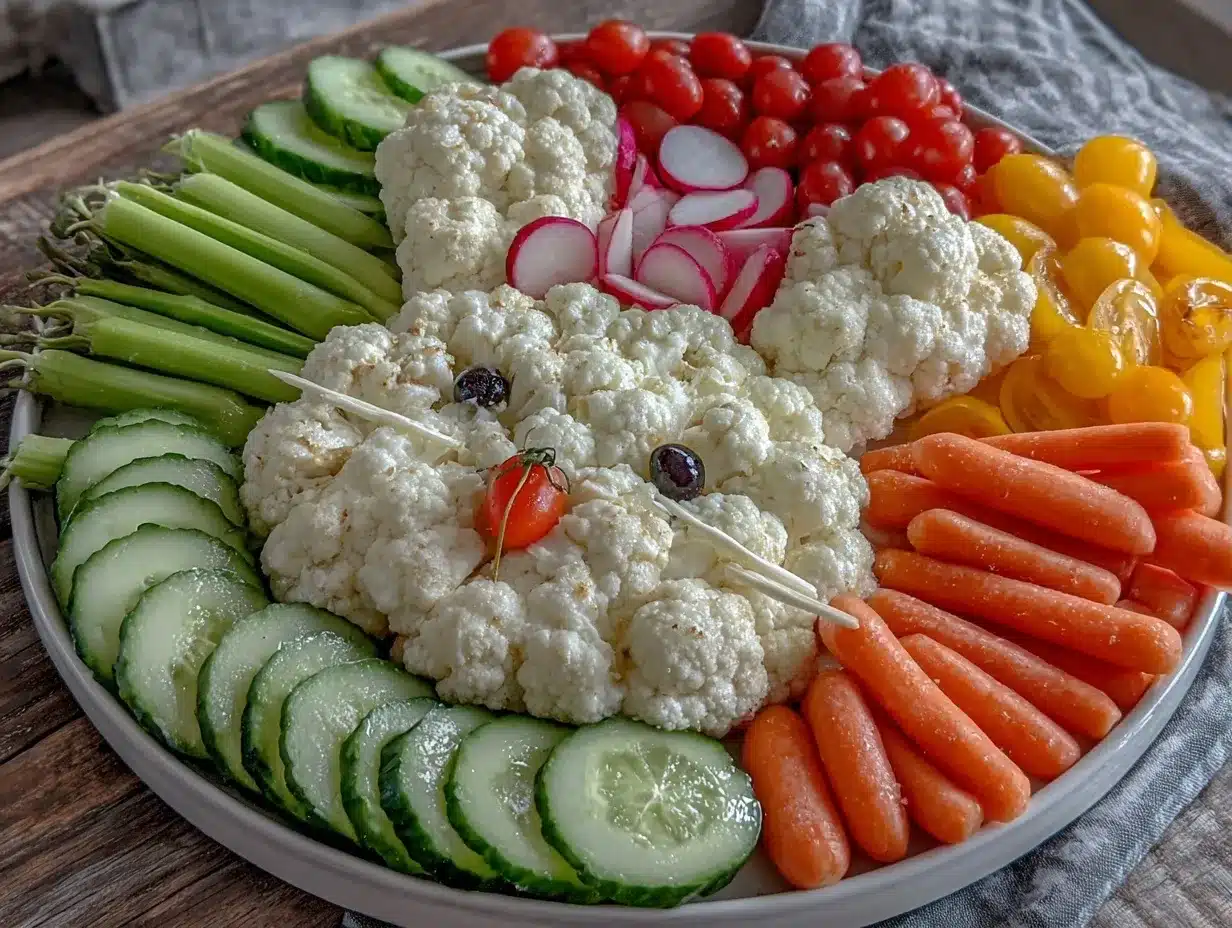
Arrange the Bunny Face:
Place a small bowl of ranch dip in the center of your tray—this is the bunny’s face. Surround the bowl with a ring of cauliflower florets to create a fluffy bunny face outline. Use black olives for eyes (press gently into the dip), one olive for the nose, and two baby carrot pieces for teeth just below the dip bowl. Add sliced radishes or cherry tomatoes for rosy cheeks. (5 minutes)
Note: If your dip is too thin, blend in some Greek yogurt or cottage cheese to thicken it.
-
Build the Bunny Ears:
On each side of the bunny face, create tall ears using rows of baby carrots for the outer edge. Line the inside with red bell pepper strips and a few radish slices for pink ear centers. You can secure the ears with toothpicks if needed. (5 minutes)
Sensory cue: The ears should stand up crisply and look bright against the white cauliflower.
-
Shape the Bunny Body and Paws:
Below the face, create the bunny’s body with overlapping cucumber rounds. Add broccoli florets and snap peas around the body for extra green and texture. Place small clusters of baby carrots or celery sticks on each side for paws. (5 minutes)
Efficiency tip: Layer veggies tightly so they stay in place and don’t slip around.
-
Decorate with Colorful Garnishes:
Fill in any gaps with grape tomatoes, yellow bell pepper strips, and extra radish slices. Scatter parsley sprigs around the edges for a fresh, leafy look. This step really brings the bunny tray to life! (3 minutes)
Personal tip: Don’t stress about perfection—sometimes the slightly crooked ears are the cutest part!
-
Final Touches & Troubleshooting:
Step back and check your bunny—are the features clear? Adjust as needed. If veggies slide, pat them dry again or layer with extra florets. If colors seem dull, add more tomatoes or bell pepper strips. (2 minutes)
Warning: Kids may start nibbling before you’re done, so keep extra carrots handy!
-
Serve Immediately or Cover:
If serving right away, present the tray at room temperature. If prepping ahead, cover tightly with plastic wrap and refrigerate for up to 4 hours. Add fresh parsley or extra dip just before serving for best look.
Cooking Tips & Techniques
I’ve learned a few tricks (sometimes the hard way) when putting together the Easter Bunny Veggie Tray. Here are my top tips to make yours a hit, every time:
- Cut Veggies Uniformly: Slicing cucumbers and carrots evenly makes the bunny face look neat and helps everything fit together. If you rush, you might end up with lopsided ears (been there!).
- Dry Thoroughly: Wet veggies slide around and make the dip runny. After washing, let veggies sit on a towel for a few minutes—trust me, this step saves you from a soggy bunny.
- Layer for Support: Stack denser veggies like cauliflower and cucumbers first, then add lighter ones like snap peas and bell pepper strips on top. This helps the bunny keep its shape, especially for longer parties.
- Use Toothpicks for Ears: If your carrots or peppers won’t stay put, gently stick a toothpick through the ear base into the cauliflower. Just remember to remove them before serving to kids.
- Multitasking: While veggies are drying, prep your dip and arrange garnishes. The more you do in parallel, the faster the tray comes together.
- Don’t Overpack: Leave a little space between veggies so guests can grab what they like. Overcrowding can make the tray look messy (and believe me, it’s hard to rescue once it’s packed tight).
- Adapt for Allergies: If you’re serving dairy-free guests, swap ranch for hummus or a vegan dip. Label dip bowls for clarity.
The biggest lesson? Have fun with it! The bunny doesn’t have to be perfect to steal the show. I’ve made trays with crooked noses and uneven ears, and they always get smiles—sometimes even more than the “perfect” ones. So, relax and enjoy the process!
Variations & Adaptations
One of my favorite things about the Easter Bunny Veggie Tray is how easy it is to customize. Here are a few ways you can make it your own:
- Dietary Swaps: For vegan guests, use hummus or a dairy-free ranch dip for the bunny’s face. Gluten-free? Stick with naturally gluten-free veggies and dips.
- Seasonal Twists: In spring, add asparagus tips and rainbow carrots for extra color. In summer, swap in cherry tomatoes and fresh corn. Fall’s bounty can include roasted sweet potato rounds and sliced apples (if you’re feeling adventurous!).
- Flavor Boosts: Try adding pickled veggies for a tangy punch, or a spicy sriracha dip for grown-ups. You can also sprinkle everything bagel seasoning over the dip for extra crunch.
- Cooking Methods: If you prefer cooked veggies, lightly steam cauliflower and broccoli before arranging. Just let them cool and dry first so they don’t make the tray soggy.
- Custom Shapes: Make mini bunny trays for individual servings, or transform the bunny into a chick or lamb for other spring holidays.
- Personal Variation: Last year, I added roasted beet slices for the bunny’s cheeks—turned out so vibrant! The earthy flavor was a hit with grown-ups, though the kids still picked carrots first.
If you’re dealing with nut or dairy allergies, always double-check dip ingredients and avoid nuts in garnishes. The beauty of this tray is its flexibility—mix and match veggies and dips to fit your crowd and your mood!
Serving & Storage Suggestions
Serve your Easter Bunny Veggie Tray chilled or at room temperature—just make sure the dip stays cool and fresh. Arrange the tray as your centerpiece for brunch or dinner; it pairs beautifully with quiche, deviled eggs, or even ham sliders. For drinks, lemonade or sparkling water with fresh mint makes a perfect match.
If you need to store leftovers, cover the tray tightly with plastic wrap and refrigerate for up to 2 days. Veggies like carrots, cucumber, and bell peppers hold up well; avoid storing the dip with the veggies, as it can get watery. For longer storage, keep the veggies in separate airtight containers.
To reheat cooked veggies (if you used steamed ones), warm gently in the microwave for 10–15 seconds, but serve most veggies fresh for best crunch. Honestly, the flavors deepen a little overnight—especially with the ranch dip as it mingles with veggie juices. I love snacking on leftovers with pita chips or tossing them into salads the next day!
Nutritional Information & Benefits
This Easter Bunny Veggie Tray is packed with vitamins, fiber, and antioxidants from all those fresh veggies. Each serving (about 1 cup / 120 g of mixed vegetables and 2 tablespoons / 30 g dip) has roughly:
- Calories: 80–100
- Protein: 2–4g
- Carbs: 12–15g
- Fat: 3–6g (mainly from dip)
- Fiber: 3–4g
Carrots and bell peppers bring plenty of vitamin A and C, while broccoli and cauliflower add potassium and folate. The ranch dip provides calcium and protein, especially if you use Greek yogurt. If you’re watching carbs or calories, you can lighten the dip or skip starchy veggies. Most ingredients are naturally gluten-free, but check dips for hidden gluten or dairy. Allergens to watch: dairy in dip, possible nightshade sensitivity (tomatoes, peppers). Honestly, this tray is one of my favorite ways to sneak more veggies into my family’s diets—easy, tasty, and so cheerful.
Conclusion
If you want to bring a burst of color and a smile to your Easter table, this Fresh Easter Bunny Veggie Tray is the recipe to bookmark. It’s easy, adorable, and guaranteed to get everyone reaching for seconds (even those who usually pass on veggies). Customize it with your favorite dips and seasonal vegetables—there’s no wrong way to make a bunny. Personally, I love how this tray turns healthy snacking into a festive event, and my kids ask for it every year.
Give it a try, and let me know how you make it your own! Did you add purple carrots, or sneak in some spicy dip? Leave a comment below, share your bunny tray on Pinterest, or tag me on social—let’s spread some spring cheer together. Wishing you a holiday full of laughter, crunchy bites, and lots of bunny love!
FAQs
How far in advance can I prepare the Easter Bunny Veggie Tray?
You can prep the veggies and assemble the tray up to 4 hours ahead. Just cover tightly with plastic wrap and refrigerate. Add fresh parsley and dip just before serving for the best look.
What can I use instead of ranch dip for the bunny’s face?
Hummus, Greek yogurt dip, or dairy-free ranch are great alternatives. You can even use whipped feta or avocado dip for a fun twist!
Can I use cooked vegetables instead of raw?
Yes! Lightly steamed broccoli, cauliflower, or green beans work well. Just cool and dry them thoroughly before arranging.
How do I make the bunny’s features stick?
Use thicker dips (like Greek yogurt ranch) and pat veggies dry. Toothpicks help secure ears or eyes if needed—just remember to remove them before serving to kids.
What if I don’t have all the listed veggies?
No problem! Swap in whatever fresh veggies you have. The key is to mix colors and textures—think carrots, peppers, radishes, cucumbers, tomatoes, or even celery sticks. The bunny will look cute no matter what!
Pin This Recipe!

Easter Bunny Veggie Tray Recipe

This easy, colorful Easter Bunny Veggie Tray is a festive holiday appetizer that turns fresh vegetables and creamy ranch dip into an adorable bunny centerpiece. Perfect for Easter brunch, kid-friendly parties, or spring gatherings, it’s healthy, customizable, and guaranteed to get everyone reaching for seconds.
- Prep Time: 15 minutes
- Cook Time: 0 minutes
- Total Time: 15 minutes
- Yield: 8 servings 1x
- Category: Appetizer
- Cuisine: American
Ingredients
- 1 cup ranch dip or Greek yogurt ranch dip
- 1–2 cups cauliflower florets
- 2–3 whole black olives
- 2–3 baby carrots
- Radishes, thinly sliced
- Cherry tomatoes, a few
- 1–2 cups baby carrots
- 1 cup sugar snap peas or green beans
- 1 large red bell pepper, sliced into strips
- 1 large yellow bell pepper, sliced
- 1–2 cucumbers, sliced into rounds
- 1 cup broccoli florets
- Celery sticks, cut into short pieces
- Handful grape tomatoes
- Fresh parsley, a few sprigs
- Optional: Sliced radishes or colored bell peppers for extra color and crunch
Instructions
- Wash all vegetables thoroughly under cool running water. Pat dry with paper towels.
- Slice cucumbers into thin rounds, bell peppers into strips, celery into sticks, and radishes into thin slices. Cut cauliflower and broccoli into bite-sized florets. Peel carrots if desired.
- Place a small bowl of ranch dip in the center of your tray for the bunny’s face. Surround the bowl with a ring of cauliflower florets to create a fluffy bunny face outline.
- Use black olives for eyes (press gently into the dip), one olive for the nose, and two baby carrot pieces for teeth just below the dip bowl. Add sliced radishes or cherry tomatoes for rosy cheeks.
- On each side of the bunny face, create tall ears using rows of baby carrots for the outer edge. Line the inside with red bell pepper strips and a few radish slices for pink ear centers. Secure with toothpicks if needed.
- Below the face, create the bunny’s body with overlapping cucumber rounds. Add broccoli florets and snap peas around the body for extra green and texture. Place small clusters of baby carrots or celery sticks on each side for paws.
- Fill in any gaps with grape tomatoes, yellow bell pepper strips, and extra radish slices. Scatter parsley sprigs around the edges for garnish.
- Step back and check your bunny—adjust features as needed. Pat veggies dry again if they slide, and add more colorful veggies if desired.
- Serve immediately at room temperature, or cover tightly with plastic wrap and refrigerate for up to 4 hours. Add fresh parsley or extra dip just before serving.
Notes
Dry veggies thoroughly to prevent sogginess. Use toothpicks to secure bunny ears if needed, but remove before serving to kids. Customize with seasonal veggies or dips (hummus, Greek yogurt, dairy-free ranch). Prep up to 4 hours ahead and refrigerate. For vegan or dairy-free, swap ranch dip for hummus or vegan dip.
Nutrition
- Serving Size: About 1 cup mixed ve
- Calories: 90
- Sugar: 6
- Sodium: 250
- Fat: 5
- Saturated Fat: 1
- Carbohydrates: 14
- Fiber: 3.5
- Protein: 3
Keywords: Easter, bunny, veggie tray, holiday appetizer, healthy, kid-friendly, spring, ranch dip, vegetarian, gluten-free, party food


