Introduction
Let me tell you, the smell of sizzling bacon mingling with fresh spring peas and garlic butter is one of those kitchen moments that just stops you in your tracks. The first time I tossed these vibrant peas in garlicky butter alongside crispy bacon, I was instantly hooked—the kind of moment where you pause, take a deep breath, and just smile because you know you’re onto something truly special. It was years ago, when I was knee-high to a grasshopper, that my grandma whipped up a side dish like this for Sunday dinner, and honestly, I wish I’d discovered this recipe much sooner.
This savory garlic butter spring peas with crispy bacon recipe has become a staple at our family gatherings. My crew can’t stop sneaking bites off the pan while it cools (and who can blame them?). It’s dangerously easy but offers pure, nostalgic comfort that brightens up any dinner plate. You know what? Whether you’re looking for a dazzling potluck side or a sweet treat for your kiddos who claim they “don’t like veggies,” this recipe is your new best friend. I’ve tested it a dozen times (in the name of research, of course), and it never disappoints.
Why You’ll Love This Recipe
Honestly, this savory garlic butter spring peas with crispy bacon recipe is one of those winners that checks all the boxes. From my experience, here’s why it’s worth bookmarking:
- Quick & Easy: Comes together in under 20 minutes, perfect for busy weeknights or when you need a last-minute side dish that wows.
- Simple Ingredients: No fancy grocery runs here; you probably have most of these in your pantry and fridge already.
- Perfect for Any Occasion: Whether it’s brunch, a cozy dinner, or a holiday feast, this side dish fits right in.
- Crowd-Pleaser: Kids and adults alike can’t get enough of the crispy bacon mixed with tender, garlicky peas.
- Unbelievably Delicious: The combo of buttery garlic and crunchy bacon takes simple spring peas to a whole new level of yum.
This isn’t just another veggie side. The magic here is in how the bacon fat infuses the peas while the garlic butter adds that silky richness. It’s comfort food reimagined—fresh, fast, but with all the soul-soothing satisfaction you want. I love how easy it makes impressing guests without the stress. Plus, it’s the kind of recipe that makes you close your eyes after the first bite and savor the moment.
What Ingredients You Will Need
This recipe keeps things straightforward with simple, wholesome ingredients to deliver bold flavor and satisfying texture without any fuss. Most are pantry staples, and substitutions are easy if needed.
- Spring peas (fresh or frozen) – about 1 pound (450g); fresh peas add a pop of sweetness, but frozen works great too.
- Bacon slices – 6 slices, thick-cut recommended for the best crispy texture (I like using Wright’s or Oscar Mayer for consistency).
- Unsalted butter – 3 tablespoons, softened (adds richness and helps the garlic flavor bloom).
- Fresh garlic cloves – 3 cloves, minced (the star of the dish; fresh is key for that punch).
- Salt and black pepper – to taste (I use kosher salt for better seasoning control).
- Fresh lemon juice – 1 teaspoon (optional, brightens all those buttery, savory notes).
- Fresh parsley – 2 tablespoons chopped (adds a fresh, herbal finish).
Substitution tip: For a dairy-free take, swap butter for olive oil or a plant-based butter alternative. If you’re gluten-free, no worries here since all ingredients are naturally free of gluten. For a vegetarian twist, replace bacon with smoked tempeh or mushrooms sautéed until crispy.
Equipment Needed
- Large skillet or frying pan – a 10-inch (25 cm) skillet works best for even cooking and crisping bacon.
- Wooden spoon or silicone spatula – for stirring the peas without scratching your pan.
- Sharp knife and cutting board – to mince garlic and chop parsley.
- Colander or sieve – to drain fresh peas or thaw frozen ones.
- Measuring spoons – for precise butter and lemon juice amounts.
If you don’t have a skillet, a heavy-bottomed sauté pan can work, but avoid nonstick pans with scratched surfaces to prevent sticking. Skillet maintenance? Season cast iron regularly, and for stainless steel, preheat well before adding butter to prevent sticking.
Preparation Method
- Prepare the peas: If using fresh peas, shell and rinse them under cold water, then drain well. If frozen, rinse briefly under warm water to thaw slightly, then drain. (About 5 minutes)
- Cook the bacon: Heat your skillet over medium heat. Add the bacon slices in a single layer. Cook until crispy, about 6–8 minutes, flipping halfway through. Transfer cooked bacon to a paper towel-lined plate to drain. Reserve about 1 tablespoon of bacon fat in the pan. (8–10 minutes)
- Sauté the garlic: Lower heat to medium-low and add butter to the bacon fat. Once melted, add minced garlic. Stir constantly for 1–2 minutes until fragrant but not browned (burnt garlic tastes bitter!).
- Add the peas: Toss peas into the skillet. Stir to coat them evenly with the garlic butter and bacon fat. Cook for 3–4 minutes, stirring occasionally, until peas are tender but still vibrant green.
- Season and finish: Crumble the crispy bacon and add it back to the pan. Stir in fresh lemon juice, salt, and pepper to taste. Toss gently to combine everything well. Remove from heat and sprinkle chopped parsley over the top.
- Serve immediately: Transfer to a warm serving dish and enjoy the balance of buttery, garlicky, and smoky flavors.
Pro tip: Watch your garlic closely in step 3—once it starts to turn golden, it’s time to add the peas. Also, don’t overcook the peas; they should still have a slight bite to keep the texture lively. This recipe comes together fast, so prep everything ahead to avoid scrambling at the last minute.
Cooking Tips & Techniques
Some tricks I’ve learned from testing this recipe several times:
- Use thick-cut bacon: It crisps up better and renders more flavorful fat to coat your peas.
- Don’t skip the butter: It adds a silky richness that plain oil just can’t match, especially when combined with garlic.
- Garlic timing is key: Add it to melted butter and bacon fat over medium-low heat to gently infuse flavor without burning.
- Peas texture: Keep an eye on your peas—they should be tender but still have a slight snap. Overcooking makes them mushy and dulls the bright green color.
- Multi-task efficiently: Cook bacon first, then use the same skillet for garlic and peas to save dishes and boost flavor.
- Season gradually: Add a pinch of salt early and adjust at the end; bacon adds saltiness, so taste before over-salting.
- Rest before serving: Let the dish sit for a minute off heat to meld flavors beautifully.
One time, I accidentally charred the garlic—lesson learned: low and slow is the way here! Also, reheating gently in a skillet preserves the crispness of bacon better than a microwave.
Variations & Adaptations
Here are some ways to make this recipe your own:
- Vegetarian version: Swap bacon for smoked paprika roasted mushrooms or tempeh bacon for that savory umami punch.
- Low-carb or keto-friendly: This recipe is naturally low-carb, but you can add a sprinkle of grated Parmesan for extra richness.
- Seasonal twist: In summer, toss in some fresh peas and mint for a bright, garden-fresh flavor. In fall, add a dash of cayenne or smoked chipotle powder for warmth.
- Cooking method: Try roasting peas and bacon on a sheet pan with garlic butter for a hands-off approach that brings out deeper caramelized flavors.
- Flavor customization: Add a squeeze of fresh orange juice instead of lemon for a sweeter citrus note or a sprinkle of chili flakes for heat.
Personally, I once added a handful of toasted pine nuts at the end for crunch and an extra nutty layer that wowed my dinner guests.
Serving & Storage Suggestions
This dish is best served warm, right off the stove, to enjoy that perfect balance of tender peas, melting butter, and crispy bacon. I like to plate it alongside roasted chicken or grilled steak—honestly, it brightens up any main.
For a casual dinner, serve it with crusty bread to soak up the garlicky butter sauce. It also pairs beautifully with a crisp white wine or a light sparkling water with lemon.
Leftovers keep well in an airtight container in the fridge for up to 3 days. When reheating, warm gently in a skillet over low heat to keep the bacon crispy; microwaving tends to soften it too much.
Flavors deepen after a day, so if you can wait, leftovers taste even better the next day!
Nutritional Information & Benefits
Per serving (about 1/4 of recipe): approximately 180 calories, 12g fat, 10g protein, 8g carbohydrates, and 3g fiber.
Spring peas are packed with fiber, vitamins A and C, and plant-based protein, making this side dish both nutritious and satisfying. The garlic adds antioxidants and supports heart health, while bacon provides protein and iron—just keep in mind the sodium content and enjoy in moderation.
This recipe fits nicely into low-carb and gluten-free diets and can be adapted for dairy-free needs. It’s a flavorful way to sneak more veggies onto your plate without sacrificing taste or comfort.
Conclusion
If you’re after a side dish that’s quick, tasty, and downright addictive, this savory garlic butter spring peas with crispy bacon recipe is a must-try. It’s simple enough for a weeknight but special enough to serve at your next holiday table. I love how it combines fresh, garden flavors with that irresistible bacon crunch—honestly, it feels like a warm hug on a plate.
Go ahead and customize it to your taste—add herbs, spice it up, or keep it classic. And please, share your tweaks or stories in the comments below—I’m always eager to hear how you make this recipe your own. Happy cooking and enjoy every buttery, garlicky, bacon-y bite!
FAQs
Can I use frozen peas for this recipe?
Absolutely! Frozen peas work great and save prep time. Just thaw them slightly under warm water and drain before cooking.
How do I make this dish vegetarian?
Replace the bacon with smoked mushrooms or tempeh bacon to keep that smoky, savory flavor without meat.
Can I prepare this recipe ahead of time?
You can prep the peas and bacon separately in advance, but it’s best to combine and cook right before serving for maximum freshness and texture.
What if I don’t have fresh garlic?
Fresh garlic is best, but in a pinch, use 1/2 teaspoon garlic powder. Add it later in the cooking to avoid burning.
How do I keep the bacon crispy when reheating leftovers?
Reheat gently in a skillet over low heat rather than microwaving to keep the bacon from getting soggy.
Pin This Recipe!
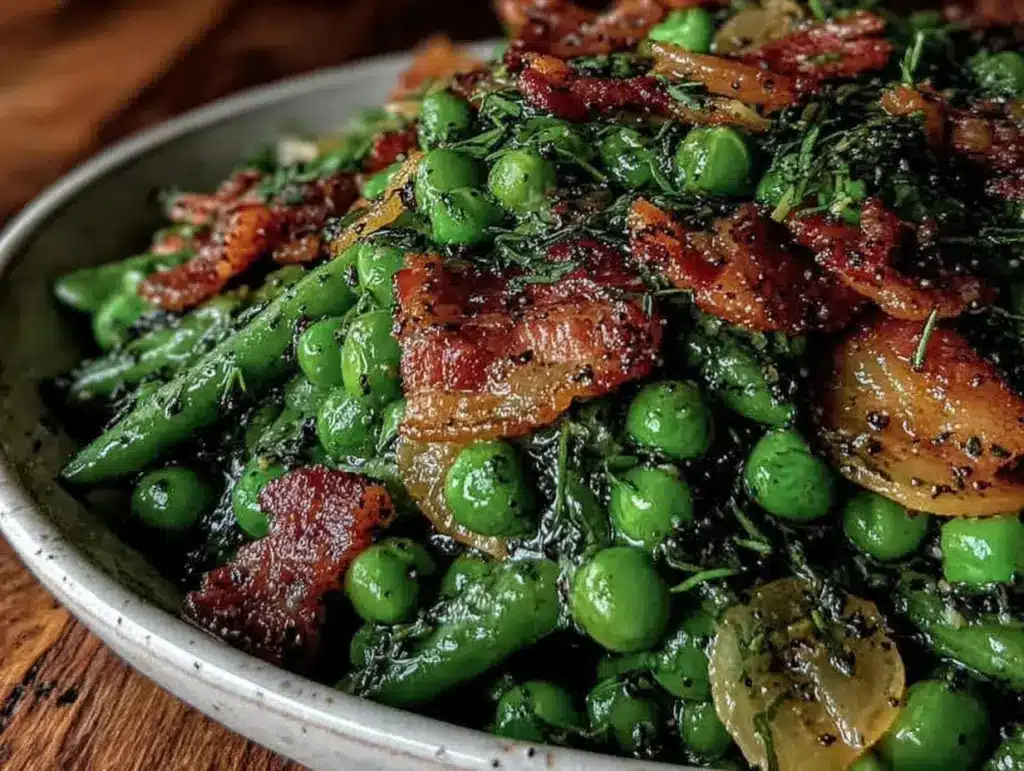
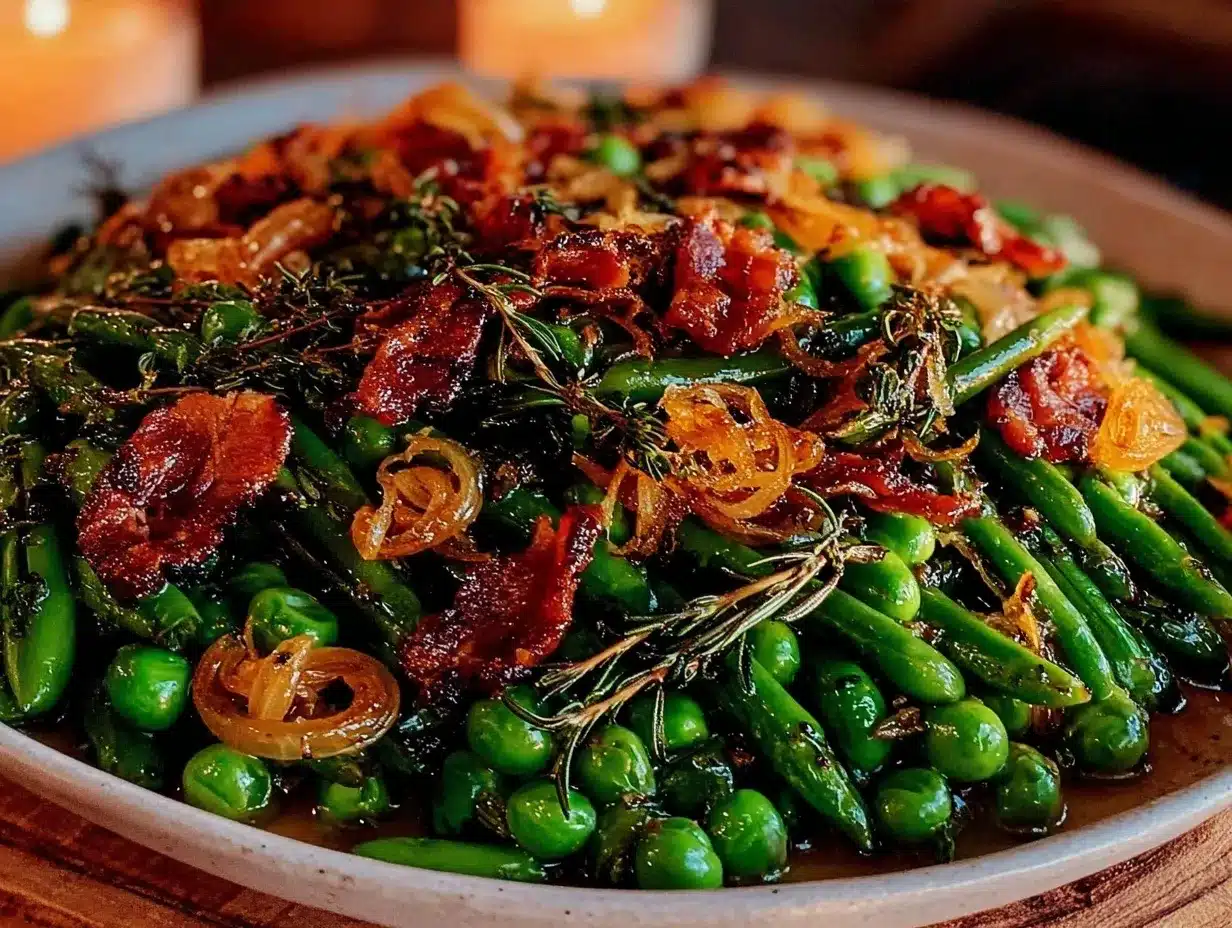
Savory Garlic Butter Spring Peas with Crispy Bacon

A quick and easy side dish featuring tender spring peas sautéed in garlic butter and crispy bacon, perfect for any occasion and loved by kids and adults alike.
- Prep Time: 5 minutes
- Cook Time: 15 minutes
- Total Time: 20 minutes
- Yield: 4 servings 1x
- Category: Side Dish
- Cuisine: American
Ingredients
- 1 pound (450g) spring peas (fresh or frozen)
- 6 slices thick-cut bacon
- 3 tablespoons unsalted butter, softened
- 3 cloves fresh garlic, minced
- Salt to taste
- Black pepper to taste
- 1 teaspoon fresh lemon juice (optional)
- 2 tablespoons fresh parsley, chopped
Instructions
- Prepare the peas: If using fresh peas, shell and rinse under cold water, then drain well. If frozen, rinse briefly under warm water to thaw slightly, then drain.
- Cook the bacon: Heat a skillet over medium heat. Add bacon slices in a single layer and cook until crispy, about 6–8 minutes, flipping halfway through. Transfer bacon to a paper towel-lined plate to drain. Reserve about 1 tablespoon of bacon fat in the pan.
- Sauté the garlic: Lower heat to medium-low and add butter to the bacon fat. Once melted, add minced garlic. Stir constantly for 1–2 minutes until fragrant but not browned.
- Add the peas: Toss peas into the skillet. Stir to coat evenly with garlic butter and bacon fat. Cook for 3–4 minutes, stirring occasionally, until peas are tender but still vibrant green.
- Season and finish: Crumble the crispy bacon and add it back to the pan. Stir in fresh lemon juice, salt, and pepper to taste. Toss gently to combine. Remove from heat and sprinkle chopped parsley over the top.
- Serve immediately: Transfer to a warm serving dish and enjoy.
Notes
Watch garlic closely to avoid burning; add peas once garlic starts to turn golden. Do not overcook peas to maintain texture and color. Use thick-cut bacon for best crispiness and flavor. For dairy-free, substitute butter with olive oil or plant-based butter. Reheat leftovers gently in a skillet to keep bacon crispy.
Nutrition
- Serving Size: About 1/4 of the rec
- Calories: 180
- Fat: 12
- Carbohydrates: 8
- Fiber: 3
- Protein: 10
Keywords: spring peas, garlic butter, crispy bacon, side dish, easy recipe, quick, family favorite, low-carb, gluten-free


