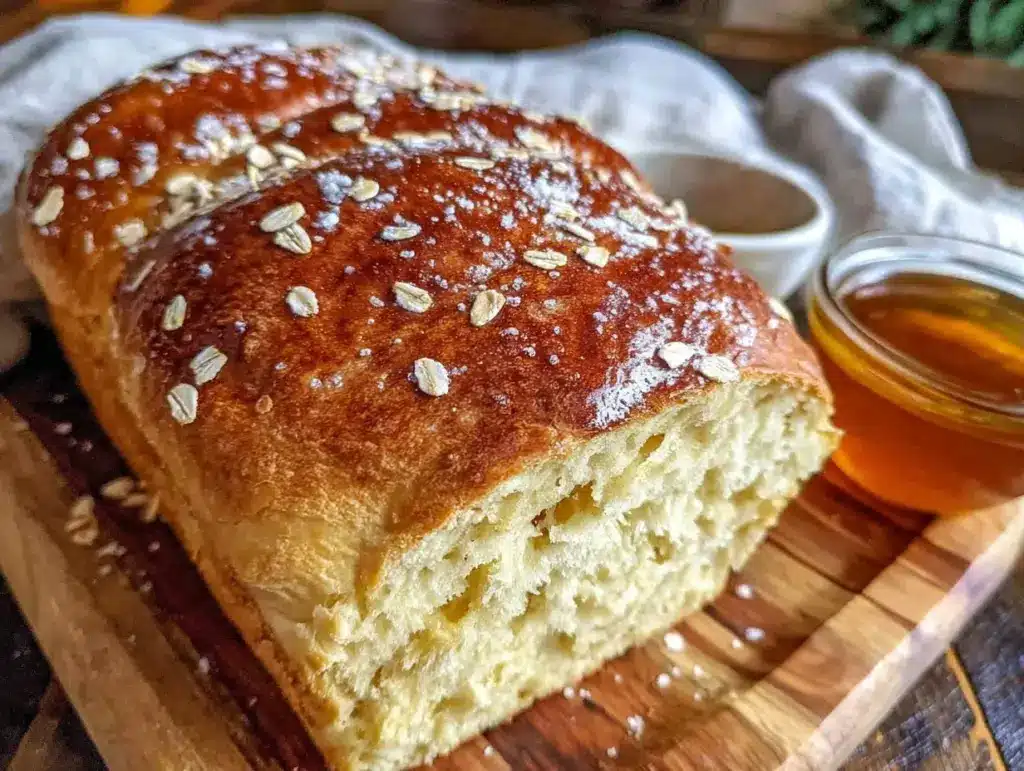
“You know that moment when you realize you forgot to buy bread, and all you’ve got is a handful of oats and honey sitting on the counter?” That was me last Tuesday afternoon, staring down my pantry and wondering if I could just whip something up without a last-minute store run. It wasn’t supposed to be a full baking day—just a quick fix. But honestly, what came out of that little experiment was this Wholesome Honey Oat Bread with Soft Tender Crumb that I’ve made three times since. I wasn’t expecting much at first, especially with a cracked mixing bowl (don’t ask), but the warm aroma filling the kitchen and the way the crumb felt so soft under my fingers made me forget all about the mess.
Maybe you’ve been there, too—craving a fresh, hearty loaf but not wanting to fuss over complicated recipes or hunt down obscure ingredients. This bread feels like a cozy hug on a cool morning, with its lightly sweet honey flavor and that rustic oat texture that’s just right. It’s not fancy, but it’s exactly the kind of homemade bread that stays with you. And let me tell you, once you try it fresh from the oven with a swipe of butter, you’ll understand why I keep coming back to this one.
What’s more, it’s made with simple pantry staples, and the tender crumb means it’s perfect for sandwiches, toast, or just snacking straight up. I’m excited to share how this humble recipe turned into a staple in my kitchen—it’s comforting, forgiving, and honestly, a little bit addictive.
Why You’ll Love This Recipe
From my experience testing this Wholesome Honey Oat Bread recipe, I can say it’s a keeper for several reasons. Here’s why it’s stood the test of time (and my occasional kitchen chaos):
- Quick & Easy: This bread comes together in about 3 hours, including rising time, which is pretty fast for homemade bread.
- Simple Ingredients: No need for fancy flours or special sweeteners—just oats, honey, basic flours, and a few pantry staples.
- Perfect for Breakfast or Snacks: Whether it’s sliced thick with jam or thin for a hearty sandwich, this bread fits the bill.
- Crowd-Pleaser: I’ve brought this loaf to potlucks where it vanished fast—kids and adults alike love the soft crumb and subtle sweetness.
- Unbelievably Delicious: The honey adds just the right touch of natural sweetness, while oats give a gentle texture without heaviness.
What sets this recipe apart is the way the oats are handled—they soak up moisture and lend a tender softness that many oat breads miss. Plus, the balance of honey and oat flavor is just right, never overpowering but always memorable. I’ve tweaked this recipe through trial and error (including that time I accidentally doubled the honey—oops!), and this version nails that perfect tender crumb every time. You won’t find a crust that’s too hard or a dry interior here—just a soft, wholesome slice that’s truly satisfying.
What Ingredients You Will Need
This recipe uses simple, wholesome ingredients to deliver bold flavor and satisfying texture without the fuss. Most of these are pantry staples, and if you don’t have something, I’ve got easy swaps for you.
- Rolled oats: 1 cup (90g), plus extra for sprinkling on top (adds hearty texture and a nutty flavor)
- Warm water: 1 ¼ cups (300ml) – to activate the yeast and soak the oats
- Active dry yeast: 2 ¼ teaspoons (one packet) – I trust Fleischmann’s for consistent results
- Honey: ¼ cup (85g) – use a mild-flavored honey like clover or wildflower for best taste
- Whole wheat flour: 1 ½ cups (180g) – contributes to flavor and nutrition
- All-purpose flour: 1 ½ cups (180g) – balances the texture to keep the crumb tender
- Salt: 1 ½ teaspoons – essential for flavor balance
- Unsalted butter: 2 tablespoons (28g), melted – adds richness and softness
- Milk: ¼ cup (60ml), warmed – helps with a tender crumb (can substitute dairy-free milk)
Substitution tips: For gluten-free options, replace all-purpose and whole wheat flour with a gluten-free flour blend and add a teaspoon of xanthan gum to help with structure. Use coconut or almond milk if you want a dairy-free loaf. If you prefer less sweetness, reduce honey to 3 tablespoons.
Equipment Needed
- Large mixing bowl: For combining ingredients. A glass or metal bowl works well; I like my Pyrex one because it’s easy to clean.
- Measuring cups and spoons: Precise measurements are key for consistent bread, especially with yeast.
- Wooden spoon or silicone spatula: For mixing the dough initially.
- Loaf pan: 9×5 inches (23×13 cm) – standard size for shaping the bread.
- Kitchen towel or plastic wrap: To cover the dough while it rises.
- Cooling rack: To let the bread cool evenly after baking.
If you don’t have a loaf pan, a baking sheet lined with parchment paper and shaped dough will also work, though the loaf will be wider and shorter. For a budget-friendly option, a clean tin foil tray can substitute in a pinch. When it comes to kneading, your hands are the best tool, but a stand mixer with a dough hook can save effort if you have one. Just remember to clean your equipment well to avoid any yeast residue for next time!
Preparation Method

- Soak the oats: In a large bowl, combine 1 cup (90g) rolled oats and 1 ¼ cups (300ml) warm water (around 110°F/43°C). Stir gently and let soak for 15 minutes. This softens the oats and helps them blend into the dough more easily.
- Activate the yeast: Sprinkle 2 ¼ teaspoons active dry yeast over the soaked oats. Add 1 tablespoon of honey from the total amount to feed the yeast. Stir lightly and wait 5–7 minutes until foamy. If it doesn’t foam, your yeast might be old or water too hot/cold, so start over.
- Mix dry ingredients: In a separate bowl, whisk together 1 ½ cups (180g) whole wheat flour, 1 ½ cups (180g) all-purpose flour, and 1 ½ teaspoons salt. This helps distribute the salt evenly.
- Combine wet and dry: Once the yeast mixture is bubbly, add the remaining 3 tablespoons honey, 2 tablespoons melted unsalted butter, and ¼ cup (60ml) warmed milk. Stir to combine.
- Add flour gradually: Slowly add the flour mixture to the wet ingredients, stirring with a wooden spoon or spatula until a sticky dough forms. The dough should be tacky but not overly wet. If too sticky, add a bit more flour, a tablespoon at a time.
- Knead the dough: Turn the dough onto a lightly floured surface. Knead for about 8–10 minutes until smooth and elastic. You’ll notice the dough becoming less sticky and more springy under your hands. If you’re using a stand mixer, knead with a dough hook on medium speed for 6–7 minutes.
- First rise: Shape the dough into a ball and place in a greased bowl. Cover with a kitchen towel or plastic wrap. Let it rise in a warm, draft-free spot for 1 to 1 ½ hours, or until doubled in size. I like to set mine near the oven light or on top of my fridge.
- Shape the loaf: Once risen, punch down the dough gently to release air. Turn it out onto a floured surface and shape into a loaf by folding edges under to create surface tension.
- Prepare the pan & second rise: Grease a 9×5 inch loaf pan and sprinkle the bottom with a few oats for a rustic touch. Place the shaped dough seam side down in the pan. Cover again and let rise for 45 minutes to 1 hour, until puffed.
- Preheat and bake: Preheat your oven to 375°F (190°C). Just before baking, brush the top of the loaf lightly with water or milk and sprinkle with rolled oats. Bake for 35–40 minutes, until the crust is golden and the loaf sounds hollow when tapped.
- Cool the bread: Remove the bread from the pan and transfer to a cooling rack. Let it cool completely before slicing for the best texture and crumb. I know it’s tempting to slice warm bread, but patience really pays off here.
Cooking Tips & Techniques
Honestly, baking bread can feel intimidating, but this recipe is forgiving if you keep a few things in mind. Here are some tips I’ve learned the hard way:
- Water temperature: Yeast loves warmth but hates heat. Aim for 105–115°F (40–46°C). Too hot and the yeast dies; too cold and it won’t activate properly. I usually test with a kitchen thermometer or just go for warm bath water temperature.
- Kneading by hand: It’s tempting to rush, but kneading builds gluten, which gives structure. If your dough is still super sticky after 10 minutes, sprinkle a pinch more flour. It’s easier to add flour than fix dough that’s too dry.
- Rising environment: Yeast loves warmth and humidity. If your kitchen is cold, try placing the dough inside your oven with just the light on (oven off) or on top of a warm appliance.
- Baking time check: Every oven is a little different. If your bread browns too fast, tent it with foil after 25 minutes. Use the hollow tap test to check doneness.
- Storing fresh bread: Avoid plastic bags right away—they trap moisture and soften crust too much. Instead, wrap cooled bread in a clean kitchen towel or store in a bread box.
One lesson I learned was to never skip the second rise. I once baked a loaf without it because I was in a rush. The crumb was dense and chewy in a bad way. Letting the dough puff up fully during the second rest is what gives that soft, tender crumb everyone loves here.
Variations & Adaptations
- Gluten-Free Version: Swap the wheat flours with a 1:1 gluten-free flour blend and add 1 teaspoon xanthan gum. Use almond or oat milk instead of dairy, and check the dough consistency—it may be a bit stickier.
- Seeded Oat Bread: Add ¼ cup mixed seeds (sunflower, pumpkin, flax) into the dough for extra crunch and nutrition. Sprinkle some on top before baking for a beautiful finish.
- Vegan Adaptation: Replace butter with coconut oil or vegan margarine. Use plant-based milk and substitute honey with maple syrup. The crumb remains soft and tender.
- Whole Grain Boost: Replace ½ cup whole wheat flour with spelt or rye flour for a different flavor profile. The loaf will be heartier but still soft.
- Personal Twist: I once stirred in cinnamon and chopped walnuts for a cozy fall loaf. It wasn’t traditional, but it was a hit for breakfast with cream cheese.
Serving & Storage Suggestions
This Wholesome Honey Oat Bread is best enjoyed fresh, but it holds up well for days if stored right. Serve it slightly warm or at room temperature for the softest experience. Toasting it brings out a lovely nuttiness and crisps the edges just right.
Pair it with creamy butter, your favorite jam, or even savory toppings like avocado or smoked salmon. It’s also a delicious base for sandwiches—try turkey and cranberry for a seasonal treat.
To store, wrap the cooled loaf in a clean kitchen towel or place it in a paper bag to keep the crust from getting soggy. For longer storage, slice and freeze in airtight bags; thaw slices at room temperature or toast directly from frozen.
Flavors mellow and blend over a day or two, so if you have leftovers, try making French toast or breadcrumbs to avoid waste. The oats in the bread add a lovely texture that holds up well even after reheating.
Nutritional Information & Benefits
Each slice (about 1/12 loaf) contains approximately:
| Calories | 120 |
|---|---|
| Carbohydrates | 22g |
| Protein | 4g |
| Fat | 2g |
| Fiber | 3g |
The oats provide soluble fiber, which supports heart health and digestion. Honey adds natural antioxidants and a gentle sweetness without refined sugar. Using whole wheat flour boosts the nutritional profile with vitamins and minerals compared to white bread. This recipe is naturally free of artificial additives and can easily be made dairy-free or gluten-free as needed.
As someone who watches nutrition closely, I appreciate that this bread balances indulgence with wholesome ingredients. It’s a satisfying option that supports a balanced lifestyle without feeling like a compromise.
Conclusion
So, here’s the thing about this Wholesome Honey Oat Bread with Soft Tender Crumb: it’s approachable, forgiving, and genuinely delicious. Whether you’re new to bread baking or a seasoned pro, this recipe invites you to make it your own. I love it because it feels like a little celebration in the kitchen—a reminder that simple ingredients can come together to create something special.
Feel free to tweak the sweetness, swap flours, or add your favorite mix-ins. I’m excited for you to try it and hear how it fits into your kitchen adventures. If you give it a go, drop a comment below with your twists or questions—I love connecting with fellow bread lovers!
Remember, baking bread is as much about the journey as the loaf, so enjoy the process and the comforting aroma that fills your home. Happy baking!
Frequently Asked Questions (FAQs)
Can I use quick oats instead of rolled oats?
Quick oats are finer and absorb liquid faster, which might make the dough too wet or sticky. Rolled oats are best for this recipe to keep that chewy texture.
How do I know if my yeast is still good?
If your yeast doesn’t foam after mixing with warm water and a little honey or sugar within 5–7 minutes, it’s likely expired or killed by temperature. It’s best to start fresh with new yeast.
Can I make this bread without honey?
Yes! You can substitute honey with maple syrup, agave nectar, or even granulated sugar. Just keep the amount the same for balanced sweetness.
Why is my bread dense and not soft?
Common reasons include insufficient kneading, not enough rising time, or using too much flour. Make sure to knead until elastic and allow the dough to double in size during both rises.
Can I freeze this bread?
Absolutely! Slice the cooled bread and freeze in airtight bags. Toast slices straight from frozen or thaw at room temperature for soft texture.
Pin This Recipe!
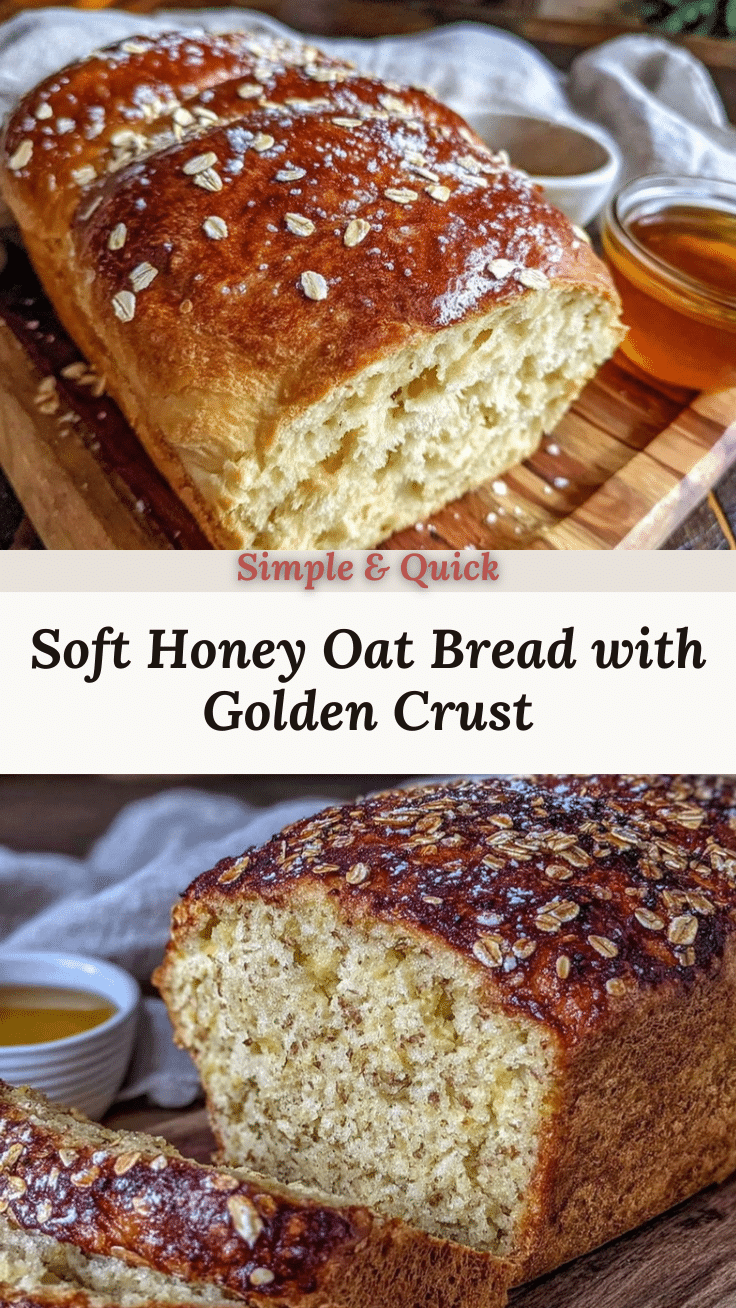
Wholesome Honey Oat Bread
A quick and easy homemade bread with a soft tender crumb, lightly sweetened with honey and textured with oats. Perfect for breakfast, snacks, or sandwiches.
- Prep Time: 20 minutes
- Cook Time: 35-40 minutes
- Total Time: 3 hours
- Yield: 12 servings 1x
- Category: Bread
- Cuisine: American
Ingredients
- 1 cup (90g) rolled oats, plus extra for sprinkling on top
- 1 1/4 cups (300ml) warm water (around 110°F/43°C)
- 2 1/4 teaspoons active dry yeast (one packet)
- 1/4 cup (85g) honey (mild-flavored like clover or wildflower)
- 1 1/2 cups (180g) whole wheat flour
- 1 1/2 cups (180g) all-purpose flour
- 1 1/2 teaspoons salt
- 2 tablespoons (28g) unsalted butter, melted
- 1/4 cup (60ml) warmed milk (can substitute dairy-free milk)
Instructions
- Soak the oats: In a large bowl, combine 1 cup rolled oats and 1 1/4 cups warm water. Stir gently and let soak for 15 minutes.
- Activate the yeast: Sprinkle 2 1/4 teaspoons active dry yeast over the soaked oats. Add 1 tablespoon of honey. Stir lightly and wait 5–7 minutes until foamy.
- Mix dry ingredients: In a separate bowl, whisk together whole wheat flour, all-purpose flour, and salt.
- Combine wet and dry: Once yeast mixture is bubbly, add remaining 3 tablespoons honey, melted butter, and warmed milk. Stir to combine.
- Add flour gradually: Slowly add flour mixture to wet ingredients, stirring until a sticky dough forms. Add more flour if too sticky.
- Knead the dough: Turn dough onto floured surface and knead 8–10 minutes until smooth and elastic. Alternatively, use stand mixer with dough hook for 6–7 minutes.
- First rise: Shape dough into ball, place in greased bowl, cover, and let rise in warm spot for 1 to 1 1/2 hours until doubled.
- Shape the loaf: Punch down dough, turn onto floured surface, and shape into loaf by folding edges under.
- Prepare pan & second rise: Grease 9×5 inch loaf pan, sprinkle bottom with oats, place dough seam side down, cover, and let rise 45 minutes to 1 hour until puffed.
- Preheat and bake: Preheat oven to 375°F (190°C). Brush top with water or milk, sprinkle oats, and bake 35–40 minutes until golden and hollow sounding when tapped.
- Cool the bread: Remove from pan, transfer to cooling rack, and cool completely before slicing.
Notes
Use warm water between 105–115°F to activate yeast properly. Knead dough until smooth and elastic for best texture. Allow both rises fully for a soft crumb. Tent bread with foil if browning too fast. Store cooled bread wrapped in a kitchen towel or paper bag to keep crust crisp. For gluten-free, substitute flours and add xanthan gum. For vegan, replace butter and honey with plant-based alternatives.
Nutrition
- Serving Size: 1 slice (1/12 of loa
- Calories: 120
- Fat: 2
- Carbohydrates: 22
- Fiber: 3
- Protein: 4
Keywords: honey oat bread, homemade bread, soft bread, easy bread recipe, whole wheat bread, oat bread, breakfast bread, sandwich bread


