Let me set the scene: It’s late evening, the kitchen is cozy, and the air carries a sweet, nutty aroma that makes you pause and smile. The first time I mixed up a batch of creamy no-bake overnight chocolate peanut butter oats, I honestly didn’t expect such magic from a handful of simple pantry staples. But the next morning, scooping up that rich, chocolatey swirl—peanut butter ribbons peeking through—was the kind of moment where you pause, take a deep breath, and just smile because you know you’re onto something truly special.
There’s something undeniably comforting about a recipe that requires zero fuss. I first stumbled onto this idea years ago when I was desperate for a quick breakfast that was both indulgent and nourishing. (And let’s face it, anything with chocolate and peanut butter gets my vote!) My family couldn’t stop sneaking spoonfuls off the top before I’d even set the bowls out—never mind waiting for breakfast. The creamy texture alone is enough to make anyone weak in the knees, and the combo of flavors? Pure, nostalgic comfort that takes me back to sticky-fingered childhood mornings with my grandma’s famous chocolate oatmeal.
Honestly, I wish I’d discovered this dangerously easy breakfast hack years ago. It’s perfect for busy workdays, lazy weekend brunches, or brightening up your Pinterest breakfast board with a pop of chocolatey goodness. Whether you’re prepping breakfast for your kids, yourself, or the whole crew, creamy no-bake overnight chocolate peanut butter oats are a staple for family gatherings, gifting, and those “just because” mornings when you want a warm hug in a bowl. Trust me, you’re going to want to bookmark this one (I tested it at least seven times in the name of research, of course!).
Why You’ll Love This Recipe
If you’re anything like me, you know the struggle of trying to balance taste, convenience, and nutrition first thing in the morning. After dozens of tweaks (and a few spectacular oat fails), I can honestly say these creamy overnight oats are the real deal. Here’s why:
- Quick & Easy: Mix everything in five minutes flat—no stove, no oven, just your fridge and a spoon. Perfect for those mornings when you’re running late or need breakfast ready to grab and go.
- Simple Ingredients: No fancy grocery trips required. You probably have old-fashioned oats, cocoa powder, peanut butter, and milk on hand. That’s it!
- Perfect for Busy Mornings or Meal Prep: Make a batch ahead for the week. These oats stay creamy and fresh for days, so you can hit snooze and still get a hearty breakfast.
- Crowd-Pleaser: Kids love the chocolate flavor, and adults appreciate the satisfying, protein-packed start. It’s been a hit at every brunch and sleepover I’ve hosted.
- Unbelievably Delicious: This isn’t just another overnight oats recipe. The secret is in the creamy peanut butter swirl and a touch of vanilla—every spoonful is a perfect blend of chocolate, nutty richness, and silky oats.
What sets this creamy no-bake overnight chocolate peanut butter oats recipe apart? Well, I blend the cocoa powder with a splash of maple syrup and a pinch of salt, which makes the chocolate flavor pop without being bitter. No chalky texture, no weird aftertaste—just pure, dessert-for-breakfast vibes. If you’ve ever had overnight oats that turned out gloopy or bland, this method fixes that with the right ratio of oats to milk and a dash of patience (overnight is truly worth it!).
This recipe isn’t just good—it’s the kind that makes you close your eyes and savor every bite. It’s comfort food made easy, healthier but with the same soul-soothing satisfaction. Impress guests with zero stress, or turn your Monday into a mini celebration. Honestly, after making these creamy overnight oats a few times, I started looking forward to mornings (and that’s saying something!).
What Ingredients You Will Need
This recipe uses simple, wholesome ingredients to deliver bold flavor and a satisfying texture, all without the fuss. Most of these are pantry staples—so you can whip up a batch anytime the craving hits. Here’s what you’ll need for creamy no-bake overnight chocolate peanut butter oats:
- Old-Fashioned Rolled Oats (1 cup / 100g) – The backbone of overnight oats. I prefer Bob’s Red Mill for the best texture, but any brand works. Don’t use quick oats—they get too mushy.
- Milk (1 cup / 240ml) – Any milk works! Dairy, almond, oat, or coconut. (I love unsweetened almond milk for a lighter breakfast.)
- Peanut Butter (2 tablespoons / 32g) – Creamy is best for smooth swirls. Use natural peanut butter for less sugar, or swap with sunflower seed butter for nut allergies.
- Cocoa Powder (2 tablespoons / 12g) – Dutch process for richer chocolate flavor, but regular works fine. Make sure it’s unsweetened.
- Greek Yogurt (1/3 cup / 80g) – Adds extra creaminess and protein. If you’re dairy-free, coconut yogurt is a great substitute.
- Maple Syrup or Honey (2 tablespoons / 30ml) – Sweetens and balances the cocoa. Choose pure maple syrup for a deep flavor.
- Vanilla Extract (1 teaspoon / 5ml) – Rounds out the flavors. Real vanilla is worth it for the aroma.
- Chia Seeds (1 tablespoon / 12g) – Optional, but helps thicken and adds fiber. If you don’t have them, just skip—they’re not make-or-break.
- Salt (Pinch) – Just a touch makes the chocolate and peanut butter pop. Don’t skip it!
- Chocolate Chips (2 tablespoons / 20g, optional) – Stir in for extra indulgence, or save for topping.
Ingredient Tips: For best results, use fresh oats and a smooth peanut butter. If you like your oats extra thick, add more chia seeds or reduce the milk slightly. For gluten-free oats, look for certified brands. In summer, swap the chocolate chips with fresh berries for a lighter twist.
Substitution Suggestions: Almond butter or cashew butter works great in place of peanut butter. For vegan oats, use plant-based milk and yogurt. Maple syrup can be swapped with agave or date syrup, depending on what you have.
And honestly, don’t stress if you’re missing an ingredient—these oats are super forgiving. I’ve subbed in cottage cheese for yogurt, used flax seeds instead of chia, and even thrown in some mashed banana for extra sweetness. It’s all about what makes you happy (and what’s in your pantry).
Equipment Needed
- Mixing Bowl – Any medium-sized bowl works. I’ve used everything from glass Pyrex to metal salad bowls. Just make sure it’s big enough to stir without splashing oats everywhere.
- Measuring Cups & Spoons – Precision is nice but not essential. I’ve eyeballed it in a pinch (not recommended, but hey, life happens).
- Whisk or Spoon – A whisk blends cocoa powder smoothly. A sturdy spoon works for thicker batters.
- Jar or Container with Lid – Mason jars look cute and are great for single servings. Any airtight container works. If you’re prepping for a crowd, a large glass storage dish is perfect.
- Rubber Spatula – Makes it easier to scrape every last bit of creamy goodness into jars. (Trust me, you don’t want to waste a drop.)
Alternatives: No jar? Cover your bowl tightly with plastic wrap. No spatula? Use a regular spoon. For mixing, I’ve even used a fork when all my whisks were in the dishwasher. If you’re on a budget, repurpose cleaned takeout containers—they work just fine.
Maintenance Tips: For containers, check that seals are tight to prevent leaks in the fridge. If you use glass jars, avoid sudden temperature changes (I cracked a few in my rookie days!). Wash everything well between uses to keep those oats tasting fresh batch after batch.
Preparation Method
-
Combine Dry Ingredients: In a mixing bowl, add 1 cup (100g) rolled oats, 2 tablespoons (12g) cocoa powder, 1 tablespoon (12g) chia seeds, and a pinch of salt. Whisk to combine. The oats should look evenly coated in cocoa; you’ll smell that chocolate right away.
Prep Note: If your cocoa clumps, sift it first. It’s worth the tiny extra step! -
Mix Wet Ingredients: In a separate small bowl, whisk together 1 cup (240ml) milk, 1/3 cup (80g) Greek yogurt, 2 tablespoons (30ml) maple syrup, and 1 teaspoon (5ml) vanilla extract until smooth.
Sensory Cue: The mixture should look creamy and slightly thick. -
Combine Wet and Dry: Pour the milk mixture into the oats. Stir well with a spoon or spatula, making sure to scrape the sides and bottom. The oats should be evenly moistened; the cocoa may leave some streaks, which is normal.
Troubleshooting: If the mixture looks too dry, add 2 tablespoons (30ml) more milk. -
Add Peanut Butter: Dollop 2 tablespoons (32g) peanut butter on top. Use a spoon to gently swirl it through the oats, leaving visible ribbons for a pretty look and pockets of flavor.
Prep Note: Don’t overmix—swirling gives a better texture! - Optional Add-Ins: Stir in 2 tablespoons (20g) chocolate chips or berries. (Sometimes I add chopped roasted peanuts for crunch.)
-
Portion and Chill: Spoon the mixture into jars or containers, filling about 3/4 full to allow for expansion. Cover tightly with lids.
Time Estimate: This takes about 2 minutes per jar. -
Refrigerate Overnight: Place jars in the fridge for at least 6 hours, ideally 8-12 hours. The oats will soak up the liquid and flavors, becoming thick and creamy.
Sensory Cue: In the morning, the oats should be set and spoonable, not runny. -
Serve: Give the oats a stir. Top with extra peanut butter, fresh fruit, or a sprinkle of cocoa powder if you like. Enjoy cold straight from the jar, or microwave for 30 seconds if you prefer it warm.
Efficiency Tip: Prep a double batch on Sunday night for grab-and-go breakfasts all week!
Warnings: Don’t skip the overnight chill—if you eat them right away, the oats will be chewy and the flavors won’t meld. If you notice any dry bits in the morning, just add a splash of milk and stir.
Cooking Tips & Techniques
Over the years, I’ve learned a few tricks to making creamy no-bake overnight chocolate peanut butter oats truly spectacular. Here’s what works best for me (and what I wish someone had told me sooner):
- Mix Wet and Dry Separately: It seems fussy, but mixing the cocoa and oats before adding liquid prevents clumps and chalky bits. Trust me—cocoa doesn’t like to dissolve!
- Don’t Overmix Peanut Butter: Swirling in the peanut butter instead of blending it through creates creamy bites and a pretty marbled look. Overmixing can make the oats dense.
- Watch the Liquid Ratio: Too much milk and the oats get soupy, too little and they’re stiff. Start with the recipe’s measurements and tweak based on your favorite brand of oats. Some soak up more than others.
- Chill Time Matters: Overnight is best. If you’re in a rush, 4 hours will do, but the texture won’t be as smooth. I’ve made this mistake—impatience leads to chewy oats!
- Add Toppings Last Minute: Fresh fruit, nuts, and chocolate chips are best added after chilling. They keep their crunch and flavor that way.
- Batch Prep: Make enough for three days at a time. The oats get creamier as they sit, and the flavors deepen. Just be sure to stir before serving—the peanut butter settles!
I’ve had a few fails—once, I added hot milk thinking it would speed things up (it didn’t, and the oats turned to paste). Another time, I forgot the salt and the chocolate tasted flat. So, don’t skip those little steps—they make all the difference. If you’re multitasking, prep everything in one bowl and portion into jars after mixing. And if you want perfectly creamy oats every time, stick with rolled oats and give the batch a good stir before chilling.
Variations & Adaptations
The beauty of creamy no-bake overnight chocolate peanut butter oats is how easily you can customize the recipe. Here are a few of my favorite twists:
- Gluten-Free: Use certified gluten-free oats. Everything else in the recipe is naturally gluten-free, so you’re set!
- Vegan: Swap Greek yogurt for coconut or almond yogurt, and use plant-based milk. Maple syrup is already vegan, so no worries there.
- Nut-Free: Use sunflower seed butter instead of peanut butter. It’s just as creamy and rich, with a slightly milder flavor.
- Seasonal Add-Ins: In summer, stir in fresh raspberries or sliced bananas. In fall, try a sprinkle of cinnamon and chopped apples. Winter calls for orange zest and dark chocolate chunks.
- High-Protein: Add a scoop of your favorite protein powder (vanilla or chocolate) with the dry ingredients. You may need a splash more milk to keep the texture creamy.
I’ve personally tried swapping out peanut butter for almond butter, and adding a layer of strawberry jam for “PB&J chocolate oats”—it’s a hit with my kids every time! If you’re short on time, skip the yogurt and use all milk, though the oats will be less creamy. For different cooking methods, you can microwave the oats for 1 minute in the morning if you prefer them warm (just stir well and let cool before eating).
Customize the sweetness to your taste—maple syrup, honey, agave, or even a mashed ripe banana all work. And if you’re watching allergens, just stick to seed butters and dairy-free options. This recipe adapts to whatever life (or your pantry) throws at you!
Serving & Storage Suggestions
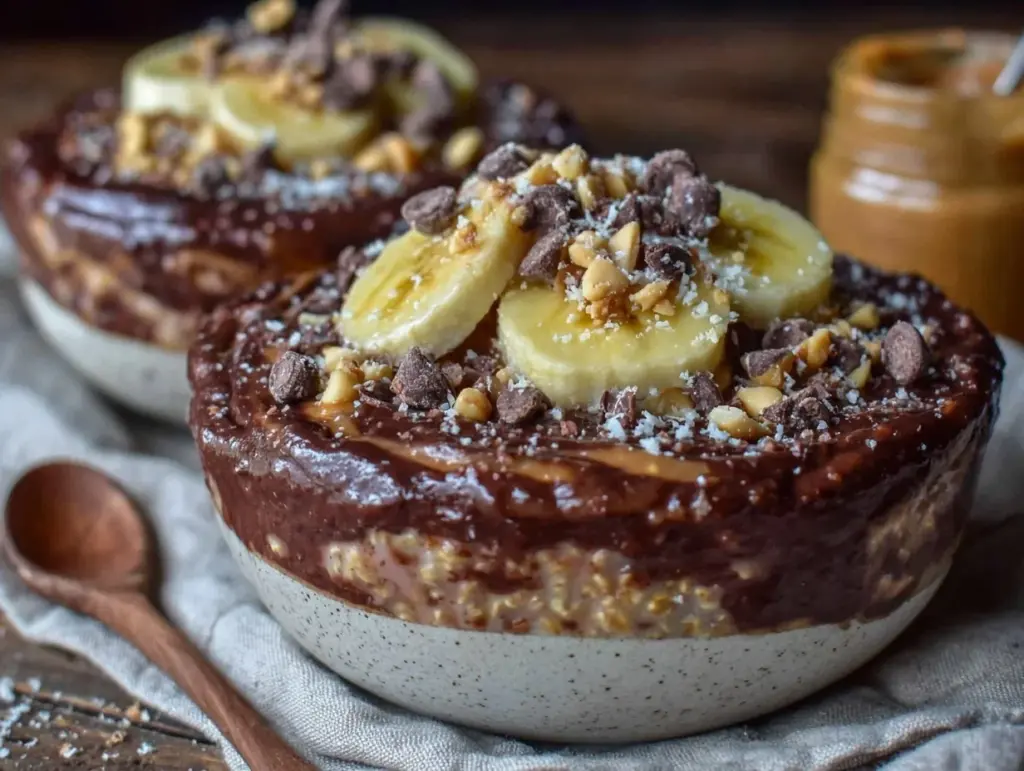
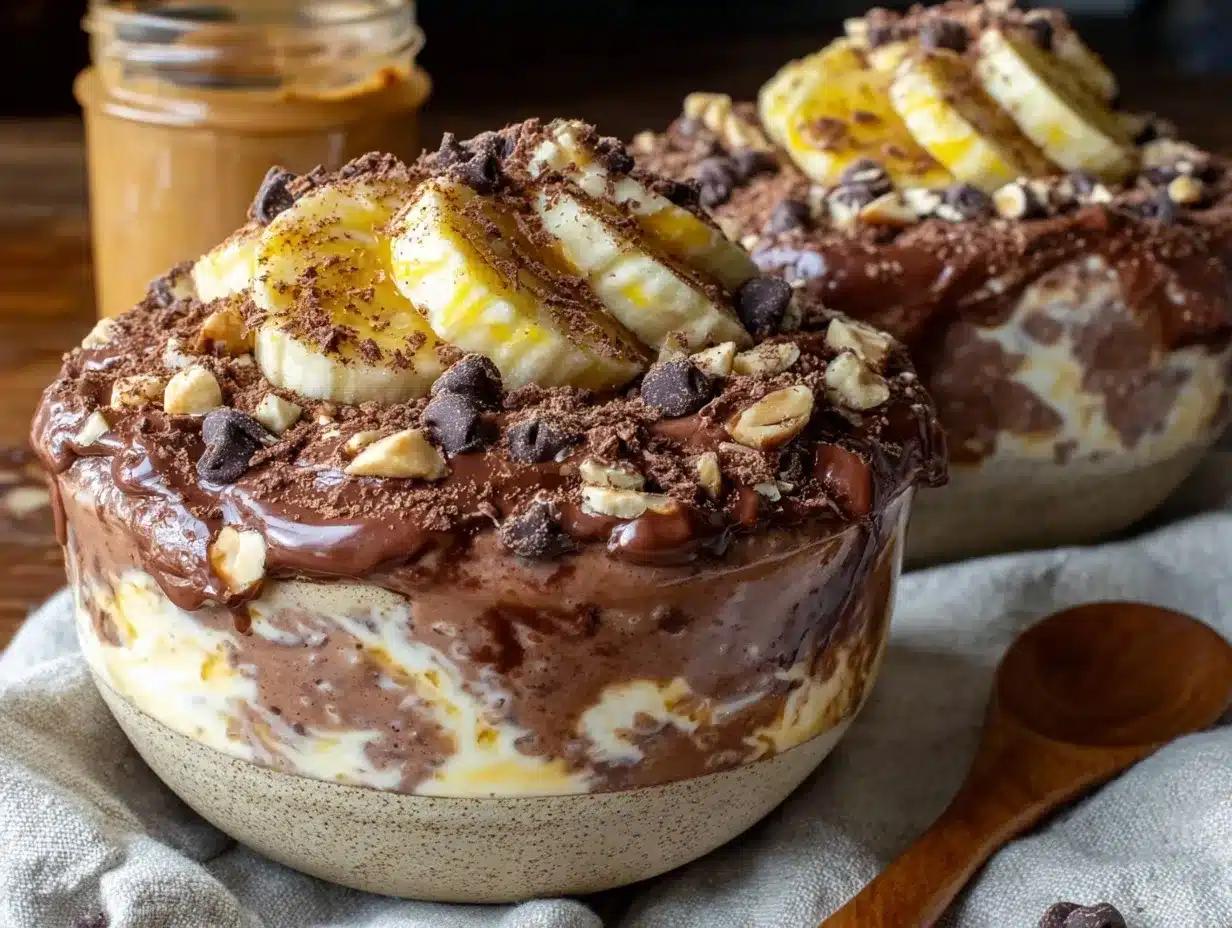
Creamy no-bake overnight chocolate peanut butter oats are best served cold, straight from the fridge. The texture is thick, almost pudding-like, with swirls of peanut butter and chocolate chips glittering on top. (Honestly, it looks Pinterest-perfect in a mason jar with a sprinkle of cocoa powder and sliced bananas!)
For a special touch, add a dollop of extra peanut butter, a handful of berries, or crunchy granola on top. Pair with a hot mug of coffee, a glass of cold milk, or even a smoothie for a complete breakfast.
Storage Tips: These oats keep well in the fridge for up to 4 days. Just make sure the container is sealed tight so the oats don’t dry out. If the oats get too thick, stir in a splash of milk before serving.
Freezing: You can freeze overnight oats for up to a month, but the texture will be a bit softer after thawing. Thaw overnight in the fridge and stir well before eating.
Reheating: If you want them warm, microwave for 30 seconds and stir. The flavors mellow and deepen after a day—so leftovers are almost better than fresh!
Nutritional Information & Benefits
Each serving of these creamy no-bake overnight chocolate peanut butter oats (about 1 cup/250g) delivers roughly:
- Calories: 350-400
- Protein: 13-16g (thanks to Greek yogurt and peanut butter)
- Fiber: 6-8g (oats plus chia seeds)
- Sugar: 8-10g (mostly from maple syrup)
Key Health Benefits: Oats are packed with beta-glucan fiber, which helps keep you full and supports heart health. Peanut butter provides healthy fats and protein for energy. Cocoa adds antioxidants, while chia seeds boost omega-3s and fiber. Greek yogurt brings calcium and gut-friendly probiotics.
Dietary Considerations: This recipe is easily made gluten-free and vegan. Watch for nut allergies, and substitute seed butter as needed. For low-sugar diets, use less maple syrup or swap with monk fruit sweetener.
From my own wellness journey, starting the day with balanced protein and fiber keeps me energized and satisfied (no mid-morning crash!). It’s a breakfast that feels indulgent but fuels you right.
Conclusion
If you’re searching for a breakfast that’s quick, delicious, and feels like a little treat, creamy no-bake overnight chocolate peanut butter oats are absolutely worth trying. They’re easy to customize, perfect for meal prep, and guaranteed to make mornings feel a bit more special—even when life is hectic.
I love this recipe not just for the flavors, but for the smiles it brings to my family (and honestly, for how often it saves me when I need something fast). Don’t be afraid to tweak it—add your favorite toppings, swap out ingredients, or make it your own signature breakfast bowl.
If you give this recipe a try, I’d love to hear how you adapted it! Drop a comment below, share your version on social media, or send your tweaks my way. Creamy overnight oats might just become your new breakfast staple—here’s to more happy mornings and chocolatey smiles!
Frequently Asked Questions
Can I make creamy no-bake overnight chocolate peanut butter oats without yogurt?
Absolutely! Just use extra milk in place of the yogurt. The oats will be slightly less creamy but still delicious and satisfying.
How long do overnight oats need to chill in the fridge?
For best texture, let them chill at least 6 hours—overnight is ideal. If you’re short on time, 4 hours works in a pinch.
Can I use steel-cut oats instead of rolled oats?
I don’t recommend it for this recipe. Steel-cut oats need more liquid and longer soaking time, and the texture will be much chewier. Stick with rolled oats for best results.
Are these overnight oats suitable for meal prep?
Yes! Make a batch for up to 4 days ahead. Store in individual jars in the fridge for grab-and-go breakfasts all week.
What can I substitute for peanut butter if I have a nut allergy?
Sunflower seed butter or soy nut butter work well. They offer a similar creamy texture and mild flavor, making the oats allergen-friendly.
Pin This Recipe!
Creamy No-Bake Overnight Chocolate Peanut Butter Oats
This easy overnight oats recipe combines creamy peanut butter, rich cocoa, and wholesome oats for a decadent, nutritious breakfast you can prep in minutes. Perfect for busy mornings, meal prep, or a comforting treat that feels like dessert for breakfast.
- Prep Time: 5 minutes
- Cook Time: 0 minutes
- Total Time: 8 hours 5 minutes
- Yield: 2 servings 1x
- Category: Breakfast
- Cuisine: American
Ingredients
- 1 cup old-fashioned rolled oats
- 1 cup milk (dairy or plant-based)
- 2 tablespoons creamy peanut butter
- 2 tablespoons unsweetened cocoa powder
- 1/3 cup Greek yogurt (or coconut yogurt for dairy-free)
- 2 tablespoons maple syrup or honey
- 1 teaspoon vanilla extract
- 1 tablespoon chia seeds (optional)
- Pinch of salt
- 2 tablespoons chocolate chips (optional)
Instructions
- In a mixing bowl, whisk together rolled oats, cocoa powder, chia seeds, and a pinch of salt until evenly combined.
- In a separate bowl, whisk milk, Greek yogurt, maple syrup, and vanilla extract until smooth and creamy.
- Pour the wet mixture into the dry ingredients and stir well, scraping the sides and bottom to ensure all oats are moistened.
- Dollop peanut butter on top and gently swirl it through the oats, leaving visible ribbons for texture.
- Stir in chocolate chips or berries if desired.
- Spoon the mixture into jars or containers, filling about 3/4 full to allow for expansion. Cover tightly with lids.
- Refrigerate overnight (at least 6 hours, ideally 8-12 hours) until thick and creamy.
- In the morning, stir the oats and top with extra peanut butter, fruit, or cocoa powder. Enjoy cold or microwave for 30 seconds if you prefer it warm.
Notes
For gluten-free, use certified gluten-free oats. For vegan, use plant-based milk and yogurt. Swirl peanut butter for best texture; don’t overmix. Add toppings after chilling for crunch. Adjust sweetness to taste. Oats keep up to 4 days in the fridge; add a splash of milk if too thick. Can be frozen for up to a month.
Nutrition
- Serving Size: About 1 cup (250g) p
- Calories: 375
- Sugar: 9
- Sodium: 180
- Fat: 14
- Saturated Fat: 4
- Carbohydrates: 48
- Fiber: 7
- Protein: 15
Keywords: overnight oats, chocolate peanut butter oats, no-bake breakfast, meal prep, healthy breakfast, easy oats, creamy oats, gluten-free, vegan option