Introduction
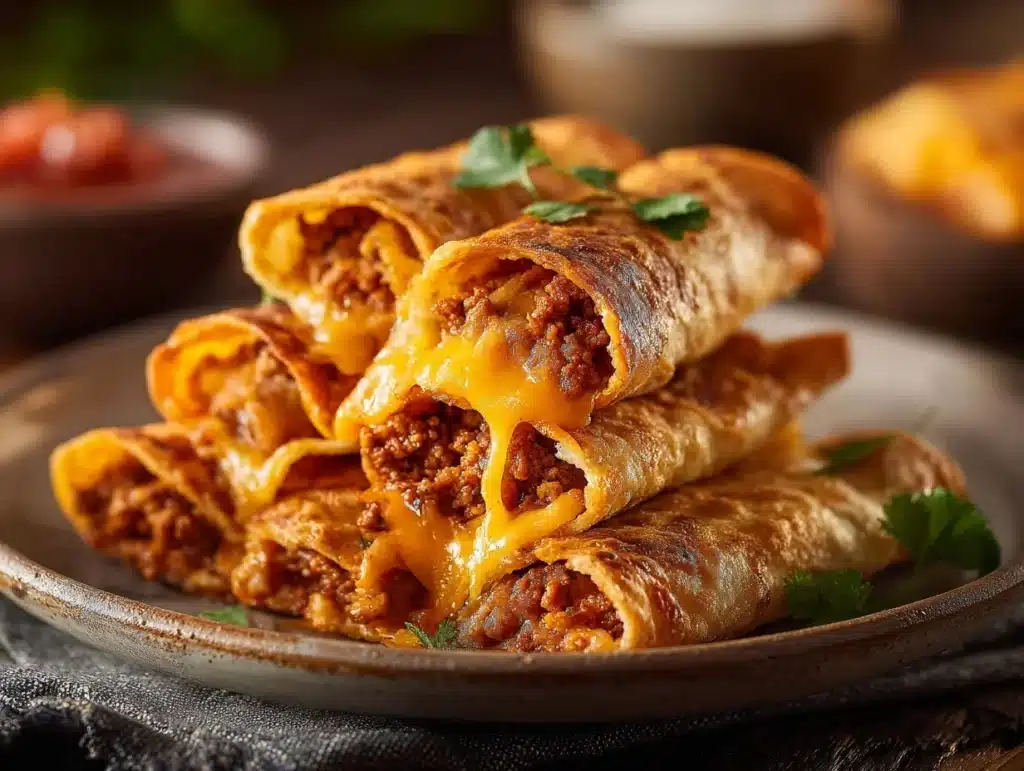
Picture this: cheesy, savory taco-flavored goodness wrapped in warm, golden pastry that’s perfectly handheld for snacking. Taco sticks are the appetizer you didn’t know you needed but won’t be able to stop making once you try them. They’re quick, easy, and ridiculously delicious. I first whipped these up for a game night with friends, and they were gone in minutes. They’re a little messy, hugely satisfying, and guaranteed to be a crowd-pleaser.
If you’re like me, you understand the joy of biting into something that’s crispy on the outside and packed with flavor on the inside. These taco sticks check all the boxes—cheese pull? Check. Spicy, seasoned beef? Check. Dippable? Double-check. But the real kicker is how simple they are to make. You don’t need fancy equipment or hours in the kitchen. Just a few pantry staples, a little prep, and you’re good to go.
Whether you’re hosting a party, looking for a fun family snack, or just craving something indulgent, these taco sticks are the answer. They’re a little bit comfort food, a little bit indulgence, and 100% irresistible. Let’s dive into this recipe—you won’t regret it!
Why You’ll Love This Recipe
- Quick & Easy: These taco sticks come together in under 30 minutes, making them perfect for impromptu gatherings or late-night cravings.
- Simple Ingredients: Everything you need is likely already in your kitchen—no special trips to the store required.
- Perfect for Parties: Bite-sized and handheld, taco sticks are ideal for potlucks, game nights, or holiday celebrations.
- Crowd-Pleaser: Adults and kids alike will devour these cheesy, flavorful snacks. They’re guaranteed to disappear quickly!
- Customizable: Whether you like it spicy, mild, or with extra cheese, this recipe can be tailored to fit your taste.
What makes these taco sticks stand out is the combination of simple ingredients and big flavor. The secret lies in the perfectly seasoned beef filling, gooey melted cheese, and flaky crescent roll dough. They’re comforting yet exciting—just the kind of snack that will make your guests ask for the recipe. Trust me, these are not your average party snacks!
What Ingredients You Will Need
This recipe uses easy-to-find ingredients that pack a punch of flavor. Here’s what you’ll need:
- Ground Beef: 1 pound, cooked and crumbled (lean ground beef works best).
- Taco Seasoning: 1 packet or homemade taco seasoning for bold flavor.
- Water: 2-3 tablespoons to mix with the taco seasoning.
- Crescent Roll Dough: 2 tubes (8 oz each) for wrapping the taco sticks.
- Shredded Cheese: 2 cups, any variety you love—cheddar and Monterey Jack are great options.
- Egg Wash: 1 egg, beaten (optional, for brushing on the dough).
- Optional Toppings: Chopped cilantro, sour cream, salsa, or guacamole for serving.
For substitutions: Use ground turkey or chicken instead of beef, or opt for a plant-based alternative for a vegetarian version. If you’re gluten-free, swap crescent roll dough for gluten-free puff pastry. You can also adjust the spice level by using mild or hot taco seasoning.
Equipment Needed
- Skillet: For browning and cooking the ground beef.
- Mixing Bowl: To combine the taco seasoning and water.
- Baking Sheet: Line it with parchment paper for easy cleanup.
- Rolling Pin: Optional, for smoothing out the crescent roll dough.
- Pastry Brush: For applying egg wash (if using).
Don’t worry if you don’t have a rolling pin—you can use a clean glass or bottle to roll out the dough. For the baking sheet, I recommend using parchment paper to prevent sticking and make cleanup a breeze!
Preparation Method
- Preheat your oven to 375°F (190°C). Line a baking sheet with parchment paper and set aside.
- In a skillet over medium heat, cook the ground beef until browned, breaking it up as it cooks. Drain any excess grease.
- Mix the taco seasoning with 2-3 tablespoons of water, then stir into the cooked beef. Let it simmer for about 2-3 minutes until the flavors meld together. Remove from heat and let it cool slightly.
- Unroll the crescent roll dough and separate into individual triangles. If you want a smoother dough, use a rolling pin to flatten each triangle slightly.
- Spoon about 1-2 tablespoons of the seasoned beef onto the wider end of each triangle. Add a generous pinch of shredded cheese on top.
- Roll the crescent dough around the filling, starting at the wide end and rolling toward the point. Pinch the edges to seal the filling inside.
- Place the taco sticks on the prepared baking sheet, seam-side down. Brush the tops with egg wash for a golden finish, if desired.
- Bake in the preheated oven for 12-15 minutes, or until the crescent rolls are golden brown and puffed.
- Remove from the oven and let cool for a few minutes before serving. Garnish with chopped cilantro if desired, and serve with sour cream, salsa, or guacamole for dipping.
Cooking Tips & Techniques
- Don’t overfill: Be careful not to add too much filling to the crescent rolls, as it can cause the dough to tear or the filling to seep out during baking.
- Seal properly: Pinch the edges tightly to ensure the filling stays inside the taco stick. If the edges won’t stick, just wet your fingers slightly and press them together.
- Chill the dough: If your crescent roll dough gets too soft or sticky, pop it in the fridge for a few minutes to firm it up.
- Experiment with cheese: While cheddar is a classic choice, you can try pepper jack for a spicy kick or mozzarella for a milder flavor.
- Batch baking: If making a large batch, keep the baked taco sticks warm in a low oven until ready to serve.
These tips are based on my own trial and error—trust me, they’ll help you get perfect taco sticks every time!
Variations & Adaptations
- Vegetarian: Replace the ground beef with black beans, refried beans, or a plant-based meat alternative. Add sautéed peppers and onions for extra flavor.
- Spicy Kick: For those who love heat, mix diced jalapeños into the beef filling or use a spicy shredded cheese blend.
- Seasonal Twist: In summer, add fresh corn kernels to the filling. In winter, try a smoky chipotle seasoning for a warmer flavor profile.
- Different Dough: Swap crescent roll dough for puff pastry or pizza dough for a different texture.
- Cheesy Upgrade: Sprinkle shredded cheese on top of the dough before baking for an extra cheesy crust.
Personally, I’ve tried adding sautéed onions and peppers to the filling, and it adds a wonderful depth of flavor. Get creative—this recipe is a great canvas for your favorite ingredients!
Serving & Storage Suggestions
These taco sticks are best served warm, straight out of the oven. Arrange them on a platter with small bowls of sour cream, salsa, and guacamole for dipping. If you’re feeling fancy, sprinkle a little chopped cilantro or diced green onions on top before serving.
If you have leftovers (though I doubt you will), store them in an airtight container in the fridge for up to 3 days. To reheat, pop them in a 350°F (175°C) oven for about 5 minutes or until warmed through. Avoid the microwave—it can make the dough soggy.
Pro tip: The flavors deepen as they sit, so taco sticks are even better the next day. If you’re planning ahead, you can assemble them a few hours early and bake them just before serving.
Nutritional Information & Benefits
While taco sticks are definitely an indulgent treat, they’re surprisingly balanced. Here’s a rough estimate per serving (1 taco stick):
- Calories: 200
- Protein: 10g
- Carbohydrates: 12g
- Fat: 12g
The ground beef provides a good source of protein and iron, while the cheese offers calcium and additional protein. You can make them healthier by using lean beef, low-fat cheese, and whole-grain dough. Just keep in mind they’re meant to be enjoyed as a fun, flavorful snack!
Conclusion
There’s a reason these taco sticks are such a hit—they’re simple, tasty, and endlessly customizable. Whether you stick to the classic recipe or add your own twist, they’re guaranteed to be a favorite. I love how they bring people together, whether it’s for a casual movie night or a big celebration.
So, what do you say? Ready to whip up a batch of these irresistible taco sticks? I’d love to hear how you make them your own! Share your variations, tips, or even your party success stories in the comments below. Happy snacking!
FAQs
Can I make taco sticks ahead of time?
Yes! You can prepare the taco sticks and keep them in the fridge for a few hours before baking. Just make sure they’re tightly covered to prevent the dough from drying out.
Can I freeze taco sticks?
Absolutely. Assemble the taco sticks, then freeze them on a baking sheet before transferring them to an airtight container. Bake them directly from frozen, adding a few extra minutes to the cooking time.
What dipping sauces go best with taco sticks?
Sour cream, salsa, guacamole, or even queso are fantastic options. You can also serve them with hot sauce for spice lovers.
Can I use store-bought taco seasoning?
Of course! Store-bought taco seasoning works perfectly, but you can also make your own if you prefer—just combine chili powder, cumin, garlic powder, onion powder, paprika, oregano, salt, and pepper.
Can I make these vegetarian or vegan?
Definitely! Swap the ground beef for beans or a plant-based meat alternative. Use dairy-free cheese and dough to make them vegan-friendly.
Pin This Recipe!

Irresistible Taco Sticks Recipe Easy Snack for Parties

Cheesy, savory taco-flavored goodness wrapped in warm, golden pastry—perfect for parties, family snacks, or indulgent cravings.
- Prep Time: 10 minutes
- Cook Time: 15 minutes
- Total Time: 25 minutes
- Yield: 16 taco sticks 1x
- Category: Appetizer
- Cuisine: Mexican-American
Ingredients
- 1 pound ground beef, cooked and crumbled
- 1 packet taco seasoning
- 2–3 tablespoons water
- 2 tubes crescent roll dough (8 oz each)
- 2 cups shredded cheese (cheddar or Monterey Jack)
- 1 egg, beaten (optional, for egg wash)
- Optional toppings: chopped cilantro, sour cream, salsa, guacamole
Instructions
- Preheat your oven to 375°F (190°C). Line a baking sheet with parchment paper and set aside.
- In a skillet over medium heat, cook the ground beef until browned, breaking it up as it cooks. Drain any excess grease.
- Mix the taco seasoning with 2-3 tablespoons of water, then stir into the cooked beef. Let it simmer for about 2-3 minutes until the flavors meld together. Remove from heat and let it cool slightly.
- Unroll the crescent roll dough and separate into individual triangles. If you want a smoother dough, use a rolling pin to flatten each triangle slightly.
- Spoon about 1-2 tablespoons of the seasoned beef onto the wider end of each triangle. Add a generous pinch of shredded cheese on top.
- Roll the crescent dough around the filling, starting at the wide end and rolling toward the point. Pinch the edges to seal the filling inside.
- Place the taco sticks on the prepared baking sheet, seam-side down. Brush the tops with egg wash for a golden finish, if desired.
- Bake in the preheated oven for 12-15 minutes, or until the crescent rolls are golden brown and puffed.
- Remove from the oven and let cool for a few minutes before serving. Garnish with chopped cilantro if desired, and serve with sour cream, salsa, or guacamole for dipping.
Notes
[‘Don’t overfill the crescent rolls to prevent tearing or leaking.’, ‘Pinch the edges tightly to seal the filling inside.’, ‘Chill the dough if it becomes too soft or sticky.’, ‘Experiment with different cheeses for varied flavors.’, ‘Keep baked taco sticks warm in a low oven for batch baking.’]
Nutrition
- Serving Size: 1 taco stick
- Calories: 200
- Fat: 12
- Carbohydrates: 12
- Protein: 10
Keywords: taco sticks, party snack, easy appetizer, cheesy snack, handheld snack