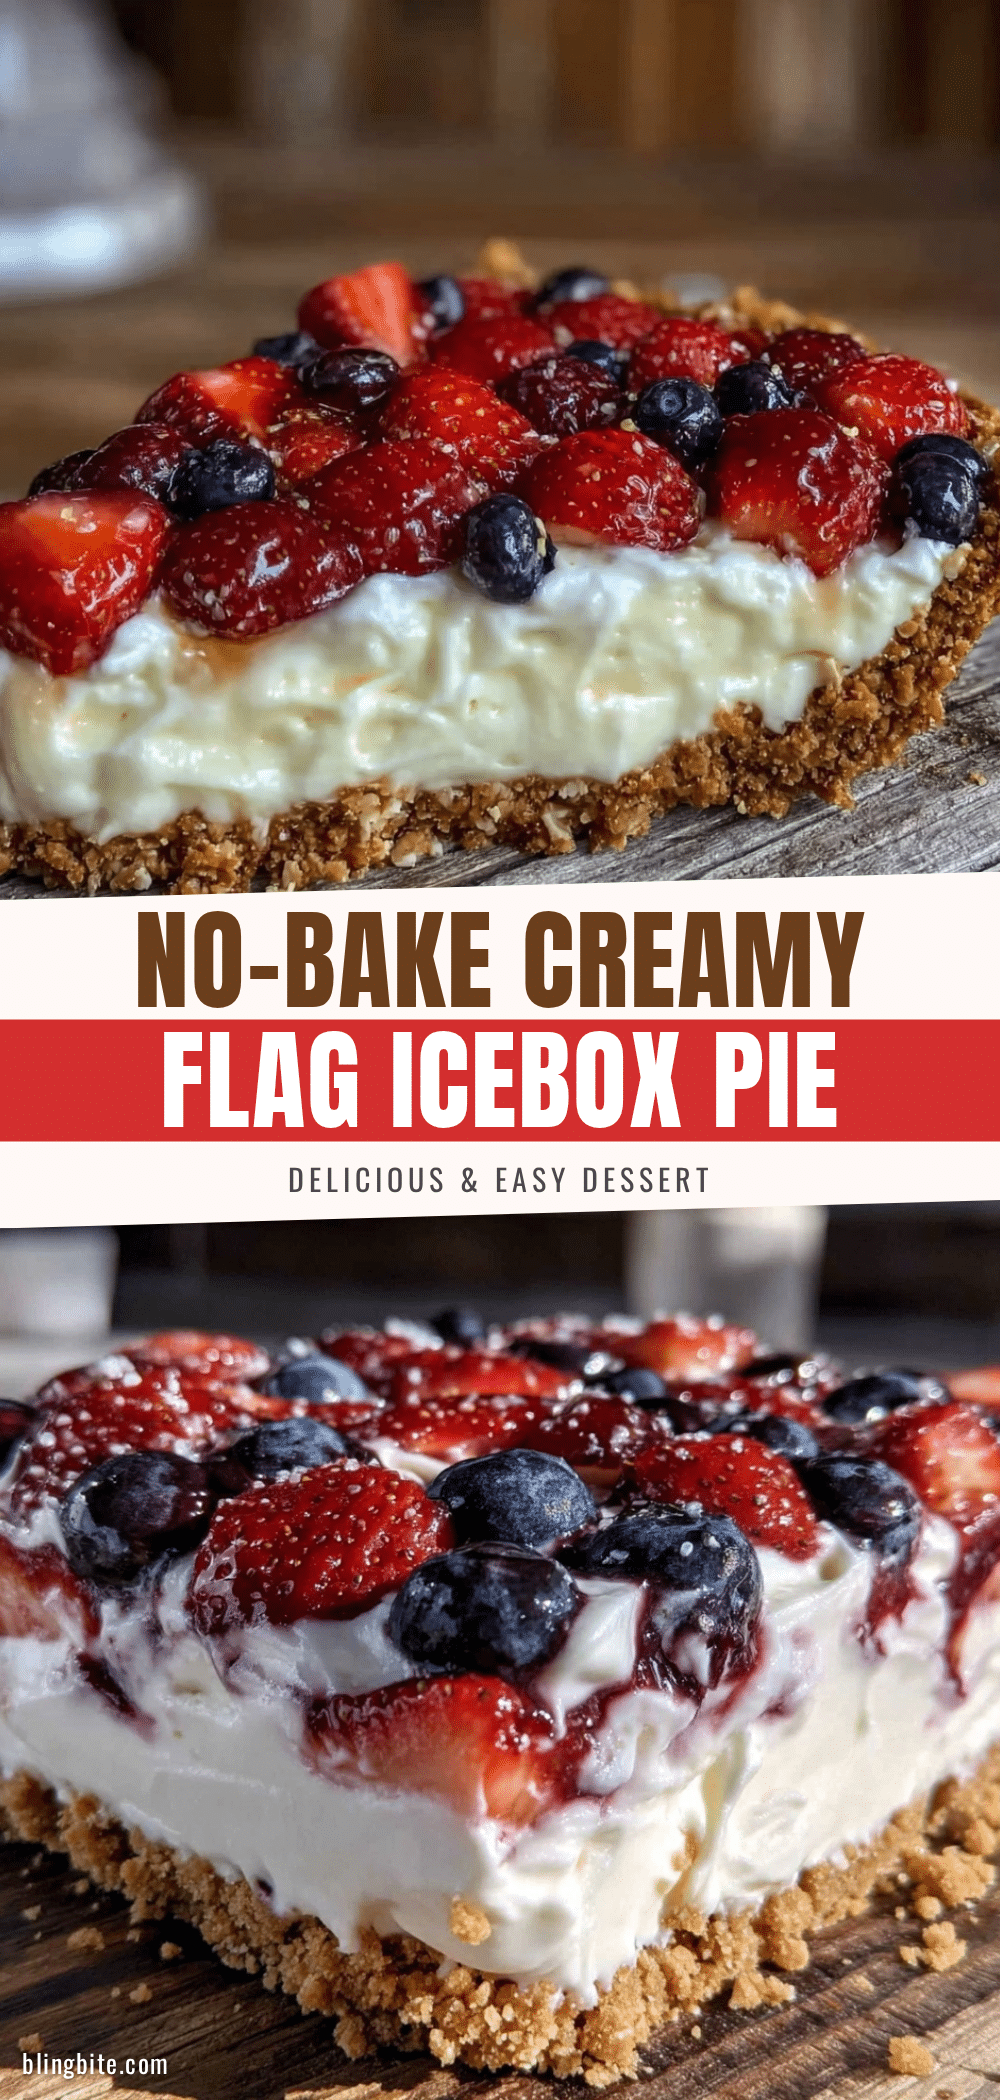
“You really have to try this pie,” my neighbor said, flashing me a grin as she handed over a plate with a slice of something that looked like a dessert version of a flag. Honestly, I raised an eyebrow — no-bake pies always sounded like a gamble to me. But that first bite of the Creamy No-Bake Flag Icebox Pie with Fresh Berries changed my mind fast. The cool creaminess paired with the bursts of fresh berries was like a summer afternoon wrapped up in dessert form. I found myself making this pie more times than I care to admit that season, tweaking it here and there — but always coming back to that original magic.
What struck me most was how simple it was to pull together. No oven fuss, no complicated steps, just straightforward ingredients that somehow come together to feel special. It’s the kind of recipe that can rescue a busy day or make an unplanned get-together feel festive. I’ve even brought it along to potlucks where it disappeared faster than I expected.
Every time I make the Creamy No-Bake Flag Icebox Pie with Fresh Berries, I get this quiet smile — not just because it’s delicious, but because it’s a little reminder that sometimes the easiest things leave the biggest impression.
Why You’ll Love This Recipe
After testing this recipe multiple times, I can say it hits all the right notes. Here’s why it stands out:
- Quick & Easy: You can whip this up in under 20 minutes — no baking needed, so it’s perfect for those spontaneous moments or busy evenings.
- Simple Ingredients: Most of what you need is probably sitting in your pantry or fridge already. No hunting down specialty items!
- Perfect for Celebrations: Whether it’s Fourth of July, summer barbecues, or any festive gathering, the patriotic look and fresh berries make it a showstopper.
- Crowd-Pleaser: Kids love the creamy texture and fruit layers, and adults appreciate the light, refreshing balance after a heavy meal.
- Unbelievably Delicious: The cream cheese and whipped topping blend into this silky filling, while the graham cracker crust adds the perfect crunch.
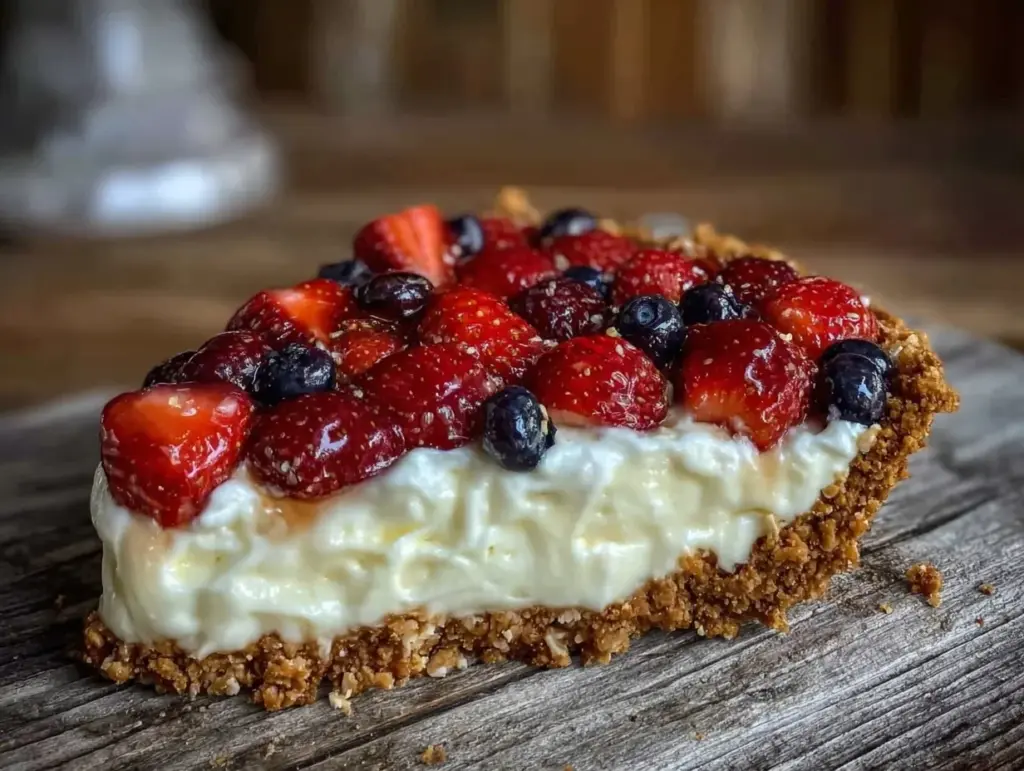
What really makes this recipe different is the way the layers come together visually and flavor-wise — the bright red of strawberries, the pure white cream, and the deep blue of blueberries arrange themselves like a sweet flag that’s as fun to look at as it is to eat. Plus, I like to use real cream cheese instead of shortcuts, which gives that ultra-smooth texture.
Honestly, this pie isn’t just a dessert; it’s a little burst of joy on a plate that’s easy enough to make whenever you want, yet impressive enough to serve at any occasion. It’s become my go-to for summer parties, much like that time I brought a puff pastry baked brie to a friend’s housewarming — simple, tasty, and always a hit.
What Ingredients You Will Need
This recipe keeps things straightforward with ingredients that combine to create a rich, creamy filling and a crunchy crust topped with fresh berries for that patriotic touch. Most are pantry staples or easy to find at the store.
- For the Crust:
- 1 ½ cups graham cracker crumbs (about 12 full sheets) – I prefer the honey-flavored kind for extra sweetness
- 5 tablespoons unsalted butter, melted (adds richness and binds the crust)
- 2 tablespoons granulated sugar (balances the tartness of the filling)
- For the Filling:
- 8 oz cream cheese, softened (room temperature for easy mixing) – I like Philadelphia brand for smoothness
- 1 cup powdered sugar (sifted to avoid lumps)
- 1 teaspoon pure vanilla extract (makes a big flavor difference, use real vanilla when possible)
- 1 ½ cups heavy whipping cream (cold, to whip to stiff peaks)
- For the Topping:
- 1 cup fresh strawberries, sliced (choose firm, ripe berries)
- 1 cup fresh blueberries (washed and patted dry)
- Optional: 1 tablespoon lemon zest (adds a subtle brightness if you want to get fancy)
Substitution tips: You can swap the heavy cream for a lighter whipped topping if you want to keep it low-fat, but the texture won’t be quite as luscious. For a gluten-free crust, almond flour mixed with a bit of coconut oil works well, though the flavor changes a bit. If fresh berries aren’t in season, frozen berries can be used but make sure to thaw and drain them well to avoid watery topping.
Equipment Needed
Nothing complicated here — just the basics you probably already own:
- 9-inch pie dish (glass or ceramic works best to show off the layers)
- Mixing bowls (one large for whipping cream, one medium for cream cheese mixture)
- Hand mixer or stand mixer (whipping the cream by hand is possible but takes some patience)
- Spatula for folding ingredients together
- Measuring cups and spoons for accuracy
- Knife and cutting board for slicing strawberries
If you don’t have a mixer, a sturdy whisk can do the job, but your arm might feel it afterward! For budget-friendly options, a simple glass pie plate and hand mixer combo will get the job done without breaking the bank. Just be sure to keep your cream cold before whipping — it makes all the difference.
Preparation Method

- Prepare the Crust: In a medium bowl, combine 1 ½ cups graham cracker crumbs, 5 tablespoons melted unsalted butter, and 2 tablespoons sugar. Stir until the mixture resembles wet sand. Press firmly into the bottom and about 1 inch up the sides of your 9-inch pie dish. Use the back of a spoon or your fingers for even packing. Chill in the fridge for at least 15 minutes to set while you prepare the filling.
- Make the Cream Cheese Filling: In a large bowl, beat the softened cream cheese with 1 cup powdered sugar and 1 teaspoon vanilla extract until smooth and creamy. This should take about 2-3 minutes with an electric mixer. Scrape down the sides as needed to avoid lumps.
- Whip the Cream: In a separate chilled bowl, whip 1 ½ cups cold heavy cream until stiff peaks form. This usually takes 3-5 minutes on medium-high speed. Be careful not to overwhip — you want it light and fluffy, not grainy or buttery.
- Combine Filling and Whipped Cream: Gently fold the whipped cream into the cream cheese mixture in thirds, using a spatula. Fold carefully to keep it light and airy — don’t rush or stir vigorously. The filling should be smooth and spreadable.
- Assemble the Pie: Pour the filling into the chilled graham cracker crust and smooth the top with a spatula.
- Arrange the Berries: For the flag effect, create a rectangle of blueberries in the upper left corner of the pie. Then, make horizontal rows of sliced strawberries across the rest of the pie to mimic stripes. If you want, sprinkle a little lemon zest over the top for a fresh scent and subtle zing.
- Chill to Set: Cover the pie loosely with plastic wrap and refrigerate for at least 4 hours or overnight. This resting time lets the flavors meld and the filling firm up to the right creamy consistency.
If your cream cheese lumps while mixing, a quick tip is to warm your bowl slightly or beat longer at low speed. Also, pressing the crust evenly helps avoid cracks or crumbling when slicing. I like to keep a damp towel under the pie plate while assembling to keep it steady.
Cooking Tips & Techniques
Making a no-bake pie sounds easy, but a few tricks can keep it from turning into a soggy or runny mess.
- Use Cold Ingredients: Cold heavy cream whips better, and cold cream cheese blends more smoothly. I pop the cream in the freezer for 15 minutes before whipping.
- Don’t Overmix: When folding the whipped cream into the cream cheese base, go slow. Overmixing deflates the air you just whipped in, leading to a dense filling.
- Press the Crust Firmly: This avoids it crumbling when you slice. I use the bottom of a measuring cup for even pressure.
- Chill Long Enough: At least 4 hours, preferably overnight. Patience here pays off with a slice that holds shape and has that luscious creamy texture.
- Choose Fresh Berries: The topping is the star visually and flavor-wise. Avoid soggy or moldy berries — rinse and dry them well to keep the crust crisp.
I once rushed the chilling step and ended up with a filling that was too soft to slice neatly — lesson learned the hard way! Also, if you want to speed things up, you can whip the cream and cream cheese mixture in the same bowl to save time, but be sure to chill the bowl first for better whipping results.
Variations & Adaptations
This pie is pretty flexible, so feel free to customize based on what you have or your taste preferences.
- Seasonal Fruit Swap: In fall, swap berries for sliced peaches and blackberries for a colorful twist. Winter? Try pomegranate seeds and kiwi slices.
- Gluten-Free Crust: Use almond flour mixed with melted coconut oil and a little sugar instead of graham crackers. It’s nutty and delicious.
- Lower-Sugar Version: Cut the powdered sugar in half and add a teaspoon of maple syrup or honey to the filling for natural sweetness.
- Mini Pies: Make individual servings in mason jars or small tart pans — perfect for parties or portion control.
- Vegan Adaptation: Substitute cream cheese with a vegan alternative and use coconut cream whipped topping. The flavor shifts but still tasty!
One of my favorite variations was adding a layer of homemade strawberry jam under the cream filling for extra berry flavor — it was a hit at a summer barbecue alongside some crispy buffalo cauliflower bites. Feel free to mix and match to suit your mood!
Serving & Storage Suggestions
This pie is best served chilled, straight from the fridge. The creamy filling holds its shape beautifully, so slice with a sharp knife for clean pieces. If you want a little extra flair, garnish slices with a few extra fresh berries or a sprig of mint.
Pair it with light beverages like iced tea, lemonade, or even a sparkling rosé for a festive touch. It’s a perfect finale after grilled meals or alongside casual finger foods.
Store leftovers covered tightly in the refrigerator for up to 3 days. The crust can soften a bit over time, so for the best crunch, serve within the first day. You can freeze this pie (wrapped well) for up to a month, but berries may lose their fresh texture after thawing.
Reheat isn’t really an option here, but letting the pie sit at room temperature for 10-15 minutes before serving can soften the filling slightly and release flavors.
Nutritional Information & Benefits
Here’s a rough estimate per serving (1/8 of pie): approximately 320 calories, 20g fat, 30g carbohydrates, and 4g protein. The fresh berries add valuable antioxidants, vitamins C and K, plus fiber.
The cream cheese provides calcium and protein, while the whipped cream adds richness but also saturated fat, so enjoy in moderation. This pie is gluten-friendly if you select gluten-free graham crackers or a nut-based crust.
For those watching sugar intake, reducing powdered sugar or choosing natural sweeteners helps make it a little lighter. From a wellness standpoint, this pie feels indulgent but includes fresh fruit, so it’s a sweet treat that feels a bit more balanced than heavy, all-butter desserts.
Conclusion
The Creamy No-Bake Flag Icebox Pie with Fresh Berries is one of those rare desserts that’s easy enough to make on a whim but looks and tastes like you put in way more effort. I love how it brings a little festive joy to the table without the usual fuss, making it a go-to for summer gatherings or any time you want a cool, creamy treat.
Feel free to play around with the fruit or crust to make it your own — that’s part of the fun. For me, this pie is a reminder that simple ingredients and a little creativity can turn into something memorable. If you’ve tried this recipe, I’d love to hear your favorite berry combos or twists in the comments below.
Happy pie making and here’s to many more sweet, no-bake moments!
Frequently Asked Questions
Can I make this pie ahead of time?
Yes! It actually tastes better after chilling overnight, which helps the filling set and flavors meld nicely.
What if I don’t have graham crackers for the crust?
You can substitute with crushed digestive biscuits, vanilla wafers, or even pretzels for a salty-sweet combo.
How do I prevent the crust from getting soggy?
Press the crust firmly and chill it well before adding the filling. Also, make sure berries are dry before placing on top.
Can I use frozen berries?
Frozen berries work in a pinch but thaw and drain them thoroughly to avoid extra moisture making the crust soggy.
Is it possible to make this pie dairy-free?
Yes! Use dairy-free cream cheese and coconut cream whipped topping, and select a dairy-free crust option like almond flour with coconut oil.
Pin This Recipe!
Creamy No-Bake Flag Icebox Pie with Fresh Berries
A quick and easy no-bake pie featuring a creamy cream cheese filling, a crunchy graham cracker crust, and fresh berries arranged like a patriotic flag. Perfect for summer celebrations and festive gatherings.
- Prep Time: 15 minutes
- Cook Time: 0 minutes
- Total Time: 4 hours 15 minutes
- Yield: 8 servings 1x
- Category: Dessert
- Cuisine: American
Ingredients
- 1 ½ cups graham cracker crumbs (about 12 full sheets)
- 5 tablespoons unsalted butter, melted
- 2 tablespoons granulated sugar
- 8 oz cream cheese, softened
- 1 cup powdered sugar
- 1 teaspoon pure vanilla extract
- 1 ½ cups heavy whipping cream, cold
- 1 cup fresh strawberries, sliced
- 1 cup fresh blueberries
- Optional: 1 tablespoon lemon zest
Instructions
- Prepare the crust: In a medium bowl, combine graham cracker crumbs, melted butter, and sugar. Stir until mixture resembles wet sand. Press firmly into the bottom and about 1 inch up the sides of a 9-inch pie dish. Chill in the fridge for at least 15 minutes.
- Make the cream cheese filling: Beat softened cream cheese with powdered sugar and vanilla extract until smooth and creamy, about 2-3 minutes with an electric mixer.
- Whip the cream: In a separate chilled bowl, whip cold heavy cream until stiff peaks form, about 3-5 minutes on medium-high speed.
- Combine filling and whipped cream: Gently fold whipped cream into the cream cheese mixture in thirds using a spatula, keeping it light and airy.
- Assemble the pie: Pour the filling into the chilled crust and smooth the top.
- Arrange the berries: Create a rectangle of blueberries in the upper left corner of the pie, then make horizontal rows of sliced strawberries across the rest of the pie. Optionally sprinkle lemon zest over the top.
- Chill to set: Cover loosely with plastic wrap and refrigerate for at least 4 hours or overnight.
Notes
Use cold heavy cream and cream cheese for best whipping results. Press crust firmly to avoid crumbling. Chill pie at least 4 hours or overnight for best texture. Fresh berries should be rinsed and dried well to prevent soggy crust. Frozen berries can be used if thawed and drained thoroughly. For gluten-free crust, substitute graham crackers with almond flour and coconut oil. For dairy-free, use vegan cream cheese and coconut cream whipped topping.
Nutrition
- Serving Size: 1 slice (1/8 of pie)
- Calories: 320
- Sugar: 20
- Sodium: 180
- Fat: 20
- Saturated Fat: 12
- Carbohydrates: 30
- Fiber: 3
- Protein: 4
Keywords: no-bake pie, icebox pie, creamy pie, fresh berries, patriotic dessert, summer dessert, easy pie recipe, graham cracker crust


