Introduction
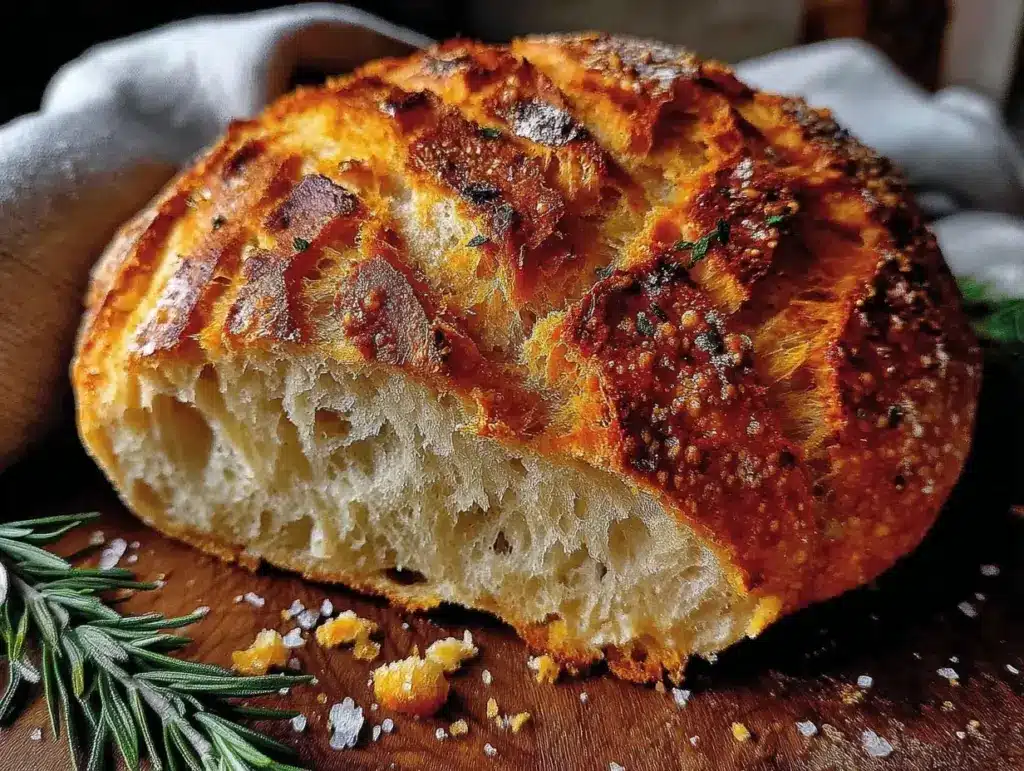
The sound of a crackling crust when you slice into a fresh loaf of crispy sourdough bread is pure magic, isn’t it? That gorgeous, golden artisan crust just begs you to tear off a hunk and savor the tangy aroma wafting out. Honestly, the first time I pulled my own homemade sourdough bread from the oven, I stood there in awe—steam curling up, the kitchen filled with that unmistakable earthy scent, and my family hovering, impatient to snag the first bite.
This recipe for crispy homemade sourdough bread with an artisan crust has become a staple in our home. I remember the first time I ever tasted real sourdough, years ago at a farmer’s market. I was knee-high to a grasshopper, and my grandma handed me a chewy slice slathered with butter—it was one of those moments where you pause, take a deep breath, and just smile because you know you’ve stumbled onto something truly special. Fast forward to today, and I’ve spent countless weekends tinkering, testing, and (let’s face it) obsessing over how to get that signature crackle and flavor.
My family can’t stop sneaking slices off the cooling rack (and, honestly, neither can I). There’s just something about the combination of chewy interior and shatteringly crisp crust that makes this sourdough bread recipe downright irresistible. Whether you’re looking for the perfect potluck loaf, a cozy weekend project, or just want to brighten up your Pinterest bread board—this one’s got you covered. I’ve tested, tweaked, and taste-tested this loaf more times than I care to admit (in the name of research, of course), and now it’s the kind of bread that feels like a warm hug every time I make it. You’re going to want to bookmark this crispy sourdough bread recipe!
Why You’ll Love This Crispy Sourdough Bread Recipe
Having baked sourdough for years, I can honestly say this recipe is the one I keep coming back to. I’ve tried everything from fancy bakery methods to quick hacks, but this loaf strikes the perfect balance between artisan technique and home cook practicality. Here’s why you’ll be hooked:
- Quick & Easy: While sourdough needs time to rise, actual hands-on time is surprisingly minimal—most of your work happens while you sleep or relax. Perfect for busy schedules!
- Simple Ingredients: Nothing fancy here—just flour, water, salt, and a lively sourdough starter. You probably have everything in your pantry.
- Perfect for Any Occasion: From brunch spreads to cozy dinners, this bread fits right in. It’s a hit at holiday gatherings and casual lunches alike.
- Crowd-Pleaser: Kids love the chewy crumb, adults rave about the tang and crunch. My neighbors beg for a loaf whenever I bake extra.
- Unbelievably Delicious: The flavor is tangy, complex, and comforting. The crust is shatteringly crisp, just like the artisan loaves you see on Pinterest.
What sets this crispy sourdough bread apart? I use a long, slow fermentation in the fridge for unbeatable flavor and texture. Plus, baking in a preheated Dutch oven traps steam, guaranteeing that perfect crust every time. Honestly, it’s not just good—it’s the kind of recipe that makes you close your eyes after the first bite. You get all the comfort of classic sourdough, but with a modern, fuss-free approach. Whether you’re impressing guests or just treating yourself, this bread will make your meal memorable.
What Ingredients You Will Need
This crispy sourdough bread recipe uses just a handful of ingredients, each playing a crucial role in creating that iconic artisan crust and chewy crumb. You don’t need anything fancy—just simple, high-quality staples. If you’re like me, you’ll appreciate how easy it is to swap or tweak ingredients to suit different tastes or dietary needs.
- Bread Flour (500g / 4 cups): Go for high-protein bread flour for the best structure and chew. I swear by King Arthur or Bob’s Red Mill (trust me, it makes a difference).
- Water (350g / 1.5 cups, room temperature): Filtered water helps your starter thrive and gives the crumb a lighter texture.
- Sourdough Starter (100g / 1/2 cup, active and bubbly): Feed your starter the night before so it’s lively. If you need a gluten-free option, swap for a gluten-free starter—just adjust hydration slightly.
- Salt (10g / 2 tsp): Fine sea salt brings out the natural flavors. Don’t skip or reduce too much; it’s vital for taste and crust.
Optional Add-ins:
- Whole Wheat Flour (up to 25% of total flour for extra flavor): Adds nuttiness and a bit more fiber.
- Seeds (pumpkin, sunflower, flax, up to 3 tbsp): For texture and added nutrition (I love tossing in a handful for crunch).
- Herbs (chopped rosemary, thyme, 1-2 tbsp): Fresh herbs infuse the loaf with aromatic notes—great for savory meals.
If you’re short on bread flour, you can use all-purpose flour, but the loaf may be a bit less chewy. For a lighter loaf, swap 50g of water for milk (dairy or plant-based). If you want to play with flavors, dried fruits or olives make delicious additions—just keep total add-ins under 1/2 cup. During summer, fresh herbs or roasted garlic are fantastic.
Ingredient selection tip: Look for unbleached flour for a more robust flavor. If you’re new to sourdough, don’t worry about fancy starters; even a basic flour-water mix will thrive over time. The beauty of this recipe is its flexibility—make it your own!
Equipment Needed

You don’t need a professional bakery setup to make crispy sourdough bread with an artisan crust—just a few kitchen staples and maybe one special piece of gear. Here’s what’s essential:
- Mixing Bowl: A large glass or stainless steel bowl works best. Plastic is fine, but avoid reactive metals.
- Banneton Basket or Bowl with Towel: For proofing. If you don’t have a banneton, a colander lined with a floured kitchen towel gets the job done (that’s what I started with years ago).
- Bench Scraper: Super handy for shaping and transferring dough. If you don’t have one, a spatula will work in a pinch.
- Kitchen Scale: For precise measurements. It’s not strictly required, but it makes a huge difference in consistency.
- Dutch Oven (5-6 quart): This is the secret to that crispy artisan crust. If you don’t have one, use a heavy lidded pot or even a clay baker.
- Parchment Paper: Makes transferring dough easy and prevents sticking.
- Sharp Knife or Bread Lame: For scoring the dough. A razor blade or even a clean pair of scissors works if you don’t have a lame.
Honestly, I started out with just a mixing bowl, kitchen towel, and my old enamel pot. For maintenance, keep your Dutch oven clean and dry (don’t use soap if it’s seasoned cast iron). Budget tip: thrift stores often have great deals on heavy pots and baking tools.
Preparation Method
Here’s the step-by-step guide to making crispy homemade sourdough bread with that coveted artisan crust. I’ve included all the little details and troubleshooting notes I wish I’d known when I started!
-
Feed Your Starter: The night before baking, feed your sourdough starter (1:1:1 ratio—100g flour, 100g water, 100g starter). Let it sit at room temperature until bubbly and doubled in volume.
Tip: If your starter isn’t doubling, leave it a bit longer or move to a warmer spot. -
Mix the Dough (Morning): In a large bowl, combine 500g bread flour, 350g water, and 100g active starter. Mix until a shaggy dough forms. Cover and let rest for 30 minutes (autolyse).
Sensory cue: Dough should be sticky and rough, not smooth yet. -
Add Salt & Bulk Fermentation: Sprinkle 10g salt over dough. Knead or use the “stretch and fold” method every 30 minutes for 2 hours (total of 4 folds). Cover and let rise at room temperature for 4-5 hours until doubled.
Note: If your kitchen is cool, extend rise by 1-2 hours. -
Shape the Dough: Lightly flour your counter. Turn out dough and gently shape into a tight ball using a bench scraper. Place seam-side up in a floured banneton or bowl.
Warning: Don’t over-flour—too much flour can toughen the crust. -
Cold Proof (Overnight): Cover with a towel or plastic wrap. Refrigerate for 8-12 hours. This slow fermentation builds flavor and texture.
Sensory cue: Dough should feel springy and hold its shape. -
Preheat & Score: Place Dutch oven in oven and preheat to 500°F (260°C) for at least 30 minutes. Turn dough onto parchment, score the top with a knife or lame (a deep slash helps the bread expand).
Tip: Steady hands make cleaner cuts, but don’t stress—rustic is beautiful! -
Bake: Transfer dough (on parchment) into Dutch oven. Bake covered for 20 minutes, then uncover and reduce heat to 450°F (230°C). Bake for another 25–30 minutes until deep golden brown.
Note: Crust should be hard and crackly; interior temp should hit 210°F (99°C). -
Cool: Remove bread from pot and cool on a wire rack for at least 1 hour before slicing.
Tip: Cutting too soon makes the crumb gummy. Patience, friend!
Troubleshooting: If your loaf spreads instead of rising, try a longer cold proof or use a stiffer starter next time. If crust isn’t crispy, bake uncovered for an extra 5 minutes. For efficiency, prep starter and dough in the evening, then bake in the morning—less waiting, more eating!
Cooking Tips & Techniques
I’ve learned a lot from baking crispy sourdough bread over the years (sometimes the hard way). Here are my top tips for getting that artisan crust and tender crumb, every time.
- Steam Is Key: Baking in a Dutch oven traps steam, creating a glossy, crispy crust. If you don’t have one, add a tray of water to the oven for the first 20 minutes.
- Don’t Rush the Proof: Long, slow fermentation develops flavor and structure. If you rush it, you’ll end up with a bland loaf (been there, regretted that).
- Use a Scale: Measuring by weight is more accurate. I used cups for years until I realized just how much flour can differ by scoop!
- Scoring Matters: Deep, confident cuts help the bread expand and get that professional look. If your blade drags, flour it first.
- Let It Cool: I know it’s tempting to slice warm bread, but cooling lets the crumb set properly. Otherwise, you get sticky slices and a squished loaf.
- Batch Baking: Make two loaves and freeze one for later. It’s just as easy as making a single loaf, and you’ll thank yourself during busy weeks.
Common mistakes? Under-proofing leads to dense bread, and over-flouring dulls the crust. I’ve messed up plenty—once I baked a loaf in a cold oven (oops), and ended up with a pale, chewy mess. Timing is everything: stick to the rise times, but adjust for your kitchen’s temperature. Multitask by prepping other meal elements during proofing. For consistency, keep notes on rise times and starter strength—seriously, that’s how I nailed the perfect loaf!
Variations & Adaptations
Crispy homemade sourdough bread is super flexible. Whether you’re working around allergies, changing up flavors, or adapting to the seasons, here are some fun ways to make this recipe your own:
- Gluten-Free: Use a gluten-free flour blend and starter. The texture will be a bit different, but it’s still delicious—just add 1 tsp xanthan gum for structure.
- Whole Grain: Swap up to 50% bread flour for whole wheat or spelt. The crumb will be heartier, and flavor more nutty.
- Seeded Sourdough: Add 2-3 tbsp mixed seeds (pumpkin, sunflower, sesame) to the dough during shaping. My family loves this version for extra crunch.
- Herb and Garlic: Mix in 2 tbsp chopped fresh rosemary and 1 tbsp roasted garlic for an aromatic twist.
- Olive and Tomato: Fold in 1/2 cup chopped kalamata olives and sun-dried tomatoes for a Mediterranean vibe.
For different cooking methods, you can bake on a pizza stone with a metal bowl inverted over the loaf for steam. For allergy-friendly versions, skip seeds and stick with basic flour, water, and salt. Personally, I love adding chopped dried figs and walnuts—makes the loaf feel extra special for brunch. Don’t be afraid to experiment: that’s how I discovered my favorite flavor combos!
Serving & Storage Suggestions
The best way to serve crispy sourdough bread is fresh, at room temperature, sliced thick with a good smear of butter. For extra crunch, toast slices lightly before serving. If you’re hosting brunch, pair with creamy scrambled eggs, smoked salmon, or a vibrant salad. A classic combo is with soup—tomato basil, potato leek, or chicken noodle are all perfect matches.
To store, let the loaf cool completely, then wrap in a cotton towel or place in a paper bag. Store at room temperature for up to 2 days. For longer storage, slice and freeze in a zip-top bag—just pop slices in the toaster or oven to reheat. Avoid airtight plastic containers, which soften the crust (learned that the hard way). Over time, the tangy flavor deepens, and the crumb becomes even more tender. Honestly, leftovers are just as good—sometimes better!
Nutritional Information & Benefits
Each slice of crispy sourdough bread (about 60g) packs approximately 140 calories, 1g fat, 28g carbs, and 5g protein. Sourdough is easier to digest than regular bread thanks to natural fermentation, which breaks down gluten and phytic acid. Bread flour provides energy and protein, while optional seeds add healthy fats.
This loaf is naturally low in fat and free of added sugars. If you use whole wheat, you’ll get a boost of fiber and minerals. For gluten-free adaptation, make sure your starter and flour blend are safe. Sourdough may contain traces of wheat, so it’s not suitable for those with celiac disease unless modified. Personally, I love how this bread fits into a balanced diet—it’s filling, satisfying, and doesn’t weigh you down.
Conclusion
There’s nothing quite like the satisfaction of baking crispy homemade sourdough bread with an artisan crust. It’s easy enough for beginners but impressive enough for any gathering. Whether you stick with the classic recipe or venture into your own flavor twists, this loaf delivers big on comfort and flavor.
Give this recipe a try and make it your own—swap in your favorite add-ins, adjust the rise times, experiment with flours. I love this bread for its versatility and the way it brings people together. If you bake it, I’d love to hear your results! Leave a comment, share your photo, or tell me your favorite variation. Happy baking, and may every loaf be crispy, chewy, and full of joy!
Frequently Asked Questions
How can I tell if my sourdough starter is ready?
Your starter is ready when it’s bubbly, doubled in volume, and passes the “float test” (a spoonful floats in water). If in doubt, let it ferment a bit longer.
Can I make crispy sourdough bread without a Dutch oven?
Yes! Bake on a pizza stone or baking sheet, and add a tray of water to the oven for steam. The crust might be slightly less crisp, but still delicious.
Why is my sourdough bread dense?
Dense bread usually means under-proofing or a weak starter. Try longer rise times or feed your starter more frequently.
Can I freeze sourdough bread?
Absolutely. Slice and freeze in a zip-top bag. Reheat slices in the toaster or oven for that fresh-baked taste.
How do I get big holes in my sourdough crumb?
Use high-hydration dough (more water), gentle folding, and avoid over-mixing. Long fermentation helps, too. Sometimes it’s just luck—embrace the rustic look!
Pin This Recipe!

Crispy Sourdough Bread Recipe – Easy Homemade Artisan Crust

This homemade sourdough bread features a shatteringly crisp artisan crust and chewy, tangy interior. With simple ingredients and a fuss-free method, it’s perfect for beginners and seasoned bakers alike.
- Prep Time: 30 minutes
- Cook Time: 45-50 minutes
- Total Time: 13-15 hours (including overnight proof)
- Yield: 1 loaf (about 12 slices) 1x
- Category: Bread
- Cuisine: American, European
Ingredients
- 4 cups bread flour (500g)
- 1 1/2 cups water, room temperature (350g)
- 1/2 cup active sourdough starter (100g)
- 2 teaspoons fine sea salt (10g)
- Optional: up to 1 cup whole wheat flour (replace up to 25% of total flour)
- Optional: 2-3 tablespoons seeds (pumpkin, sunflower, flax)
- Optional: 1-2 tablespoons chopped fresh herbs (rosemary, thyme)
- Optional: 1/2 cup chopped dried fruits or olives
Instructions
- Feed your sourdough starter the night before baking (1:1:1 ratio—100g flour, 100g water, 100g starter). Let it sit at room temperature until bubbly and doubled in volume.
- In a large bowl, combine bread flour, water, and active starter. Mix until a shaggy dough forms. Cover and let rest for 30 minutes (autolyse).
- Sprinkle salt over dough. Knead or use the ‘stretch and fold’ method every 30 minutes for 2 hours (total of 4 folds). Cover and let rise at room temperature for 4-5 hours until doubled.
- Lightly flour your counter. Turn out dough and gently shape into a tight ball using a bench scraper. Place seam-side up in a floured banneton or bowl.
- Cover with a towel or plastic wrap and refrigerate for 8-12 hours (cold proof).
- Place Dutch oven in oven and preheat to 500°F (260°C) for at least 30 minutes. Turn dough onto parchment, score the top with a knife or lame.
- Transfer dough (on parchment) into Dutch oven. Bake covered for 20 minutes, then uncover and reduce heat to 450°F (230°C). Bake for another 25–30 minutes until deep golden brown.
- Remove bread from pot and cool on a wire rack for at least 1 hour before slicing.
Notes
For a crispier crust, bake uncovered for an extra 5 minutes. Use a kitchen scale for best results. If you don’t have a Dutch oven, bake on a pizza stone with a tray of water for steam. Let bread cool completely before slicing to avoid a gummy crumb. For gluten-free, use a gluten-free starter and flour blend plus 1 tsp xanthan gum.
Nutrition
- Serving Size: 1 slice (about 60g)
- Calories: 140
- Sodium: 350
- Fat: 1
- Carbohydrates: 28
- Fiber: 1
- Protein: 5
Keywords: sourdough bread, artisan bread, crispy crust, homemade bread, easy sourdough, Dutch oven bread, beginner sourdough, crusty bread, bread recipe


