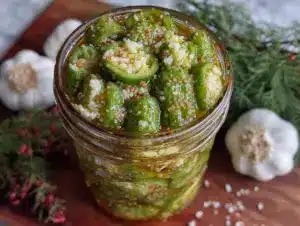
Late summer evenings, and the only thing I want is the faint snap of a crisp pickle sliced thin, the kind that tastes like sun-warmed cucumbers soaking up dill and garlic in a jar on the countertop. The kind you make without fuss, no long canning rituals, just a quiet waiting game that feels like a small act of patience. It’s that time of year when cucumbers pile up from the garden, and the fridge starts to look like a green army ready to be transformed. These quick refrigerator dill pickles are my quiet ritual for savoring summer’s end — simple, crunchy, and just tangy enough to make you stop whatever you’re doing and reach for another slice.
I remember the first time I made these pickles in a rented apartment kitchen, with nothing but a mason jar and a few pantry staples. No fancy pressure canner, no complicated guessing—just a straightforward recipe that rewarded me with that unmistakable pop of dill and garlic in every bite. Honestly, it’s the kind of recipe that sticks with you because it’s reliable and unpretentious, a little comfort in a jar. And while the world busies itself with elaborate preserves, these refrigerator pickles wait patiently and quietly, ready when you are.
It’s funny how such a simple recipe can feel like a secret handshake among home cooks who know that sometimes, less is more. These pickles are crisp, fresh, and tangy, with the unmistakable brightness of dill shining through. No canning needed means you can make them anytime, even on a whim after a trip to the farmers’ market. If you’re into snacking or just want a crunchy side for your sandwiches, these quick refrigerator dill pickles have a way of making the ordinary extraordinary — quietly, patiently, without show.
That’s why this recipe has stuck with me. It’s one of those low-key pleasures that never disappoints. And if you’re like me, who loves the small rituals of cooking that don’t demand much but give back so much flavor, you’ll appreciate these pickles too. They’re a little jar of summer’s best memories, waiting without rush and ready to brighten your meal whenever you need them.
Why You’ll Love This Recipe
Let me tell you why these crispy quick refrigerator dill pickles have become a staple in my kitchen—and why they might just become yours as well.
- Quick & Easy: You can have these pickles ready to eat in as little as 24 hours, with no special equipment or complicated canning involved.
- Simple Ingredients: Chances are, you already have everything you need in your pantry—fresh cucumbers, vinegar, dill, and spices. No last-minute grocery store runs!
- Perfect for Any Occasion: Whether it’s a casual sandwich lunch, a potluck, or an easy snack while binge-watching your favorite show, these pickles fit right in.
- Crowd-Pleaser: These pickles always get nods of approval from kids and adults alike. Their crisp texture and balanced flavor are universally loved.
- Unbelievably Delicious: Thanks to the perfect balance of garlic, dill, and vinegar, these pickles have a bright, tangy punch with a satisfying crunch that’s hard to beat.
- No Canning Needed: This is the best part—no boiling water baths or pressure canners. Just mix, jar, and refrigerate.
What makes this recipe different? I’ve tested it through countless batches and tweaked the seasoning until it hits just the right note—crisp, flavorful, and tangy without being overpowering. I add a little crushed red pepper sometimes for a subtle kick, but the classic garlic and dill combo is what keeps me coming back.
It’s more than just a pickle. It’s the kind of recipe that makes you pause after the first bite and savor the simplicity of good, honest flavor. It’s easy to make, easy to love, and exactly what you want when the summer cucumbers are begging to be transformed.
What Ingredients You Will Need
This recipe calls for straightforward, pantry-friendly ingredients that come together to create that classic dill pickle flavor with a crisp bite. These ingredients are easy to find, and many are likely already sitting in your kitchen.
- Fresh Cucumbers: About 1 pound (450 g) of Kirby or pickling cucumbers, sliced into spears or rounds. Kirby cucumbers are ideal for their firm texture and smaller size.
- White Vinegar: 1 cup (240 ml) of distilled white vinegar provides the tang and preserves the pickles. You can use apple cider vinegar for a slightly sweeter note.
- Water: 1 cup (240 ml) to balance the acidity and keep the pickles crisp.
- Salt: 1 tablespoon of kosher salt or pickling salt—avoid iodized salt as it can cloud the brine.
- Granulated Sugar: 1 teaspoon to mellow the sharpness of the vinegar (optional but recommended).
- Fresh Dill: 3-4 sprigs of fresh dill or 1 tablespoon dried dill weed for that unmistakable herbaceous flavor.
- Garlic Cloves: 2-3 cloves, peeled and lightly crushed to release flavor.
- Pickling Spices (Optional): 1 teaspoon mustard seeds, 1/2 teaspoon black peppercorns, and a pinch of red pepper flakes if you like a touch of heat.
For best results, I recommend looking for firm, fresh cucumbers without soft spots. When fresh dill is in season, it really makes a difference, but dried dill works fine if that’s what you have on hand. If you want to mix things up, you can try adding fresh tarragon or a few slices of fresh jalapeño for a spicy twist.
If you’re concerned about sodium, you can reduce the salt slightly, but keep in mind it’s important for flavor and crispness. For a gluten-free variation, all these ingredients are naturally gluten-free as long as your spices are certified safe.
Equipment Needed
Not much gear is required for these refrigerator dill pickles—just the basics you probably already own.
- Mason Jar or Airtight Container: A quart-sized (about 1 liter) jar works perfectly. I prefer glass over plastic to keep flavors pure.
- Measuring Cups and Spoons: For precise vinegar, water, salt, and spice measurements.
- Knife and Cutting Board: For slicing cucumbers and crushing garlic.
- Small Saucepan: To heat the brine ingredients and dissolve salt and sugar.
- Mixing Spoon: For stirring the brine.
If you don’t have a mason jar, any clean glass container with a tight-fitting lid will do. I once made a batch in a repurposed spaghetti jar in a pinch, and it worked just fine. Just be sure it seals well to keep the pickles fresh in the fridge.
For maintaining your jars, I recommend washing them thoroughly in hot soapy water and rinsing well. I like to sterilize mine by pouring boiling water over them before use, especially if you plan to keep the pickles for longer than a week.
Preparation Method
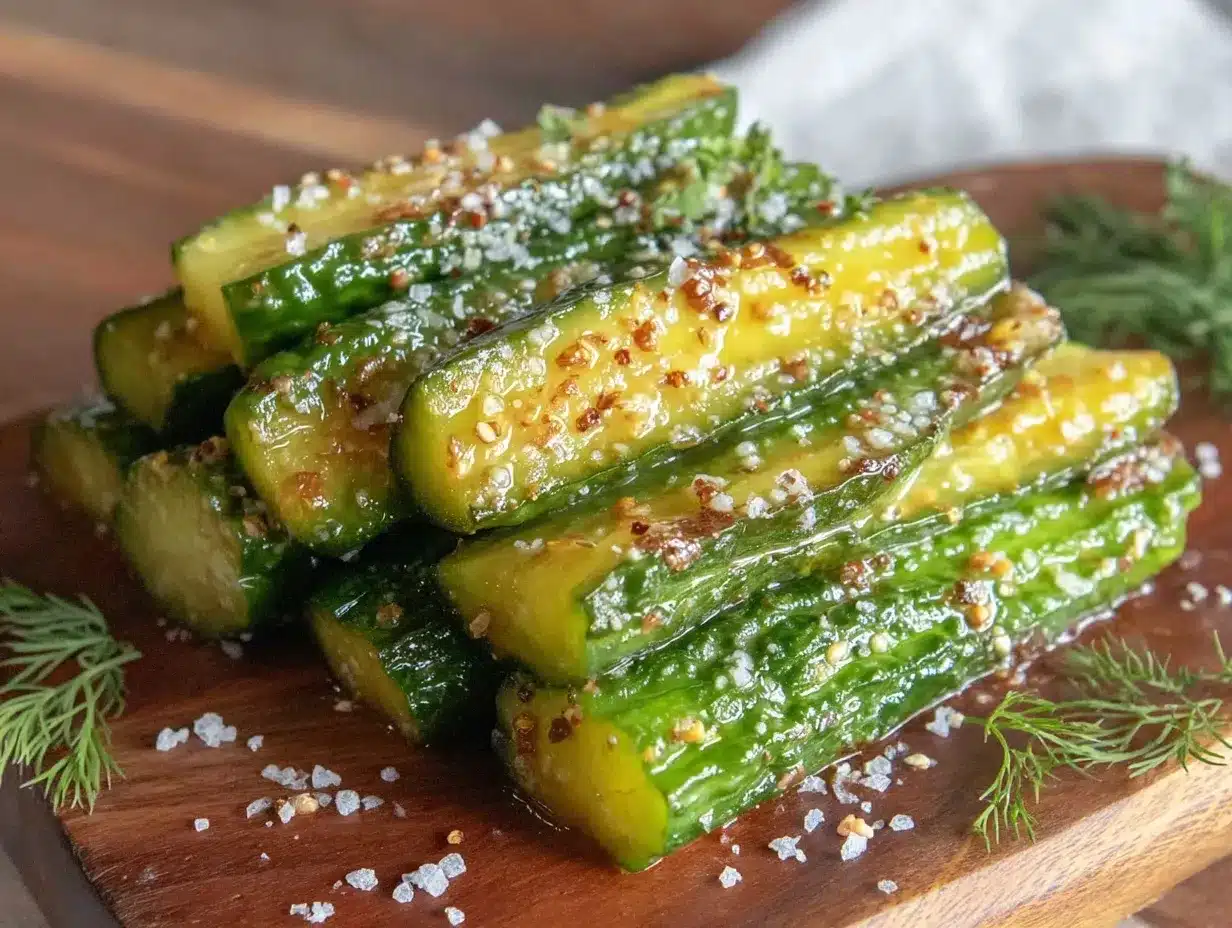
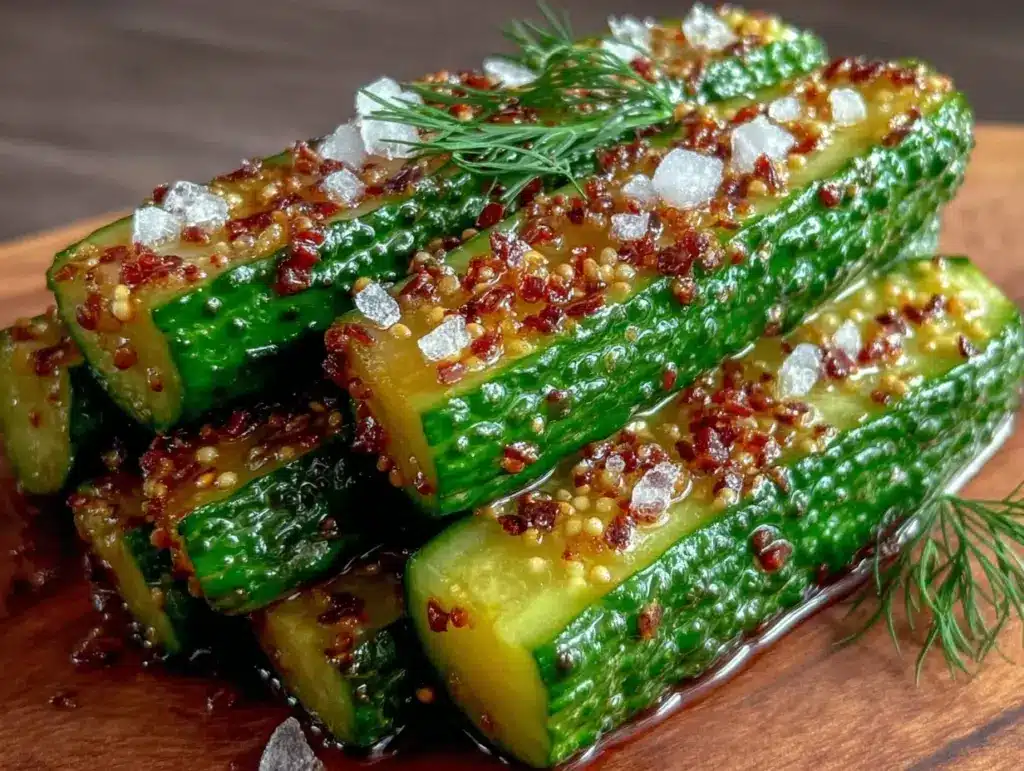
- Prepare the cucumbers: Wash about 1 pound (450 g) of Kirby cucumbers thoroughly. Slice them into 1/4-inch (6 mm) thick rounds or spears if you prefer. The spears hold up well and look great in the jar. Set aside.
- Make the brine: In a small saucepan, combine 1 cup (240 ml) distilled white vinegar, 1 cup (240 ml) water, 1 tablespoon kosher salt, and 1 teaspoon granulated sugar. Heat gently over medium heat, stirring until the salt and sugar dissolve completely. This should take about 3-5 minutes. Remove from heat and let cool slightly while you prepare the rest.
- Pack the jar: In your clean quart-sized jar, add 3-4 sprigs fresh dill, 2-3 lightly crushed garlic cloves, and your optional pickling spices (1 tsp mustard seeds, 1/2 tsp black peppercorns, pinch of red pepper flakes). Then pack the sliced cucumbers tightly but without crushing them.
- Pour the brine: Carefully pour the warm brine over the cucumbers and herbs, making sure they’re fully submerged. Leave about 1/2 inch (1.3 cm) of headspace at the top. You can press down lightly with a spoon to release any trapped air bubbles.
- Seal and refrigerate: Place the lid on tightly and refrigerate the jar. The pickles will start to develop flavor after about 24 hours, but they taste best after 2-3 days. You can keep them in the fridge for up to 2 weeks.
Some things to keep in mind: If your pickles turn out a little soft, it might be due to overripe cucumbers or too much water in the brine. Next time, try to get the freshest cucumbers you can find. Also, if you want a more intense garlic punch, add an extra clove or two.
When opening the jar after refrigeration, listen for that satisfying pop of the seal breaking—it’s like a little reward for your patience. The brine should smell fresh and tangy, with hints of dill and garlic inviting you to dive in.
Cooking Tips & Techniques
Making quick refrigerator dill pickles is straightforward, but a few tips from my experience can help you get the best results every time.
- Choose the right cucumbers: Kirby cucumbers or other small pickling varieties hold their crunch better than slicing cucumbers. If you only have large slicing cucumbers, peel them partially and remove the seeds for a firmer bite.
- Salt matters: Pickling salt or kosher salt is your best bet. Table salt can introduce off-flavors and cloudiness to your brine.
- Don’t skip the sugar: Even a small amount balances the vinegar’s sharpness and rounds out the flavor.
- Brine temperature: Pouring warm brine over the cucumbers helps them absorb the flavors faster, but don’t use boiling hot liquid—too hot can soften your cucumbers prematurely.
- Keep them submerged: Cucumbers exposed to air can turn soft or moldy. Use a clean weight or the back of a spoon to keep them under the brine.
- Patience pays off: The flavor intensifies with time. Even though you can eat them after 24 hours, waiting a couple of days makes a noticeable difference.
- Experiment with spices: Mustard seeds, peppercorns, or even coriander seeds add complexity. I once added fresh tarragon for a subtle twist that surprised everyone.
One time, I forgot to crush the garlic cloves and the flavor was milder than I liked. Lesson learned: crushing garlic releases oils and flavor much better. Also, always refrigerate promptly after adding the brine—this keeps the pickles crisp and safe.
Variations & Adaptations
This recipe is a great base to customize according to your taste or dietary needs. Here are some variations I’ve enjoyed or heard about from fellow home cooks:
- Spicy Refrigerator Dill Pickles: Add sliced fresh jalapeños or a pinch of red pepper flakes to the jar for a little heat that wakes up your taste buds.
- Garlic Lover’s Version: Double the garlic cloves or add roasted garlic for a mellow, sweet garlic flavor.
- Low-Sodium Pickles: Reduce the salt to 1/2 tablespoon and increase refrigeration time slightly to compensate for preservation.
- Herbal Twist: Swap dill for fresh tarragon or add fresh thyme for different herbal notes.
- Vinegar Swap: Use apple cider vinegar instead of white vinegar for a gentler, fruitier acidity.
For those who want to preserve pickles longer, you could try quick canning methods, but honestly, these refrigerator pickles are perfect when you want something fast and fresh. I once tried making a batch with turmeric and mustard seeds inspired by Indian pickling flavors — it was surprisingly bright and complex!
Serving & Storage Suggestions
These crispy quick refrigerator dill pickles are best served cold, straight from the jar. They make a fantastic crunchy side to sandwiches, burgers, or smoked meats — and honestly, I often snack on them by the handful when no one’s watching.
Try pairing them with creamy spreads like roasted red pepper hummus or alongside a rich puff pastry baked brie for an unexpected but delicious contrast.
Store your pickles in the refrigerator, where they keep well for up to two weeks. Over time, the flavors deepen, and they get tangier without losing their crunch, so don’t hesitate to let a jar sit a bit longer. When reheating isn’t necessary, but if you want to serve them at room temperature, just take them out about 15 minutes before serving.
If you happen to have leftovers, the brine can be reused once or twice to pickle another batch of cucumbers, though fresh brine is always best for crispness.
Nutritional Information & Benefits
These quick refrigerator dill pickles are low in calories—roughly 10 calories per serving (about 3 spears). They’re naturally fat-free and gluten-free, making them a safe snack for many dietary preferences.
The vinegar and garlic offer gut-friendly benefits as natural antimicrobials, and cucumber skin provides fiber and antioxidants. Dill itself is rich in vitamins A and C and adds a fresh burst of flavor without sodium or calories.
Because the pickles are made without added sugars (beyond a teaspoon) or preservatives, they’re a wholesome alternative to store-bought versions loaded with artificial ingredients. Just watch the sodium if you’re salt-sensitive.
Conclusion
These crispy quick refrigerator dill pickles have earned a quiet spot in my kitchen routine because they’re easy, flavorful, and reliable. They remind me that sometimes the best things don’t need fuss—just fresh ingredients, a little patience, and a trusty jar in the fridge.
Feel free to make them your own by adjusting the garlic, heat, or herbs to what suits your palate. I love how this recipe makes summer’s bounty last a little longer and adds a crisp, tangy note to so many meals.
Give them a try, and I’d love to hear how you made these pickles your own. Your comments and tweaks help keep the recipe alive and evolving. Here’s to many crunchy, savory snacking moments ahead!
Frequently Asked Questions
How long do quick refrigerator dill pickles last?
They typically last up to two weeks in the refrigerator. Make sure they stay submerged in the brine and keep the jar sealed tightly.
Can I use regular cucumbers instead of Kirby cucumbers?
Yes, but Kirby cucumbers tend to stay crisper. If you use slicing cucumbers, peel and seed them to help maintain crunch.
Do I have to use fresh dill?
Fresh dill is best for flavor and aroma, but dried dill weed works fine if fresh is unavailable.
Why are my pickles not crispy?
Soft pickles can result from overripe cucumbers, too much water in the brine, or warm storage. Use fresh cucumbers and keep pickles refrigerated.
Can I make these pickles without garlic?
Yes, you can omit garlic if you prefer a milder flavor, but it does add a classic punch to the pickles.
Pin This Recipe!

Crispy Quick Refrigerator Dill Pickles Recipe Easy No Canning Needed

These quick refrigerator dill pickles are simple, crunchy, and tangy, made without any canning. Ready to eat in as little as 24 hours, they offer a fresh, flavorful snack or side with minimal fuss.
- Prep Time: 10 minutes
- Cook Time: 5 minutes
- Total Time: 24 hours (including refrigeration time)
- Yield: 4 servings 1x
- Category: Side Dish
- Cuisine: American
Ingredients
- 1 pound (450 g) Kirby or pickling cucumbers, sliced into spears or rounds
- 1 cup (240 ml) distilled white vinegar (or apple cider vinegar for a sweeter note)
- 1 cup (240 ml) water
- 1 tablespoon kosher salt or pickling salt (avoid iodized salt)
- 1 teaspoon granulated sugar (optional but recommended)
- 3–4 sprigs fresh dill or 1 tablespoon dried dill weed
- 2–3 garlic cloves, peeled and lightly crushed
- 1 teaspoon mustard seeds (optional)
- 1/2 teaspoon black peppercorns (optional)
- Pinch of red pepper flakes (optional)
Instructions
- Wash about 1 pound (450 g) of Kirby cucumbers thoroughly. Slice into 1/4-inch (6 mm) thick rounds or spears.
- In a small saucepan, combine 1 cup distilled white vinegar, 1 cup water, 1 tablespoon kosher salt, and 1 teaspoon granulated sugar. Heat gently over medium heat, stirring until salt and sugar dissolve (3-5 minutes). Remove from heat and let cool slightly.
- In a clean quart-sized jar, add 3-4 sprigs fresh dill, 2-3 lightly crushed garlic cloves, and optional pickling spices (mustard seeds, black peppercorns, red pepper flakes). Pack sliced cucumbers tightly but without crushing.
- Pour the warm brine over the cucumbers and herbs, ensuring they are fully submerged. Leave about 1/2 inch (1.3 cm) headspace. Press down lightly to release air bubbles.
- Seal the jar tightly and refrigerate. Pickles develop flavor after 24 hours but taste best after 2-3 days. Keep refrigerated up to 2 weeks.
Notes
Use fresh, firm Kirby cucumbers for best crunch. Avoid iodized salt to prevent cloudy brine. Warm brine helps flavor absorption but should not be boiling hot. Keep cucumbers submerged to avoid softening or mold. Flavor improves after 2-3 days. Brine can be reused once or twice for new batches but fresh brine is best for crispness.
Nutrition
- Serving Size: About 3 spears (appr
- Calories: 10
- Sugar: 1
- Sodium: 600
- Carbohydrates: 2
- Fiber: 0.5
Keywords: quick pickles, refrigerator pickles, dill pickles, no canning, easy pickles, crispy pickles, homemade pickles, summer recipe