Introduction
That sharp, warm scent of garlic sizzling in olive oil — the kind that hits you before you even step into the kitchen — still takes me straight to my grandmother’s cozy little house on a rainy Saturday afternoon. I remember how the air thickened with that irresistible aroma, mixing with the faint nuttiness of parmesan melting into golden breadcrumbs. It was always a slow, unhurried ritual, a comfort in its simplicity that made everything feel just right. I never thought much about recipes back then; cooking was more about feeling the rhythm — dipping the chicken tenders in egg wash, then the garlicky parmesan coating, and hearing that satisfying crunch when they hit the hot oven.
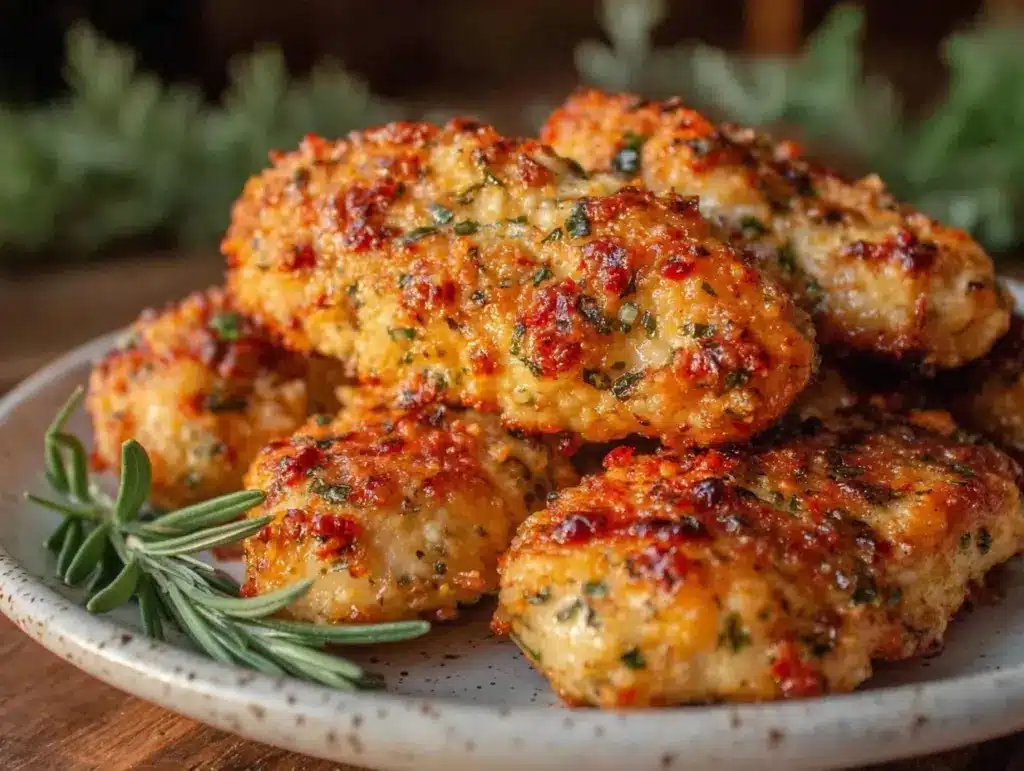
Honestly, these crispy garlic parmesan chicken tenders baked to perfection have stuck with me for years because they’re not just food — they’re a memory wrapped in flavor. They’re the kind of dish that invites you to pause, to savor, and maybe even remember your own kitchen moments. Baking instead of frying means less mess but all the golden crispiness you’d expect. The tender chicken stays juicy inside, while the outside crackles with that perfect garlicky, cheesy crust. It’s a recipe that’s as much about the process as the result, and it’s one I come back to when I want something reliably delicious without fuss.
There’s a quiet promise in this recipe — that you don’t need hours or complicated ingredients to create something that feels special. It’s a little moment of joy you can make any night of the week, and that’s why it’s remained a favorite in my kitchen.
Why You’ll Love This Recipe
After testing countless variations in my own kitchen, I can say these chicken tenders hit a sweet spot you don’t often find: crispy, garlicky, and cheesy, yet baked for a healthier twist. Here’s why I trust this recipe to deliver every time:
- Quick & Easy: Ready in under 35 minutes, so it’s perfect for those busy weeknights when you want comfort food without the wait.
- Simple Ingredients: No need for fancy or hard-to-find items — just pantry staples like garlic powder, parmesan, and breadcrumbs.
- Perfect for Any Occasion: Whether it’s a casual family dinner, a kid-friendly lunchbox treat, or even a game day snack, these tenders fit the bill.
- Crowd-Pleaser: I’ve brought these along to potlucks and picnics, and they always vanish fast — kids and adults alike can’t get enough.
- Unbelievably Delicious: The combination of garlic and parmesan coating gives a rich, savory flavor that feels indulgent but stays light thanks to baking.
This isn’t just another baked chicken recipe — it’s my best version because I blend the parmesan right into the breadcrumb crust for extra cheesy depth. Plus, the garlic seasoning is perfectly balanced, never overpowering, just enough to make you close your eyes after the first bite. It’s comfort food that feels a little elevated but stays approachable. And if you’re curious about pairing it with dips, I often reach for a creamy herb and garlic cheese ball dip recipe I love — it’s a game changer for serving!
What Ingredients You Will Need
This recipe uses simple, wholesome ingredients to deliver bold flavor and satisfying crunch without fuss. Most are pantry staples, and you can swap a few based on what you have on hand.
- Chicken tenders: About 1.5 pounds (680 g), trimmed of excess fat. You can also use chicken breast sliced into strips.
- Parmesan cheese: 1 cup (100 g) finely grated. I recommend using fresh parmesan (not pre-grated) for the best texture and flavor.
- Breadcrumbs: 1 cup (100 g) plain or panko for extra crispiness. Panko gives a lighter, airier crunch.
- Garlic powder: 1 teaspoon for that signature savory hit.
- Onion powder: 1/2 teaspoon to deepen the flavor.
- Dried Italian herbs: 1 teaspoon mix of oregano, basil, and thyme adds a subtle herbaceous note.
- Salt and pepper: To taste, about 3/4 teaspoon salt and 1/4 teaspoon black pepper.
- Eggs: 2 large, beaten, room temperature. These help the coating stick perfectly.
- Olive oil or melted butter: 2 tablespoons (30 ml) brushed on top before baking to get that golden finish.
Optional tweaks:
- Use almond flour or gluten-free breadcrumbs if you need a gluten-free option.
- Swap parmesan with Pecorino Romano for a sharper tang.
- If you want a little kick, add 1/4 teaspoon smoked paprika or cayenne pepper to the breadcrumb mix.
Equipment Needed

- Baking sheet lined with parchment paper or a silicone baking mat — this keeps the chicken from sticking and makes cleanup easier.
- Wire rack (optional but recommended) — placing tenders on a rack lets air circulate underneath, helping them crisp up all around.
- Mixing bowls — one for the egg wash and one for the breadcrumb mixture.
- Tongs or fork — for dipping and coating without getting your hands too messy.
- Measuring cups and spoons — for precise seasoning.
Personally, I like using a silicone brush to spread melted butter or oil evenly over the tenders before baking. If you don’t have a wire rack, just flip the tenders halfway through baking to get both sides crispy. For budget-friendly options, parchment paper works just fine instead of silicone mats, and any sturdy baking sheet will do.
Preparation Method
- Preheat your oven to 425°F (220°C). This high heat helps get that crispy crust without frying.
- Prepare the breadcrumb mixture: In a shallow bowl, combine 1 cup (100 g) grated parmesan, 1 cup (100 g) breadcrumbs, 1 teaspoon garlic powder, 1/2 teaspoon onion powder, 1 teaspoon dried Italian herbs, 3/4 teaspoon salt, and 1/4 teaspoon black pepper. Mix well.
- Beat the eggs: In another bowl, crack 2 large eggs and whisk them until smooth.
- Coat the chicken tenders: Dip each tender into the egg wash, letting any excess drip off, then press firmly into the breadcrumb mixture. Make sure each piece is fully coated on all sides. I find pressing gently but firmly helps the coating stick better.
- Arrange tenders: Place coated tenders on a wire rack set over a baking sheet lined with parchment to catch drips. If you don’t have a rack, place them directly on the parchment but flip halfway through baking.
- Brush with olive oil or melted butter: Lightly brush each tender with about 2 tablespoons (30 ml) of oil or butter. This step is key for that gorgeous golden color and crisp texture.
- Bake: Put the baking sheet in the oven and bake for 15 minutes. Then flip the tenders over, brush the other side with a little more oil or butter, and bake for an additional 10-12 minutes. The tenders should be golden brown and crispy — the internal temperature should reach 165°F (74°C).
- Rest and serve: Let the tenders rest for 5 minutes on the rack or plate. This helps the juices redistribute and keeps the coating crisp.
Pro tip: If you notice the coating isn’t sticking well, try patting the tenders dry with paper towels before dipping in the egg wash. Too much moisture can cause slipping. Also, avoid overcrowding the baking sheet, or they might steam instead of crisp.
Cooking Tips & Techniques
Crispy garlic parmesan chicken tenders bake up best when you keep a few things in mind. First, using a wire rack is a game-changer. It lets hot air circulate around the chicken, which means you get even crispiness on all sides — no soggy bottoms. I learned this the hard way after a few batches that stuck to the pan!
Another tip is to use panko breadcrumbs for that light, flaky crunch. Regular breadcrumbs work, but panko gives you that restaurant-quality texture you’re craving. Also, pressing the breadcrumb mixture firmly onto the tenders helps create that satisfying crust that stays put even when dipped in sauce.
Don’t skip the oil or melted butter brushing before baking — that’s the secret to golden, crispy edges without deep frying. I usually use olive oil for a subtle flavor, but butter adds a richer note if you’re in the mood.
One common mistake is baking at too low a temperature. You want a hot oven (425°F/220°C) so the coating crisps up quickly and seals in the juices. Baking too slow can make the tenders dry out or get rubbery.
Finally, timing is key. Flip the tenders halfway through baking to brown both sides evenly unless you’re using a rack. And when they’re done, resting them for a few minutes helps keep everything juicy inside.
Variations & Adaptations
This recipe is super flexible, so you can easily make it your own. Here are a few ideas I’ve tried or thought about:
- Spicy Kick: Add 1/4 teaspoon cayenne pepper or smoked paprika to the breadcrumb mix for a subtle heat that pairs beautifully with the garlic and parmesan.
- Herb Boost: Fresh chopped parsley or rosemary mixed into the breadcrumb coating adds a fresh, aromatic dimension. I sometimes toss in a bit of fresh basil when I want a summery vibe.
- Gluten-Free: Use almond flour or gluten-free breadcrumbs instead of regular ones. The texture will be slightly different but still very tasty.
- Cooking Methods: Though baking is my favorite for convenience and less mess, these tenders can also be shallow-fried in olive oil for extra crispiness if you don’t mind the extra calories.
- Dipping Sauces: Pair with a homemade roasted red pepper hummus for a flavorful dip or a creamy garlic aioli. I often make a batch of creamy herb and garlic cheese ball bites to serve alongside for a fun combo.
Serving & Storage Suggestions
Serve these chicken tenders warm, right out of the oven, for maximum crunch. They’re fantastic alongside crispy honey bacon potatoes or a fresh green salad to balance the richness. For a party spread, pairing them with dips like roasted red pepper hummus adds a bright, savory contrast.
Leftovers keep well in an airtight container in the fridge for up to 3 days. To reheat and retain crispiness, pop them in a 375°F (190°C) oven for 8-10 minutes instead of microwaving, which tends to make them soggy.
These tenders also freeze beautifully. Place them in a single layer on a baking sheet to freeze, then transfer to a freezer-safe bag. Reheat directly from frozen in the oven for about 15-20 minutes until crisp and heated through.
Over time, the flavors deepen, especially the garlic and parmesan notes, making them even more addictive when reheated.
Nutritional Information & Benefits
Each serving (about 4 tenders) provides approximately 320 calories, 25 grams of protein, and 15 grams of fat, depending on the exact ingredients used. This recipe is a great source of lean protein and calcium thanks to the parmesan cheese.
Using baked instead of fried chicken tenders reduces the fat content, making it a lighter option without sacrificing taste. Garlic offers immune-boosting antioxidants, and the herbs add subtle anti-inflammatory benefits. For those watching carbs, swapping standard breadcrumbs for almond flour can make this recipe low-carb and gluten-free.
Personally, I love that this recipe lets me enjoy comfort food with a bit more balance — it’s nourishing but never boring.
Conclusion
Crispy garlic parmesan chicken tenders baked to perfection are my go-to for a reliable, delicious meal that feels like a treat without the fuss. They bring together simple ingredients and straightforward steps to create something that’s both nostalgic and fresh — crunchy on the outside, juicy inside, and bursting with garlicky, cheesy flavor.
Feel free to tweak the seasoning to fit your taste or try out different dipping sauces to make it your own. I keep coming back to this recipe because it reminds me of those quiet kitchen moments that make cooking feel like home.
If you give it a try, let me know how you like to serve your tenders or what tweaks you make — sharing those little discoveries is part of the fun. Here’s to many cozy, crispy dinners ahead!
Frequently Asked Questions
Can I use chicken breast instead of tenders?
Yes! Just slice the chicken breast into strips similar in size to tenders for even cooking and coating.
How do I make sure the coating sticks well?
Pat the chicken dry before dipping in egg wash, then press the breadcrumb mixture firmly onto the chicken. Using a wire rack to bake also helps keep the coating intact.
Can I prepare these in advance?
You can coat the chicken tenders and keep them covered in the fridge for a few hours before baking. Just add the oil or butter brush right before baking.
What dipping sauces pair well with these chicken tenders?
Garlic aioli, ranch, honey mustard, or creamy herb and garlic cheese ball dips all complement these tenders beautifully.
Is baking healthier than frying these chicken tenders?
Generally yes. Baking reduces the amount of oil absorbed, lowering fat content while still producing a crispy texture when done right.
Pin This Recipe!

Crispy Garlic Parmesan Chicken Tenders

These crispy garlic parmesan chicken tenders are baked to perfection with a golden, garlicky, cheesy crust and juicy inside. A healthier, easy-to-make comfort food perfect for any occasion.
- Prep Time: 10 minutes
- Cook Time: 27 minutes
- Total Time: 37 minutes
- Yield: 4 servings 1x
- Category: Main Course
- Cuisine: American
Ingredients
- 1.5 pounds chicken tenders, trimmed of excess fat (or chicken breast sliced into strips)
- 1 cup (100 g) finely grated Parmesan cheese
- 1 cup (100 g) plain or panko breadcrumbs
- 1 teaspoon garlic powder
- 1/2 teaspoon onion powder
- 1 teaspoon dried Italian herbs (oregano, basil, thyme mix)
- 3/4 teaspoon salt
- 1/4 teaspoon black pepper
- 2 large eggs, beaten, room temperature
- 2 tablespoons (30 ml) olive oil or melted butter
Instructions
- Preheat your oven to 425°F (220°C).
- In a shallow bowl, combine Parmesan, breadcrumbs, garlic powder, onion powder, dried Italian herbs, salt, and black pepper. Mix well.
- In another bowl, beat the eggs until smooth.
- Dip each chicken tender into the egg wash, letting excess drip off, then press firmly into the breadcrumb mixture to coat all sides.
- Place coated tenders on a wire rack set over a baking sheet lined with parchment paper. If no rack, place directly on parchment paper.
- Lightly brush each tender with olive oil or melted butter.
- Bake for 15 minutes, then flip tenders, brush the other side with oil or butter, and bake for an additional 10-12 minutes until golden brown and internal temperature reaches 165°F (74°C).
- Let tenders rest for 5 minutes before serving.
Notes
Use a wire rack for even crispiness. Pat chicken dry before coating to help the crust stick. Brush with oil or butter for golden color. Flip tenders halfway through baking if not using a rack. For gluten-free, substitute breadcrumbs with almond flour or gluten-free breadcrumbs. Optional spices like smoked paprika or cayenne pepper can add a spicy kick.
Nutrition
- Serving Size: About 4 chicken tend
- Calories: 320
- Sugar: 1
- Sodium: 600
- Fat: 15
- Saturated Fat: 4
- Carbohydrates: 15
- Fiber: 1
- Protein: 25
Keywords: chicken tenders, garlic parmesan chicken, baked chicken, crispy chicken, easy chicken recipe, healthy chicken tenders, parmesan crusted chicken


