Spooky Spiderweb Sugar Cookies: Easy Halloween Recipe
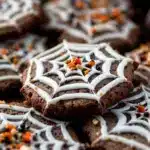
These Spooky Spiderweb Sugar Cookies feature a tender, buttery sugar cookie base topped with a crisp royal icing web. They look like a professional bakery creation but are surprisingly easy to make, perfect for Halloween parties and family baking.
- Prep Time: 15 minutes
- Cook Time: 10 minutes
- Total Time: 1 hour (including cooling and decorating)
- Yield: 24 servings 1x
- Category: Dessert
- Cuisine: American
Ingredients
- 1 cup (226g) unsalted butter, softened to room temperature
- 1 cup (200g) granulated sugar
- 1 large egg, room temperature
- 2 teaspoons pure vanilla extract
- 2 and ½ cups (312g) all-purpose flour, spooned and leveled
- 1 teaspoon baking powder
- ½ teaspoon fine sea salt
- 2 cups (240g) powdered sugar, sifted
- 2 tablespoons meringue powder
- 3–4 tablespoons warm water
- ½ teaspoon vanilla extract
- 1–2 drops black gel food coloring
- White gel food coloring (optional)
Instructions
- In a stand mixer fitted with the paddle attachment, cream together the softened butter and granulated sugar on medium speed until light and fluffy, about 3 minutes. Scrape down the sides halfway through.
- Add the egg and vanilla extract, then beat on low until just combined. Do not overmix.
- In a separate bowl, whisk together the flour, baking powder, and salt. With the mixer on low, gradually add the dry ingredients to the wet mixture. Mix until the dough just comes together—it should look shaggy and slightly crumbly but hold together when squeezed.
- Divide the dough in half, flatten each portion into a 1-inch thick disk, and wrap tightly in plastic wrap. Refrigerate for at least 30 minutes, or up to 3 days.
- Preheat oven to 350°F (175°C) and line two baking sheets with parchment paper or silicone mats.
- Lightly flour your work surface and rolling pin. Roll one disk of dough to ¼-inch thickness. Use a 3-inch round cutter to cut out cookies, re-rolling scraps once. Place cookies 2 inches apart on prepared baking sheets.
- Bake for 8-10 minutes, rotating pans halfway through. Cookies are done when edges are just barely golden; centers will look pale and slightly puffed. Let rest on baking sheet for 5 minutes, then transfer to a wire rack to cool completely.
- In a stand mixer fitted with the whisk attachment, combine sifted powdered sugar and meringue powder. Add 3 tablespoons warm water and vanilla extract. Beat on low until combined, then increase to medium-high and whip for 4-5 minutes until thick and glossy with stiff peaks.
- Divide icing into two bowls. Leave one bowl white (add a tiny drop of white gel coloring if desired). Add black gel food coloring to the other bowl, starting with 1 drop and mixing thoroughly. Transfer each color to a piping bag fitted with a #2 tip for black and #1 tip for white.
- Using black icing, pipe a thin outline around the edge of each cooled cookie, then fill the center with a back-and-forth zigzag motion. Use a scribe tool or toothpick to spread into an even layer. Let dry for at least 30 minutes until firm to the touch but still slightly tacky.
- Using white icing, pipe a small dot in the center of each cookie, then pipe concentric circles around it, spacing them about ¼-inch apart (4-5 circles). Immediately use a scribe tool or toothpick to drag lines from the center outward through all the circles, like spokes on a wheel, spacing them evenly (6-8 spokes).
- Allow decorated cookies to dry completely at room temperature for at least 2 hours, or overnight for best results. Royal icing should be hard to the touch and not smudge when stacked.
Notes
Chill the dough for at least 30 minutes to prevent spreading. For the royal icing, use gel food coloring (not liquid) to avoid thinning. Work one cookie at a time when piping the web—pipe all circles then immediately drag spokes. If using a toothpick, dip it in cornstarch to prevent sticking. Store decorated cookies in an airtight container at room temperature for up to 5 days; do not refrigerate. Undecorated baked cookies can be frozen for up to 3 months.
Nutrition
- Serving Size: 1 cookie
- Calories: 185
- Sugar: 16
- Sodium: 95
- Fat: 8
- Saturated Fat: 5
- Carbohydrates: 27
- Fiber: 0.5
- Protein: 2
Keywords: Halloween cookies, spiderweb cookies, sugar cookies, royal icing, Halloween dessert, easy Halloween recipe, spooky cookies